How to customize search in Windows 10
The search feature in Windows 10 is a convenient way to find apps and files. The most common method to use Windows search is using the search box on the taskbar. But what if you cannot find what you are looking for? Or what if you don’t want to see search highlights? Learn how to customize search in Windows 10 to tweak it to your preferences.
Customize the search box
Windows 10 allow you to change the way the search box is displayed. To customize the search box on the taskbar, follow these steps.
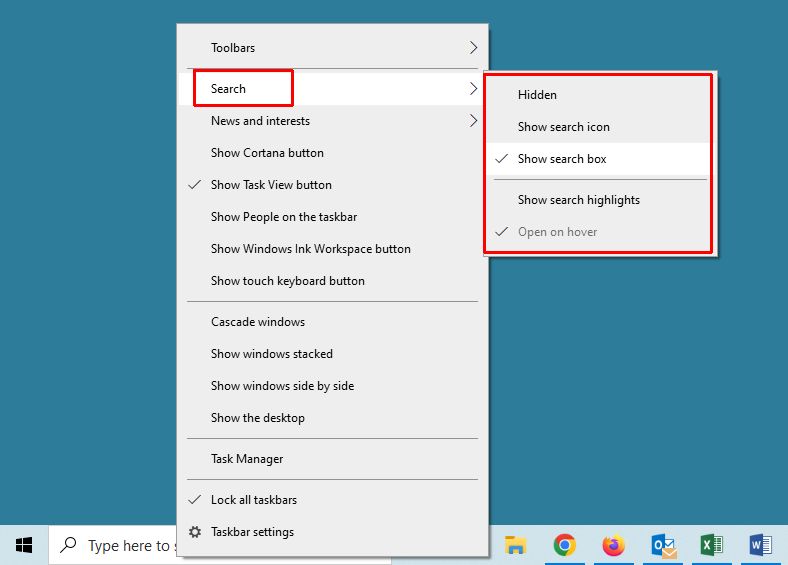
- Right-click on the taskbar to bring up the popup menu.
- Bring the cursor over the Search option (you can click it, or just hover over it for a second).

- In the Search submenu, select the desired option to change.
- To hide the search box, select Hidden.

This will leave you no way to access search using the mouse. The quickest way to open search is using the keyboard, press the Windows key + S at the same time to bring up the search window. - Select the option Show search icon to only show the search icon on the taskbar, but not the search box.

If you click the search icon, the search window will show and you can then type the search term. - To show the search box on the taskbar, select the option Show search box.

This is the Windows default option. You can directly type the search term in the box and press Enter to start the search. - Select the option Show search highlights to show search highlights in the search window when it is opened.

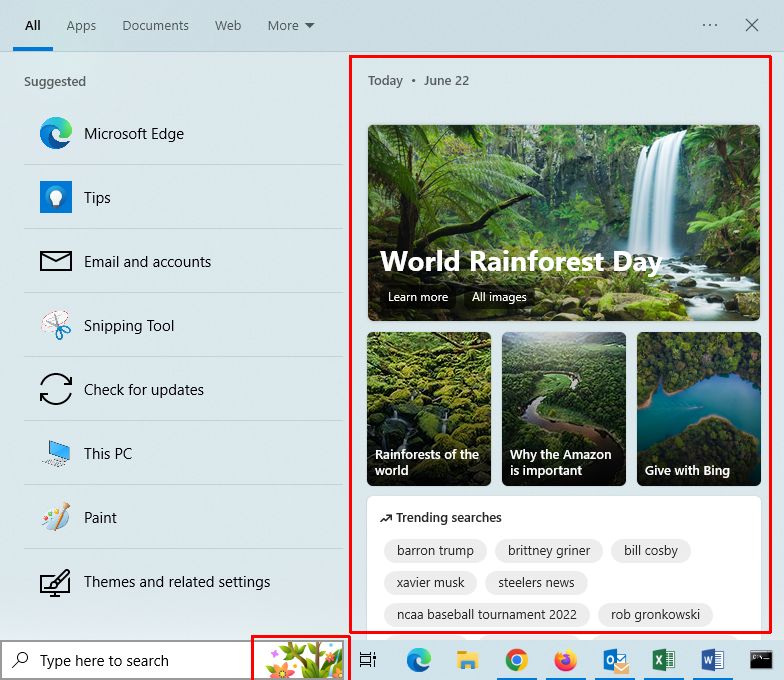
Search highlights will show relevant content to you according to Microsoft. The content is regularly updated and includes things like news, images, special aspects of the current day, and trending searches.
Search highlights will show in the search window when opened, but it will also show an image on the right-hand side of the search box. - Select the Open on hover option to automatically open the search window when the cursor hovers over the highlights image on the right-hand side of the search box.
This option is only enabled if the Show search highlights option is selected.
- To hide the search box, select Hidden.
Using these steps, it is easy to tweak the search bar to your preferences.
Be aware that the Search Highlights feature is using web content, and as such needs an active Internet connection to work. Most users will probably disable this option.
Customize search indexing
Apart from customizing the search box, Windows 10 users can also customize what is indexed. Files on the PC, emails, your online content, and even filter content.
This allows you to tweak the Windows indexing service to only index what is needed. Indexing takes time and storage, so performance is a consideration (especially for low-end systems), but you might also want to exclude content for privacy or security reasons.
Specify what to index
To change what is indexed by Windows, you need to access the Indexing options.
- Open the Search window by clicking the search icon or search box on the taskbar. Alternatively, you can use the Windows + S keys.
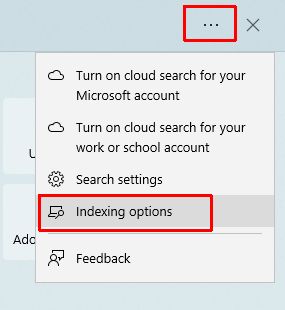
- In the Search window, click the three (3) horizontal dots in the top-right to access the search options.

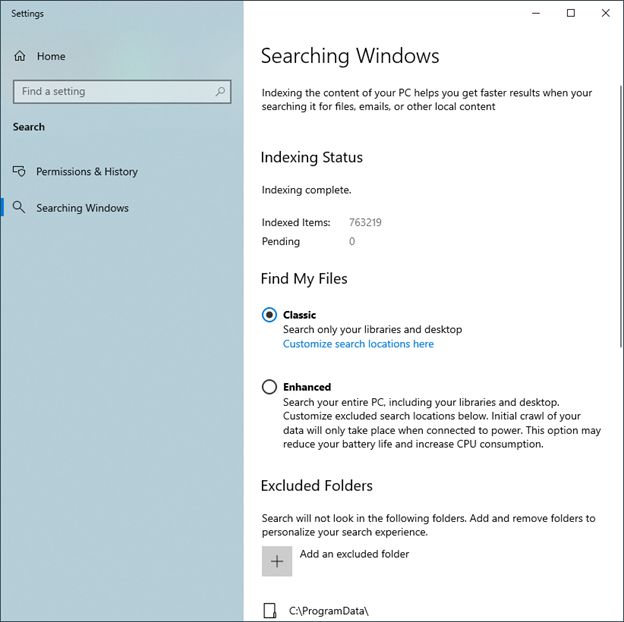
- Next, click the Indexing options to bring up the Settings window for Searching Windows.

Here you will see the Indexing Status, how many items have been indexed, and any Pending items (in case the indexing is currently being updated). - In the Find My Files section, you can select what will be indexed. The Enhanced option is the most extensive indexing option. But it will also take more resources, as indicated by Microsoft “This option may reduce your battery life and increase CPU consumption”.
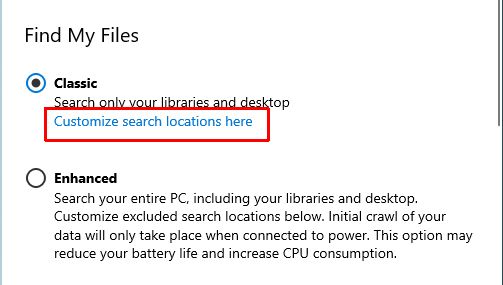
In most cases, the better option is to use the Classic option and then click the Customize search locations here link to customize what is indexed.
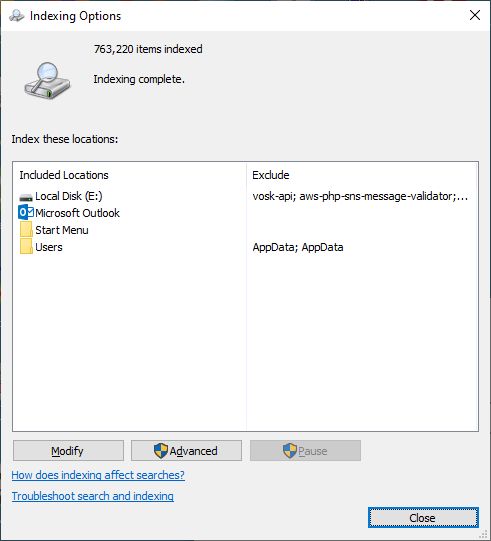
- When you click Customize search locations here, it will bring up the Indexing Options window.
Here you will see the locations that are being indexed.
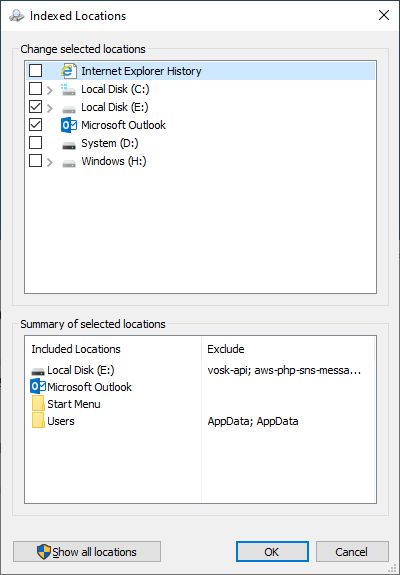
- To change what locations are indexed, click the Modify button. This will bring up a window showing the Indexed Locations.

Now you can add or remove locations to be indexed using the Change selected locations section. The checkboxes control what is indexed and what is not. Use the arrows next to the checkboxes to expand the drive or folder tree and see subfolders. Each subfolder will have a checkbox to control the indexing status.
Note: This also includes the option to include Microsoft Outlook if you have a local copy installed. If you want emails, contacts, and other Outlook content to be searchable, make sure this option is enabled.
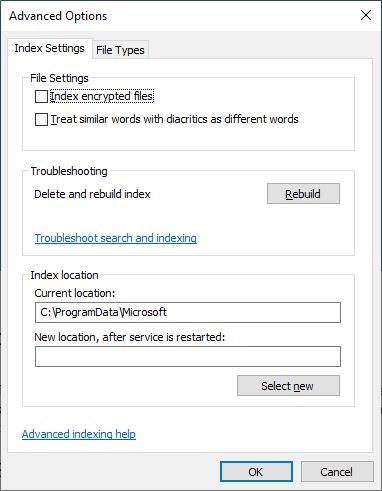
Click the OK button to confirm. - Clicking the Advanced button will allow you to control more aspects of the indexing.

- Specify if you want to Index encrypted files.
If you are using volume encryption using BitLocker, or something similar, you might want to enable this option to include files in encrypted drives. - Specify if the indexing should Treat similar words with diacritics as different words.
This option will only be useful if you use multiple languages and your file or folder names use diacritics, and you want to ability to search based on this. Note: if you enable this option, the index will be rebuilt, which can take time. - Rebuild the index.
Manually triggering the index to be rebuilt is not something you would do unless there is a problem with the search in Windows that can be solved this way. - Change the Index location.
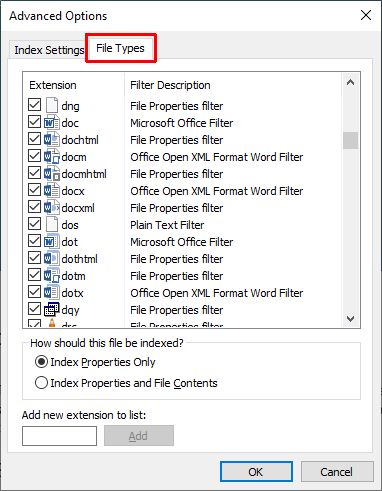
If you have a drive or storage medium that is faster than the default location, it can be beneficial to change the location where the index is stored to be that drive. Click the Select new button to select the new storage location. Once you confirm, the location will only be used after the indexing service is restarted after you restart Windows. - Configure which file types should be indexed using the File Types tab.

By default, Windows will index all file types. Here you can change that behavior by disabling the indexing for the file types (based on Extension).
Apart from disabling the indexing of certain file types, you can also configure if the file should be indexed by Properties Only, or Properties and File Contents. This can be specified for each file type individually using the radio buttons. By default, text-based file types are indexed by properties and content, while binary files will only be indexed by properties.
If you need to add a file extension that is not in the list, type it in the box and click the Add button. After you have added it, you can change the indexing option.
Click OK when done.
- Specify if you want to Index encrypted files.
Specify what not to index
Apart from the configuration of what to index, it is possible to exclude locations from being indexed. Using this method, it is possible to exclude a subfolder from being indexed while all other content in the parent folder is being indexed.
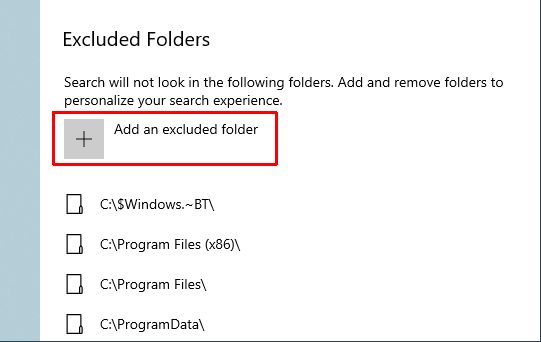
- In the Searching Windows screen, scroll down until you see the Excluded Folder section.
- Click the plus (+) sign to Add an excluded folder.

- In the Select Folder window, navigate to the folder to exclude.
- Click the Select Folder button to confirm.
You can add as many excluded folders as you like. And these settings supersede the configuration of what to index.
Customize Search – Filter content
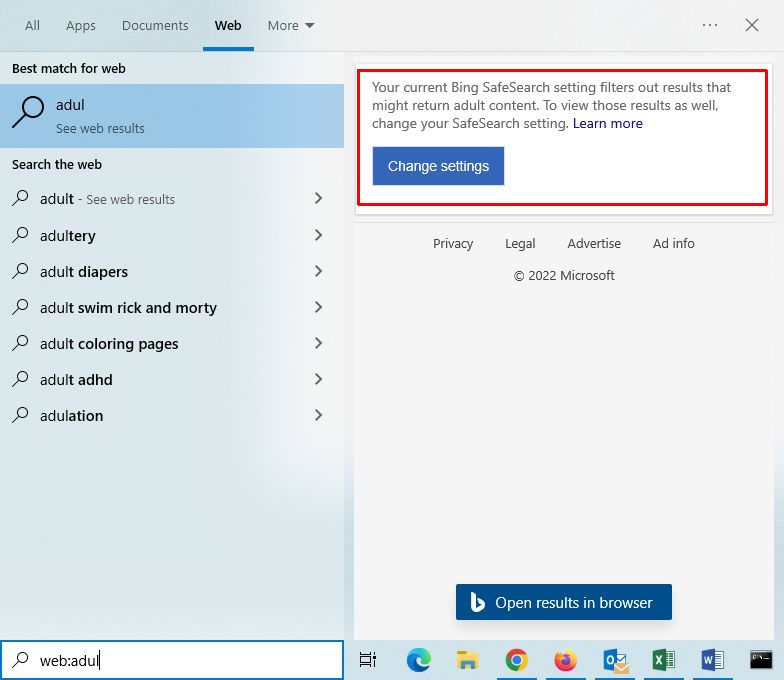
Using the search box in the taskbar, you can search for online content using the web: prefix. With the feature, the result may contain adult content. To prevent getting undesired results, Windows search has the SafeSearch option to filter the results.
To configure the level of filtering applied, use the steps below.
- Open the Search window by clicking the taskbar icon or search box.
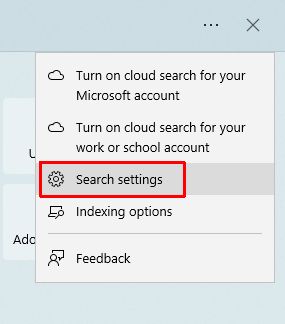
- In the Search window, click the three (3) horizontal dots in the top-right to access the search options.
- Click the Search settings option in the drop-down menu.

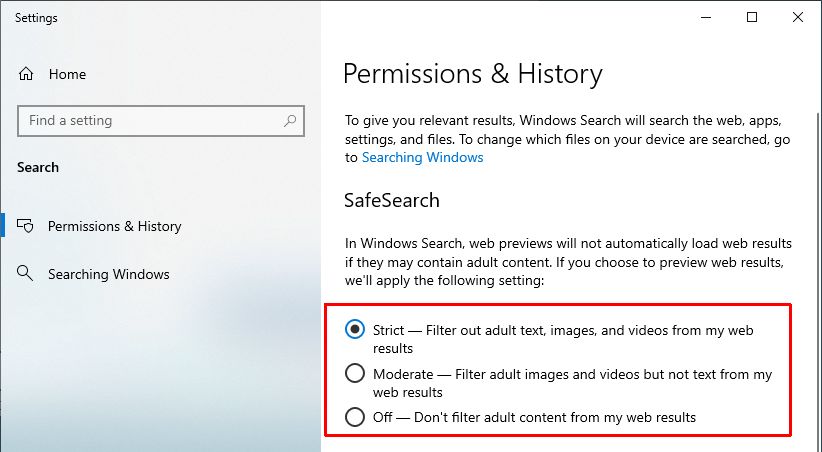
- In the Settings window, select the desired level for SafeSearch.

- Strict, the default, will block any adult content returned in the search result.
- The Moderate option will only block images and video, not text.
- Off means, no filtering, and web search results are returned as is.
If content is blocked in the search results, you will see a message to inform you that the search settings are the reason for that.
Exclude OneDrive and Office 365 from search
By default, most users will use a Microsoft account to log in to Windows. When you use an online account like that, you will also be logged in to online Microsoft services like OneDrive and Office 365.
When you use the Windows search option, these online resources are also included in the search.
If you want to exclude online services that you are logged into with your Microsoft account from the search results, you can change the search settings.
- Use the first three steps from the previous Filter content section to open the search Settings.
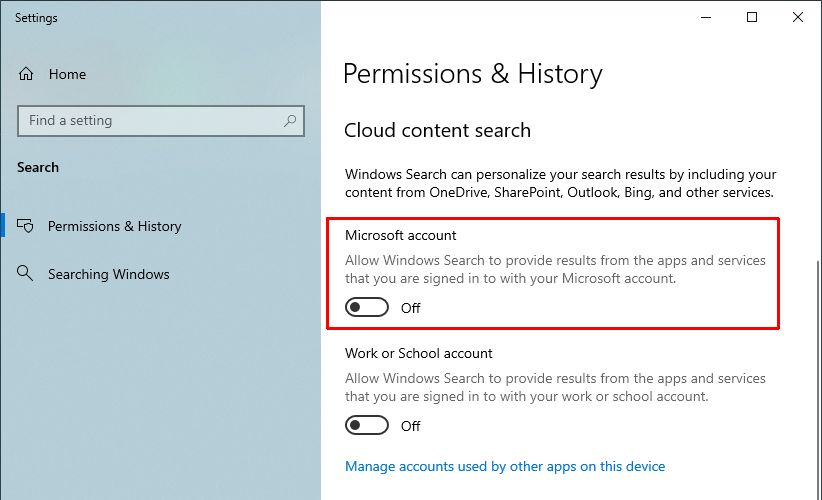
- Scroll down until you see the Cloud content search section.
- Now turn off the Microsoft account search by changing the slider from On to Off.

- If you use a Work or School account, you can also turn that off to prevent searching apps and services logged into with that account.
Performance considerations
When you search for something on your Windows computer you want to find it fast. That means that you want to make sure everything you ever would want to search for is indexed.
Indexing items means they can be found quickly. But the more you index, the more the indexing process takes time. Of course, this also depends on the frequency of changes being made to the items that are being included in the indexing process.
Performance of indexing and searching has been the subject of many articles and discussions online. Some people say, with a fast CPU and SSD, there is no need to use an index. On the other hand, updating an index on a fast system also does not take time…
Without getting into too many details, here are some general guidelines:
- Only index that is needed. So, think about which locations you want to be indexed.
- Don’t index contents of file types that you will never search for. File contents are way larger than file properties, and as such has a larger impact on indexing.
- If you are on a slow or intermittent Internet connection, exclude online content from indexing and searching.
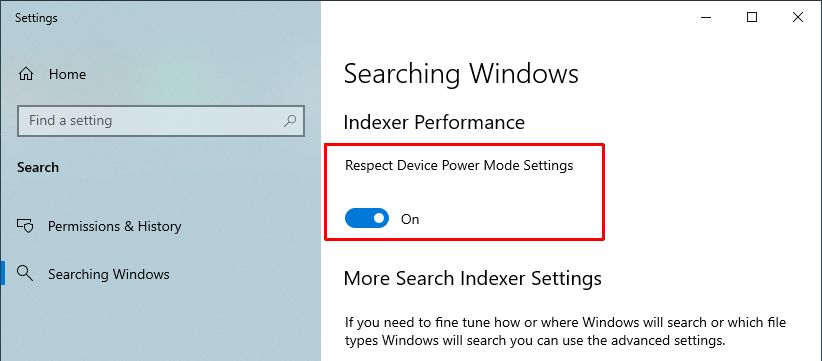
- Enable the option Respect Device Power Mode Settings in the Indexer Performance section of the Search Settings. This will help save resources if your system is configured for power saving. Especially on laptops (or other battery-powered devices), this is recommended.

- Adjust your settings based on your usage and experience. Come back to the search settings when you feel you need to make changes based on how you experience the Windows search function operating.



Thank you. It works.
@Fritz Liessling - Thank you for your feedback. I understand that you are looking for other resolutions, but within Windows…
Although the answer to this question is correct, it is really a cop-out answer. It's easy enough to find answers…
To the pcauthorities.com administrator, You always provide useful links and resources.
???? ?? ??? The Last of us