Split text into columns in Excel 2019
Sometimes you have data in Excel in a single column, but data actually contains fields that you need in separate columns. For this you can use the Excel feature to split text into columns.
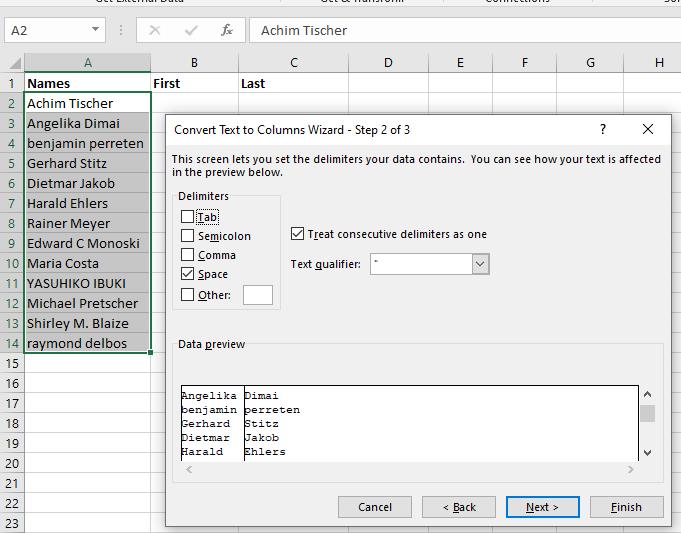
Let’s look at an example where we have names in a single column that we want to split into first and last.
Here is how to do it:
- Select the cell range containing the text to be split into columns.
- In the Ribbon, select the Data
- In the Data Tools group, click the Text to Columns option.
- You will see the Convert Text to Columns Wizard – Step 1 of 3 dialog box. Select the condition to be used for splitting the text.
Note: In this example the Delimited option is used. - Click the Next button.
- Now select the checkbox for the Delimiters to be used for splitting the text.
Note: Multiple Delimiters can be used, for example if both spaces and commas are used between first and last name.
- Click the Next button to specify a format for the resulting columns, or Finish to use the General format.
You will see the resulting columns be populated with the split text result. Take note that there can be more than 2 columns if there are multiple occurrences of the selected delimiter. In the example “Shirley M. Blaize” will result in 3 columns.
Tip: The possibility to split data into individual columns is also possible when importing a text file.


Thank you. It works.
@Fritz Liessling - Thank you for your feedback. I understand that you are looking for other resolutions, but within Windows…
Although the answer to this question is correct, it is really a cop-out answer. It's easy enough to find answers…
To the pcauthorities.com administrator, You always provide useful links and resources.
???? ?? ??? The Last of us