Fix Kernel Data Inpage Error in Windows 11
Like all blue screen of death (BSOD) errors, KERNEL DATA INPAGE ERROR is a serious problem. BSOD errors are kernel-level errors that are serious enough to stop Windows from executing further. As such, these types of errors are also referred to as STOP errors.

The KERNEL DATA INPAGE ERROR has been occurring in Windows since the earliest versions of Windows and can still happen in Windows 11. The error is triggered when Windows experiences a problem reading a page of kernel data from the paging file into memory.
The paging file is a system file on disk that Windows uses as virtual memory. Virtual memory allows Windows to use more memory during execution than the actual amount of RAM in the computer. Some of the RAM contents are saved in the paging file so that the RAM can be reused for new tasks. When the saved memory is required again during future processing, it is read back into RAM. If this process fails, the stop error can occur.
Causes for the Kernel Data Inpage Error
It is obvious from the type of processing involved in the paging file that there can be different reasons for the stop error to occur. The main culprits are faulty memory (RAM) and problems with accessing the paging file on disk. The disk itself can have a problem, the paging file can have a problem, and even the disk controller can have a problem.
The paging file is used for additional memory beyond the internal memory (RAM). So, the error is generally happening in scenarios where a lot of memory is being used. Video file processing and gaming are good examples of such cases.
If you are using your computer for gaming, you might use performance tweaking to get the maximum performance from your PC. Tweaking Windows 11 settings by using the Game Mode is fine. But in case you use over-clocking, switching the CPU and memory settings in the BIOS to the default settings can solve the stop error from happening.
Solutions for the Kernel Data Inpage Error
In this guide, we will outline the most logical steps in troubleshooting the stop error. Finding the cause is the first step so that the appropriate corrective steps can be taken. The solution can be a software- or hardware-based solution, depending on what is found during the troubleshooting.
As a general rule when troubleshooting Windows errors, start by rebooting your computer. Restarting Windows can often be a solution to many problems. Problematic programs, pending Windows Updates, both can cause problems and be fixed during a reboot.
Check the computer memory
Faulty RAM is one of the possible reasons for the error to happen. Depending on the computer manufacturer and the BIOS used, it is possible to run a memory test from the BIOS. These steps are however not possible for all computers. I recommend you check the manufacturer’s website for the support document (or your computer manual) to see if this option is available.
The solution that is available to all computers running Windows 11 is the Windows Memory Diagnostic Tool. Microsoft included this tool in all recent Windows versions, and it allows the user to execute an extensive memory test.
To run the Memory Diagnostic Tool in Windows 11:
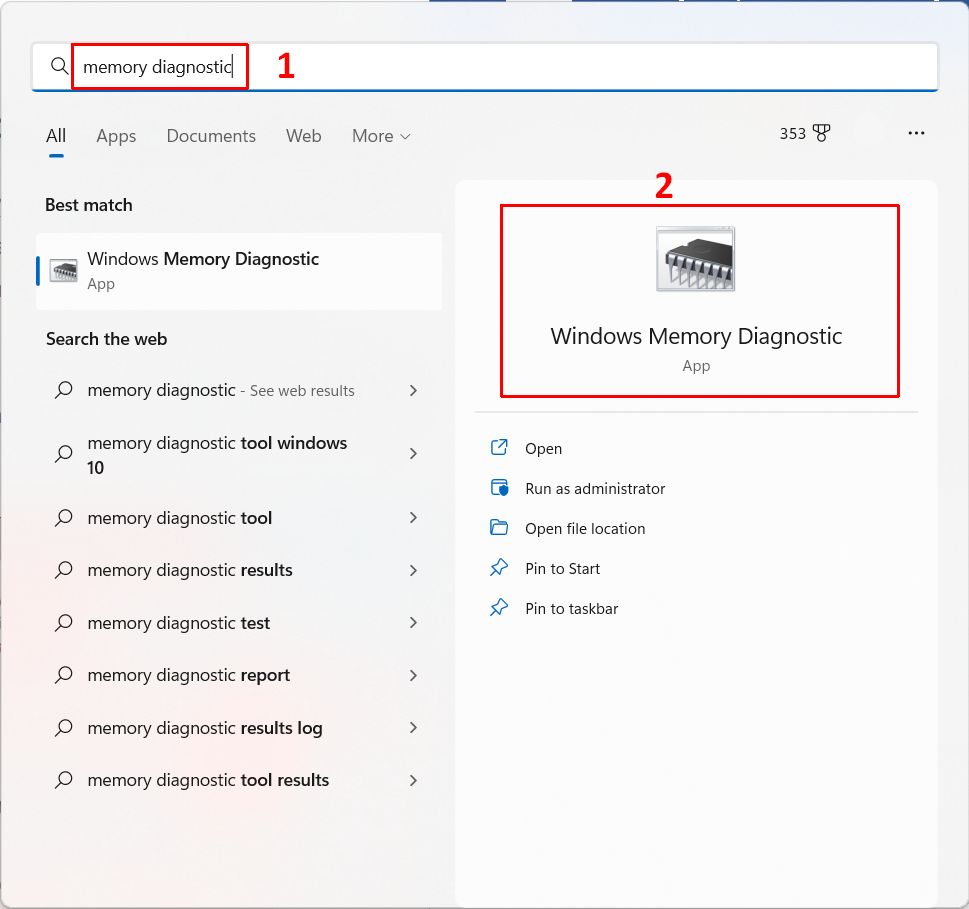
- Click the Start menu button on the taskbar, and in the search box type “memory diagnostic”.
- In the search results, click the Windows Memory Diagnostic App.

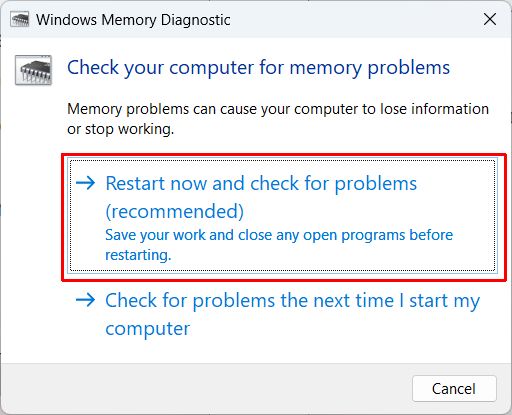
- When the Windows Memory Diagnostic window appears, click the option Restart now and check for problems. This will restart your computer and the memory test will be executed.
Note: the memory check will take a bit of time to process. If you want to execute it later, simply select the option Check for problems the next time I start my computer.
- Wait for the memory check to be complete and see if any problems are found. Windows will report any issues found during the memory test when complete.

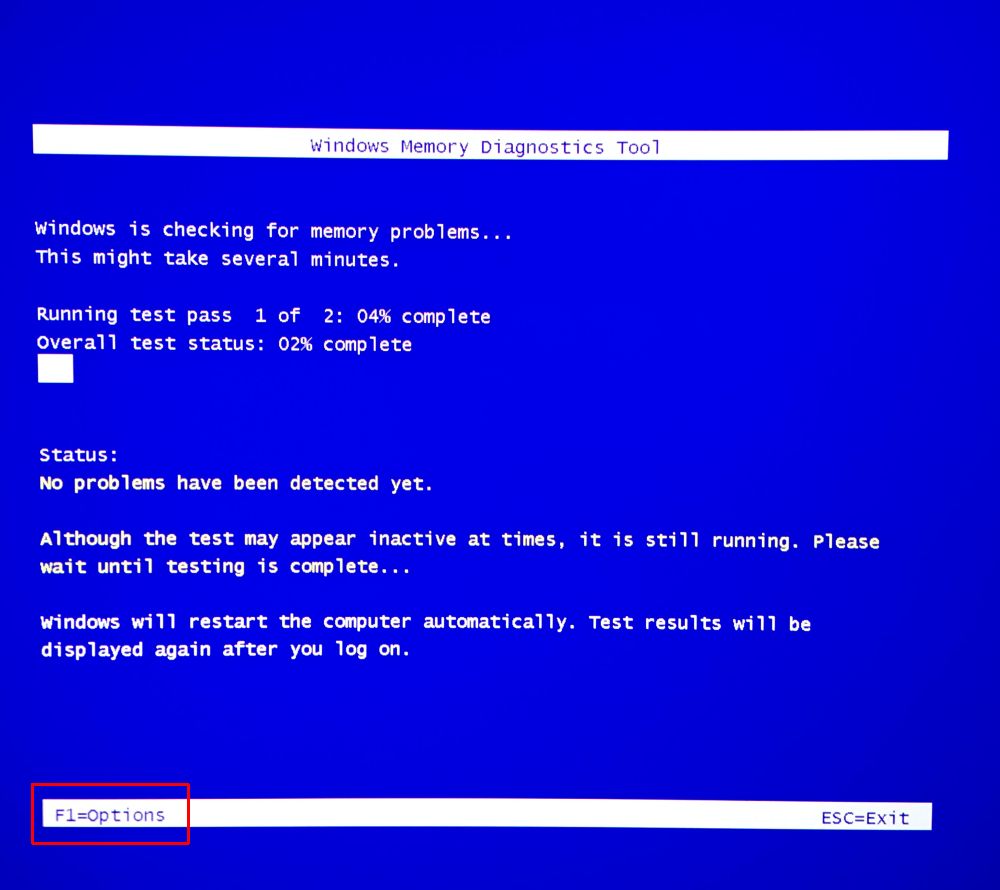
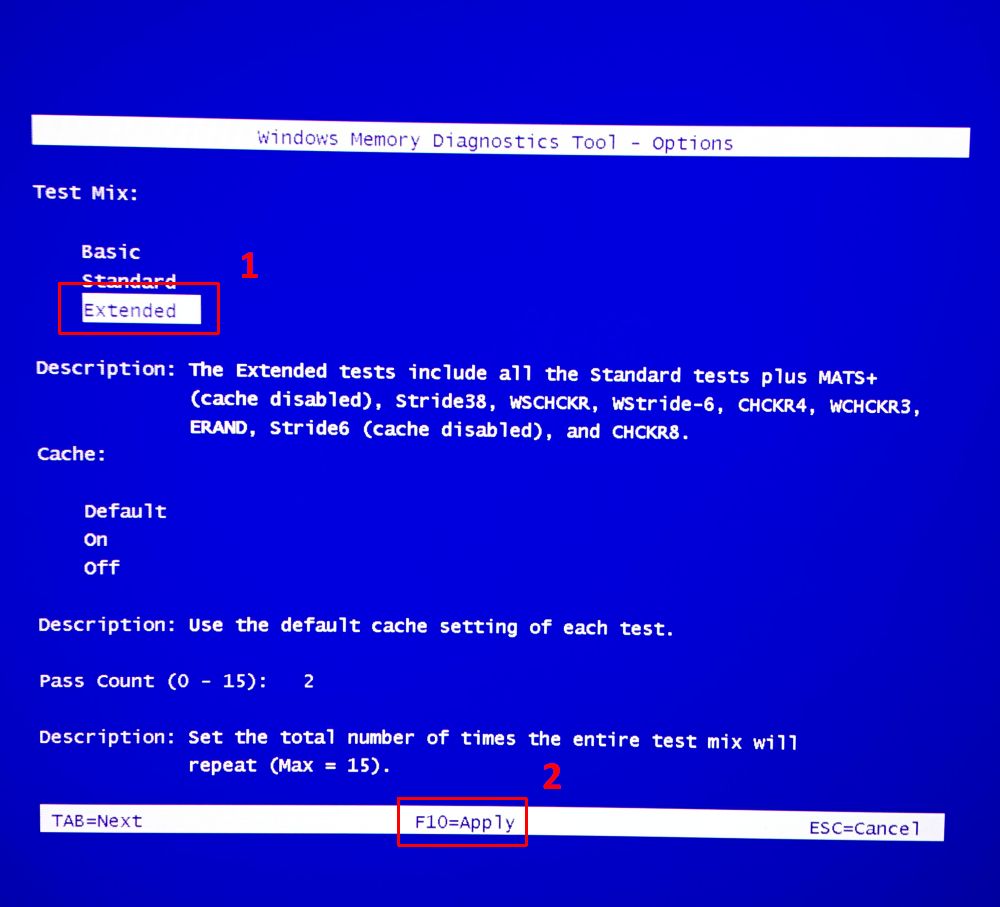
- It is advisable to run an extended memory test when you encounter the Kernel Data Inpage error. To run the extended memory scan, press the F1 key when the memory scan begins. Then select the Extended option. Press the F10 key to confirm and execute the extended memory scan.

Note: The Extended memory test will take even more time to execute than the Standard memory test.
In case the Windows Memory Diagnostic does not find any problems, it is possible to use a third-party solution for memory testing. MemTest86 has been around almost since the beginning of Microsoft Windows. Different editions are available, but the free edition already does a great job checking the PC RAM.
If a memory problem is found, you will probably need to replace the faulty memory module. Go to a PC repair show, or buy memory online and replace it yourself. Make sure you check the PC manual or the BIOS to make sure you get the right memory modules.
Check the system disk
If the PC memory testing did not find any problems, it is time to move on to the virtual memory. Virtual memory as described earlier, consist of a paging file on disk. To find any problems with the paging file, a disk check needs to be executed.
In Windows 11, a disk check can be executed using the GUI, or from the command prompt.
To run a disk check from the Windows GUI:
- Right-click the Start menu button in the taskbar, and in the popup menu select File Explorer.
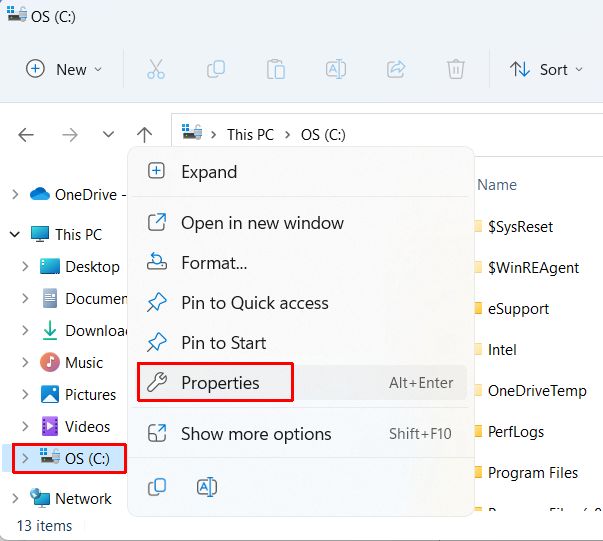
- In the left-hand pane, locate the system disk (the drive containing the Windows files). Right-click the drive, and in the popup menu select Properties.

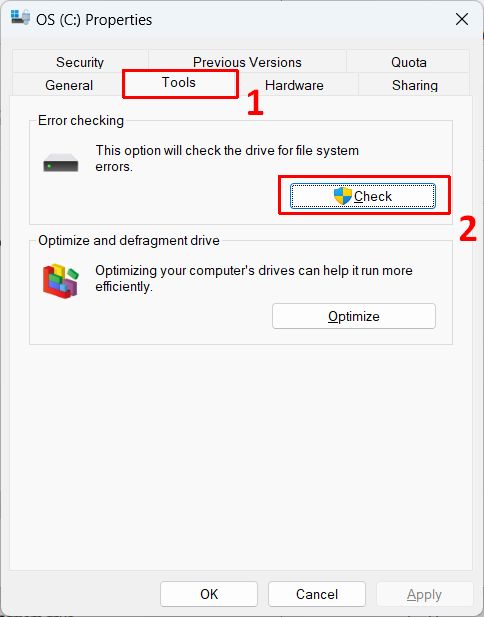
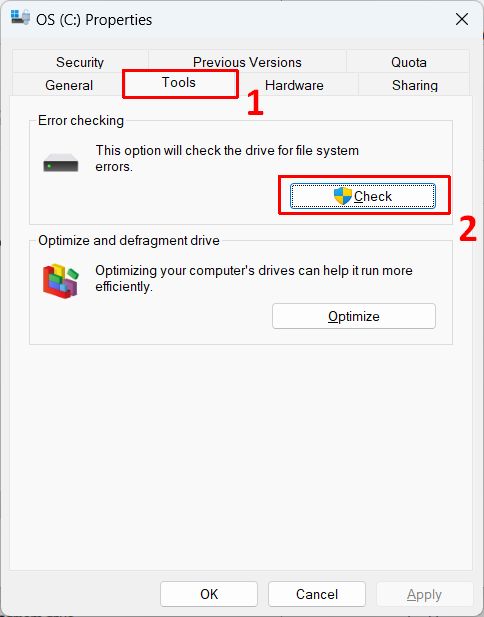
- In the Properties window select the Tools tab (1).
- Next, click the Check button in the Error checking section (2).

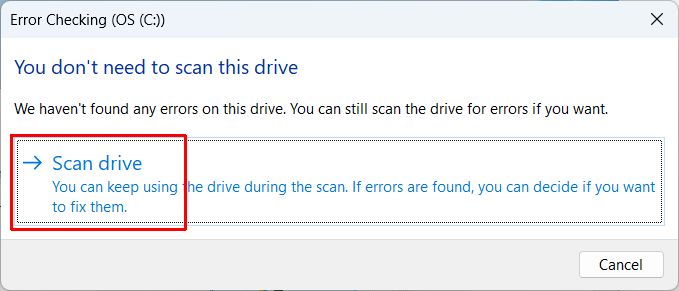
- Click the Scan drive option to start the disk check.

Note: The message might indicate that You don’t need to scan this drive. That is because Windows monitors disk health automatically. Since we want to be thorough, we run the disk check anyway. - Wait for the Error Checking to complete. This can be quite fast (SSDs) or take considerable time (HDDs).

- Click the Close button when done.
- Click Ok to close the Properties window for the system drive.
To run a disk check from the Windows command prompt:
- In the Start menu search box, type “command”.
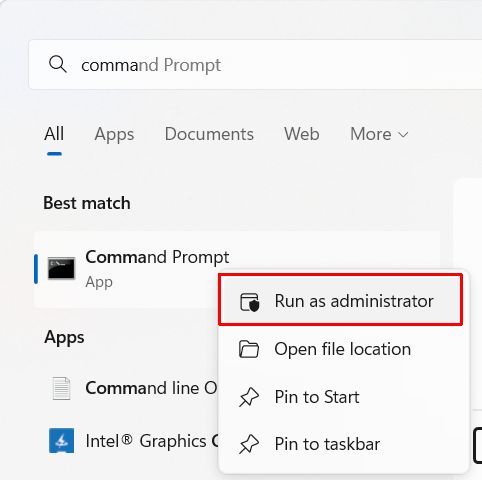
- In the search results, right-click the Command Prompt App.
- In the popup menu, click the option Run as administrator.

- Click Yes in the UAC window.
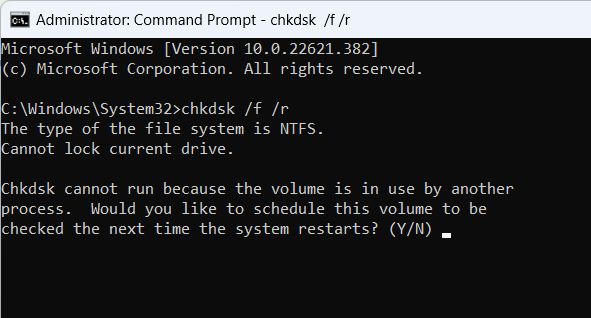
- In the Command Prompt window, type “chkdsk /f /r” and press Enter.

Note: The /F parameter tells the chkdsk command to fix errors on the disk. The /R parameter tells the chkdsk command to locate bad sectors and recover readable information.
- Since we are trying to scan the Windows system drive and exclusive access is needed to the drive while scanning, Windows will report “Cannot lock current drive”. Simply press the Y key followed by the Enter key to execute the disk check during the next system start.
- Now type “exit” followed by the Enter key to close the command prompt window.
- When you are ready, restart Windows to let the disk check be performed.
During the next restart, you will see a black screen showing the progress of the disk check operation. The process will run through 5 stages before it completes.
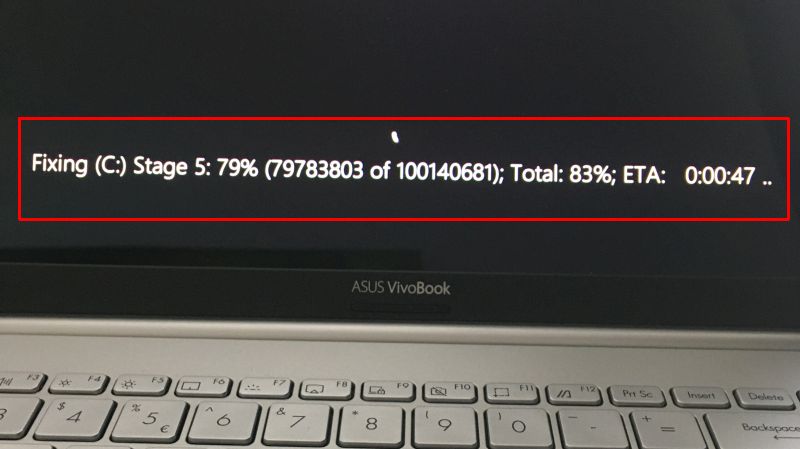
Check the paging file location
Windows 11 by default will automatically manage the paging file (virtual memory). In general, this is also the best setting, but when you experience the Kernel Data Inpage error, you can try tweaking the paging file to solve the problem.
The paging file properties can be accessed using these steps:
- From the Start menu, open the Settings window.
- In the Settings window, click System in the left-hand pane and then select About in the right-hand pane (at the bottom of the list).
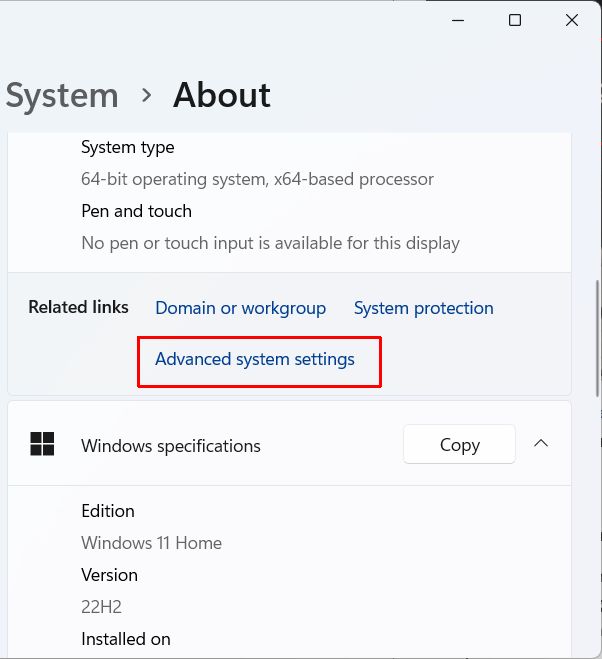
- Under System -> About, scroll down until you see the Advanced system settings link and click it.

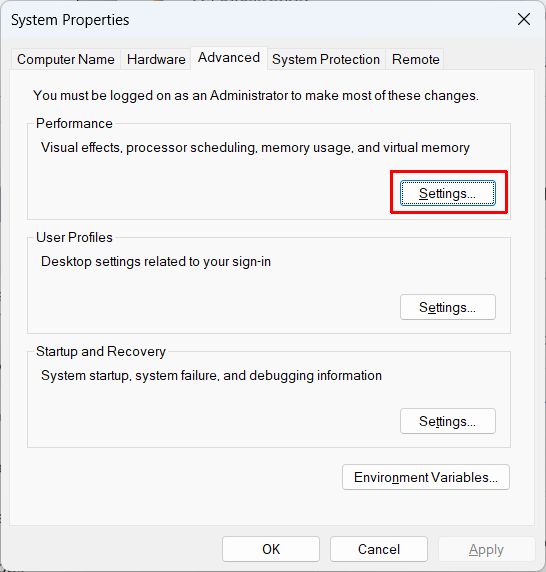
- This will bring up the System Properties window with the Advanced tab selected. Click the Settings button in the Performance section.

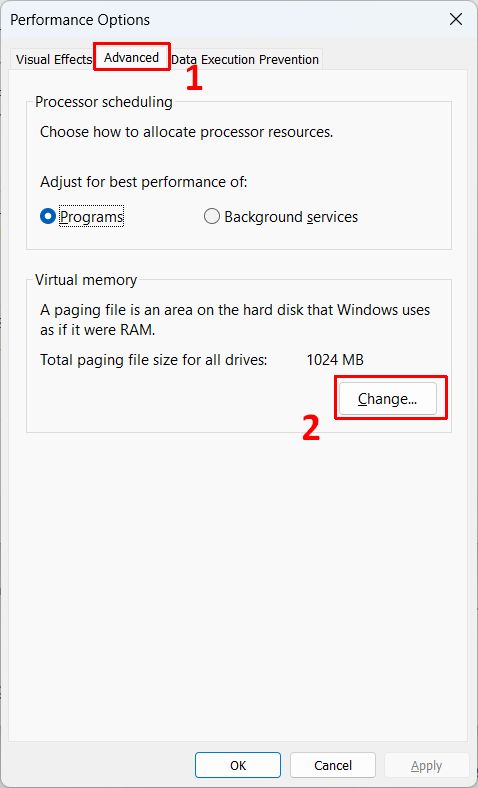
- A new window will show called Performance Options. Select the Advanced tab (1).
- Under Virtual memory click the Change button (2).

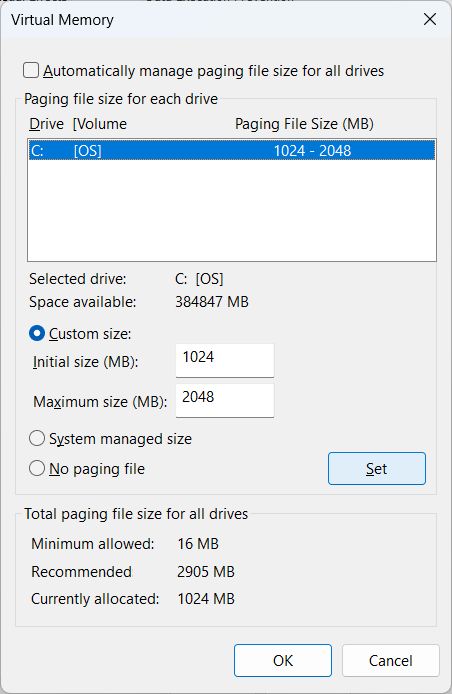
- In the Virtual Memory window, deselect the checkbox labeled “Automatically manage paging size for all drives” to enable the other options in the window.
- If a second drive is available in the computer, it is possible to try and create a paging file on that second drive. If only a single disk is present in the computer, you can try creating a paging file with a custom size.

- Once done, click the OK button. Windows will inform you that the changes will require a system restart.
- Click OK to close the Performance Options window.
- Click OK to close the System Properties window.
- Windows will prompt you to Restart Now or Restart Later to allow the changes to the paging file to take effect.
Once Windows is restarted, the paging file changes are in effect and you should test if the Kernel Data Inpage error still happens.
If this step solves the error, that means that there was an error in the original location of the paging file. In that case, run the disk check again to see if the disk error can be located and fixed.
Run a virus scanner
A virus is another possible cause for the Kernel Data Inpage error. Although you should always have anti-virus software running on a Windows PC, running an extensive scan in case of this STOP error is a good step.
Instead of the normally scheduled scans which are only scanning a limited portion of the disks, execute an extensive anti-virus scan on the system disk including a check of the Master Boot Record. Before executing the AV scan, make sure the AV software has been updated to the latest version and contains the latest virus definition information.
Steps for executing the scans are not included here for the simple reason that there are so many different AV solutions for Windows. Please check the Microsoft website for more information on running scans using the Microsoft Defender solution.
Be ready for a full AV scan to take quite a bit of time to complete. All files need to be checked, so the processing will take considerable time. For SSDs this process will be quicker than for HDDs of course.
Check the device drivers
Device drivers are essential software components of Windows 11 (and previous versions). They ensure that Windows can communicate with the hardware and that the hardware will operate without problems. Device drivers are also used for storage devices, so disk controllers cannot operate in Windows without the proper device driver.
In general Windows, 11 will automatically install the correct drivers for most hardware. But if a stop error like the Kernel Data Inpage error occurs and previous steps have not led to a solution, checking the device drivers is a next step.
Use the Device Manager in Windows 11 to check for any problems with the Disk drives or Storage controllers.
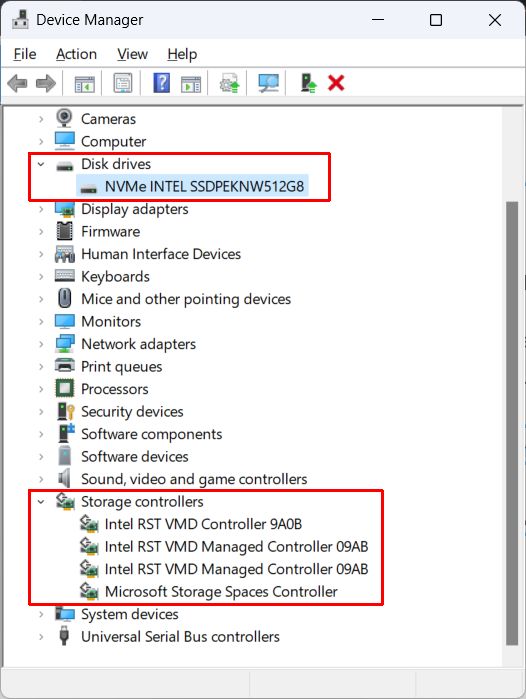
If device drivers have recently been updated, use the Roll Back Driver option in the device properties window to switch back to a previous version.
If no driver updates have been applied to the devices, try updating the device drivers to newer versions. Drivers updates, like any software updates, implement improvements and bug fixes. New driver versions can solve the stop error if the error is caused by driver software.
For non-standard controllers or disk drives, the manufacturer may offer drivers that are not automatically included in Windows 11 updates. In that case, check the manufacturer’s website for driver software. Download and install those drivers to ensure full hardware compatibility with Windows 11.
If none of the solutions above provide a solution to the problem, it possible that your computer has a hardware problem. Especially with computers that have been in-use for some time, this is possible. With newer computers a hardware problem is less likely. Check with the manufacturer of your PC or motherboard for support.


Thank you. It works.
@Fritz Liessling - Thank you for your feedback. I understand that you are looking for other resolutions, but within Windows…
Although the answer to this question is correct, it is really a cop-out answer. It's easy enough to find answers…
To the pcauthorities.com administrator, You always provide useful links and resources.
???? ?? ??? The Last of us