How to Fix Error 1719 in Windows
Error 1719 in Windows is related to the error message “The Windows Installer Service could not be accessed.”, and is related to the Windows installer. The error can come up both when installing software and uninstalling software. This includes Windows updates, since the Windows update process also makes use of the installer. If you encountered this error and needs to fix error 1719, read on.
The actual file that error 1719 is related to is “MSIEXEC.EXE”. Most likely the file is missing or corrupt. Corrupt can also mean that there is a problem in the Windows registry involving the msiexec.exe file.
How to Repair Error 1719
In most cases the error can be fixed by re-registering the msiexe.exe file. Simply start a command prompt (Start menu -> Run -> type “cmd” and press Enter), and then type “msiexec /unregister” and press Enter. Next type “msiexec /regserver” and press Enter again. Now reboot the computer and see if the problem is fixed.
Note that for the 64-bit version of Windows 7, you will also need to run this command “C:\Windows\Syswow64\Msiexec /regserver” to re-register the 64-bit version of the installer.
If this does not solve the issue, try to boot Windows in Safe Mode (F8 during startup) and repeat the previous steps.
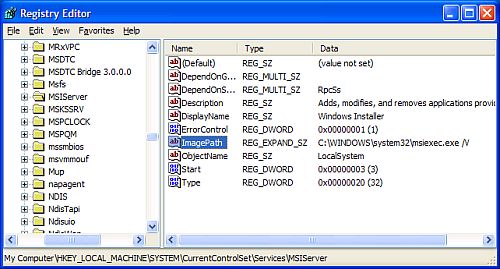
Another thing to check is if the Windows registry entry actually matches the location of the file on disk. Open the Windows registry (Start menu -> Run -> type “regedit” and press Enter), and then browse to the registry key named:
HKEY_LOCAL_MACHINE\SYSTEM\CurrentControlSet\Services\MSIServer

Check the Data for a value named “ImagePath”. This should contain the folder and file name of the msiexec.exe program, followed by “/V”. So check the actual location of the file on disk, and if necessary change the path in the Windows registry. Make sure you make a backup of the registry before changing it.
Manual start of Windows Installer service
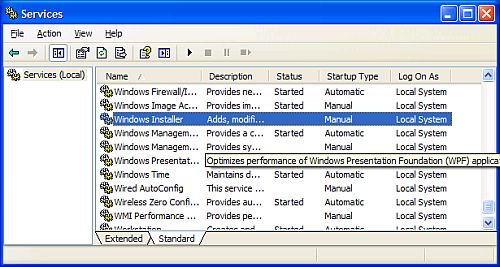
The last thing to check is if the Installer service is set to run manually. For this you need to start the Services window (Start menu -> Run -> type “services.msc” and press Enter). Scroll down to the Windows Installer service and check if Startup Type is set to Manual. If this is not the case, then right-click it, and in the popup menu select Properties. Next, change the Startup type to Manual and click OK. Again it is best you restart your PC before trying to install or uninstall software again.

This will set the installer service to manual installation, as some software programs do not install if the installer service is already running. Keep in mind that you might need to set it to Automatic again for installation of other programs.
If you find nothing helps, you can also try to download and reinstall the Windows Installer from the Microsoft website, but this would normally only help in Windows XP and Windows 2003 server as Vista and Windows 7 already include that version of the installer.
In the 64-bit edition of Windows 7, there is one more thing to try, which is related to the WOW64 entry in the same registry key: HKEY_LOCAL_MACHINE\SYSTEM\CurrentControlSet\Services\MSIServer
Look up the WOW64 entry and double-click it to be able to modify it. Change the value from 1 to 0, and then use the Services window to Stop and Start the Windows Installer service. After that try the installation again.


+1 for the Win 7 64 bit HKey fix, worked for me :)
I DO NOT KNOW HOW BUT I TURNED OFF MY KASPERSKY AND IT WAS PERFECT THEN !
IT COULD BE REASON !
it’s………….awesome….thanks a lots….
Just would like to say thanks for the information pertaining to Windows 7 64bit nothing else anywhere had a solution besides reinstalling.
Thank you very much. It really helped indeed. Happy New Year and greetings from Ukraine.