How To Fix Webcam Problems
With broadband internet widely available, many PC users are actively using their webcams for video chatting and online meetings. Not only does the increased bandwidth facilitate the use of video over the internet, but improved webcams and better video compression also help a lot. But if your hardware is not working as it should be, a webcam is not much fun. So dealing with webcam problems can be a necessary evil. Webcam problems often simply mean there is no image to be seen, but in other cases, you might actually get an error message or will not be able to select the webcam as the video source in your programs.
In Windows Live Messenger, for example, you might get webcam error 0x8a70013, indicating a problem with the webcam device.
Steps to solve the webcam problems
Check the webcam connection
One of the very first steps is of course to check your webcam connection. Most webcams use the USB port to connect to the PC, so check if your USB cable is properly plugged in. For built-in webcams, these steps of course do not apply. Many new laptops have a built-in webcam. Also, try connecting your webcam directly to your PC instead of through a USB hub (if you are using one).
Enable the webcam
But don’t forget to check if you need to manually activate your webcam. In most cases, the webcam will be automatically activated by software that can use the webcam, but for some computer brands, it is necessary to press a certain key combination to activate the webcam (it will be a Function key, either with Alt or Ctrl or the Fn key, but check the laptop manual for details).
Some known key combinations:
<Fn> + <F9> (Alienware laptop webcams)
<Fn> + <F6> (Packard Bell laptops, MSI laptops, Lenovo laptops)
<Fn> + <F10> (Neo laptops, some Asus laptops)
Check the webcam in the Device Manager
The next thing to do is to check your Windows Device Manager and see if all hardware is recognized and installed properly. Use the Scan for hardware changes in the Action menu to make sure Windows lists all available hardware devices.
It might be that the hardware is recognized as a camera, but the right drivers are not installed. The yellow exclamation mark will indicate a problem.

If the device is not recognized in Windows, it will be listed under Other Devices.

In either case, you can try to update the drivers. Right-click the device, and in the popup menu select Update Driver Software (in Windows 11 – Update driver). Then follow the instructions on screen, but make sure you allow Windows to search the web for updated drivers.
In case no driver for the webcam can be found, you can try a third-party driver-finding program that scans your PC for installed hardware and allows you to install missing drivers.
Reinstall the webcam software
If this fails, the next step would be to uninstall the software that came with your webcam. Use the Add or Remove Programs feature in the Control Panel. If that does not work you can use a third party uninstaller.
After uninstalling the software, restart your PC and then reinstall the webcam software. In most cases, this will solve the problems. Depending on the software, you might need to unplug your webcam during the software installation. For many HP systems, you need to install the CyberLink YouCam software, which can be downloaded from the HP site (for Windows 7 and Windows 8). This program allows you to check the webcam feed to see if it is working.
Check the software settings
If the drivers and webcam software are correctly installed, and you still cannot see any video, there can be a problem with the program settings. Most chat and meeting software have a configuration option to select the video source for the webcam feature. If you have multiple devices that qualify for video, you might need to select your webcam device as the source for the webcam feature in that program.
Some webcams and programs require additional software, although that should be installed with the webcam if things are right. But is does not harm to check if your Java, Flash (discontinued in 2019) and Quicktime software (version 7.6) are installed and up to date. But certainly check your DirectX software, since all video applications, including webcams, use DirectX for video processing. Try downloading the latest DirectX version and install it (Windows XP: DirectX 9.0c – Windows Vista: DirectX 10 (version 11 for Vista with SP2) – Windows 7: DirectX 11 – Windows 8, 8.1: DirectX 11.2 is only available through the Windows Update function – Windows 10: DirectX 11.3 and 12 are included with Windows and updates are only available through Windows update).
Manual focus correction
Lastly, if your webcam’s image is not sharp, check to see if it has a focus ring. A blurry image can sometimes simply mean the webcam is not in focus. Adjusting the focus through the ring can solve that problem.
Adjust video capture quality
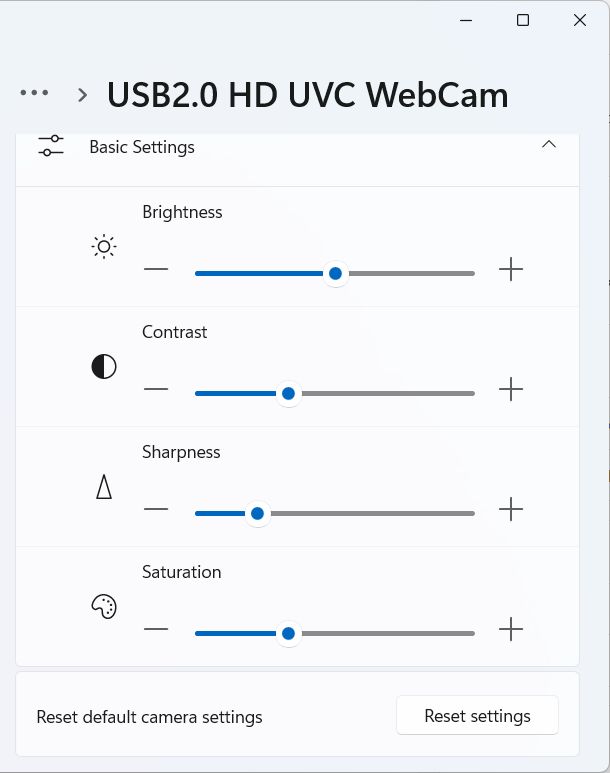
Other picture quality problems with webcams can be addressed by changing the video capture properties for the webcam. Most programs that can use a webcam will have the option to access the properties of the video source, which will bring up the video capture properties window.

Do keep in mind that not all settings will be enabled depending on the webcam and the webcam driver installed on your computer. In the example, you can see that some settings are disabled. The example shows the video capture properties for an Acer Crystal Eye webcam.
In Windows 11 the Camera properties look different. Access them by opening Settings from the Start menu, then select Bluetooth & devices in the left-hand pane, click Cameras in the right-hand pane, and then click your camera.
Camera Privacy Settings Causing Webcam Problems
Starting with Windows 8.1 (and Windows 10) there is a privacy setting in Windows that allows (or blocks) access to the camera. If access to the camera is blocked to Apps, your webcam will not work in certain applications.
Here are the steps to ensure that the camera is not blocked in Windows 10:
- From the Start menu, select Settings.
- In the Settings window, click on Privacy.
- Make sure that the setting for Let my apps use my camera is turned On.


Fix Flipped Camera Issues
Having the image from the camera shown as mirrored or upside down has been a long-time problem on some Windows-compatible webcams. In most cases, the right device driver for the camera will fix the issue.
If the camera image is not showing correctly, or changes to an incorrect image when using it to capture video, try the options below to fix it.
Registry tweak to flip camera
Although this solution is not applicable to all webcams, it is good to check if it is applicable in your case.
- Open the Registry Editor using the Windows + R keys and then type
regeditin the Run box. Press Enter or click the OK button. - In the Registry Editor, select the top-level entry (Computer), and then use the File menu Export option to make a backup of the registry.
- Next, locate the following registry entry:
HKEY_LOCAL_MACHINE\SYSTEM\CurrentControlSet\Control\Class\
{6BDD1FC6-810F-11D0-BEC7-08002BE2092F}\0000\VIDEOPROCAMP - With the key selected, change entry in the right-hand panel called
HFLIPfrom 0 to 1 (or from 1 to zero, depending on the current value). If the entry does not exist, you can create a new DWORD (32-bit) Value with that name.
Note: Use theVFLIPentry for a vertical flip.
If you cannot find the key, this option probably will not work for your webcam.
Use software settings to flip the camera
If you cannot get the webcam image corrected in Windows itself, using the driver, settings, or registry tweak, you can often use program settings to correct the webcam image.
Do keep in mind that many video chat programs show you the mirrored image of the webcam while people on the other end see the correct image of you. So consider if it is really something that needs to be addressed!
In Zoom you can toggle video mirroring to change the image.
- Click the up arrow in the Video button on the Zoom meeting window.
- Select the Video Settings option in the popup menu.
- In the Video settings pane, unmark the option Mirror my video.
- Close the Video settings pane.
- Close and restart Zoom (close it completely from the Taskbar icon).


If you prefer working with web-based interfaces for online meeting and chat programs like Zoom, Google Meet, and others, installing a browser plugin or extension is the better way to go. For Chrome, there is VideoMirror, which is free and supports camera mirroring. There are others, but make sure to check that the mirror function is available in the free version before you install it.
If you are using your webcam for instant messaging / video chatting with one of the popular chat programs, have a look at ManyCam, which allows you to record your webcam but also allows screen recording, which allows you to record any video stream! Third-party programs like ManyCam act as a virtual webcam and even work to mirror the camera image in Discord, which is not otherwise possible.
Windows 10 Camera Problems
In one of the initial Windows 10 updates, a camera problem was introduced that needed a specific fix. The update causes the camera to stop working in most apps trying to use it. The update pertained to the Windows Frame Server Mode for processing webcam images. Microsoft disabled support for webcams using MJPEG and H264 compression. The way to address this is to disable the Frame Server Mode to allow it to work.
- Open the Registry Editor in Windows.
- Make a backup of the registry using the File -> Export option.
- Navigate to the following registry key:
HKEY_LOCAL_MACHINE\SOFTWARE\Microsoft\Windows Media Foundation\Platform - Right-click in the left-hand pane and select New in the popup menu.
- Select DWORD (32-bit) Value and enter the
EnableFrameServerModeas the name. - The value should be zero (0) by default, if not, change it to zero (0) by double-clicking the new key.
- If you are running a 64-bit version of Windows, you need to repeat these steps for the following registry key:
HKEY_LOCAL_MACHINE\SOFTWARE\WOW6432Node\Microsoft\Windows Media Foundation\Platform - Close the Registry Editor and check if the camera issue is fixed.


A restart of Windows should not be required, but if the fix does not work, restart Windows to make sure the changes take effect.
Realtek Webcam Problems
If your Windows system is using a webcam that is using Realtek components, a specific problem can occur. The Windows service host will report errors that report the camera frame service terminated unexpectedly. The error is caused by a Realtek driver file (RsProvider.dll). The file resides in the path: C:\Program Files\Realtek\RsProviders\RsProvider.dll (unless your system drive is not the C-drive).
You can either delete or rename the RsProviders folder or try a registry option to disable it. Lenovo provides a patch for its affected systems to disable it. The patch removes the following key:
HKEY_LOCAL_MACHINE\SOFTWARE\Microsoft\Analog\Providers\RsProvider
Before you change the registry, make a backup! If you decide to delete the RsProvider folder, also make a backup first (the better option is to try and rename it first).
Windows 11 Camera Troubleshooter
Microsoft has included a troubleshooter feature in Windows 10 and Windows 11 that can help fix common problems. So, if you experience a camera-related problem in one of these Windows versions, run the Camera Troubleshooter first.
- Open the Settings from the Start menu.
- Select Bluetooth & devices in the left-hand pane.
- Click Cameras in the right-hand pane.
- Select your Camera (USB2.0 HD UVC WebCam in the example).
- Click the Troubleshoot button.

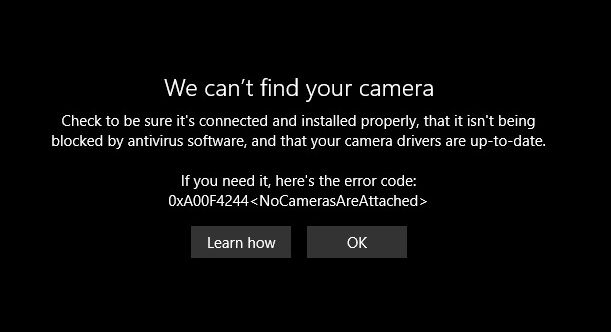
Errors that can be solved this way include the 0xA00F4244 error showing NoCamerasAreAttached. The Camera window will show the message “We can’t find your camera“.
A second frequent error in Windows 10 and Windows 11 relating to the webcam is error 0xA00F429F WindowsShowFailed. The message, in this case, is “Can’t start your camera“.
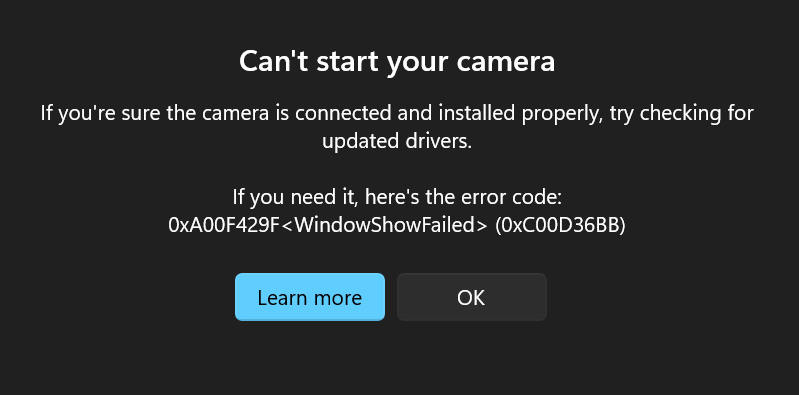
In most cases, this is an App access issue (permissions), but just run the troubleshooter to see if it can be fixed by Windows automatically.


@Peter – Problems with webcams that result in a message about setting the frame rate are generally software errors.
Have you tried reinstalling the webcam driver and software?
@TARIQ – Are you using Windows Live Messenger when you get error 0x80ee000c? Because that is basically a timeout message. Could be a connection problem, but even a firewall or misconfiguration can cause it.
First thing that is important to note or check is when it started, as that allows you to see if a change caused the error to come up (changes in network, new software, windows update, etc). If possible revert the change and see if that resolves it.
You can also try using a previous version of the Live Messenger, as I have seen specific problem with new versions in the past as well.
(Error: 0x80ee000c)
during web cam chat call disconnects and following message appears
(Error: 0x80ee000c)
I got a rocksoul webcam and wen i turn it on the error 80070491 cannot set frame rate for preview. What should i do?
@Ken – Simplest solution is probably to reinstall the webcam drivers for your Acer Aspire 8951G. Unless the webcam is really broken, that should bring the webcam device back into the device manager and make it usable again.
@Rahul – Always make sure you use the webcam in sufficient light conditions, otherwise the quality can deteriorate quickly. Also check your internet bandwidth, as insufficient speed can also affect the broadcast quality.
But it would be better to simply test the webcam’s HD quality by doing a local recording, so you are not depending on a connection with a second party and the internet speed.
Hey, i recently purchased a Sony VPCCB27FD and the quality is not great at all. Near the lens it says “HD web camera” however it seems far from HD quality. When video calling through windows live messenger, quality is blurry. It is slightly better with skype. Camera is also very dark. What can be the issue?
Well, I have an Acer Aspire 8951G and suddenly got a problem. Earlier today I had video conference on skype and it worked fine, then now on the evening I had one more video conference, then after like 2 minutes it suddenly canceled. Now my webcam does not work, and I can’t find it in the Device Manager. It’s no error or anything, just says I don’t have a webcam device anymore.
@Specky – You reinstalled the toshiba L500D-16L webcam driver, did it show any problems during install? Also check if the webcam shows up in the Device Manager and has not error indicated.
And if you say it does not open, what program are you using to open the webcam? Have you tried different programs?
@Mery – If the correct webcam driver from the HP site does not work with your webcam both in Vista and Windows 7, then it is more likely there is a hardware problem.
Has the webcam ever worked properly?
One thing I can still imagine is some kind of conflict with another device, possibly a USB device. Are you suing any external USB devices? If so, try unplugging them if possible.
@Mylene – I cannot quite imagine the problem you are having. 9 little squares in the webcam window? Can you email me a screenshot of the problem?
@mima – You mean the webcam image is inverted? What program are you using to view the webcam image? Upside down images are generally the result of a wrong driver, but inverted is often a setting in the webcam software itself.
images are seen inverted
you can go to HP and download driver. Extract files . Uninstall driver , restart comp and SCAN for Hardware changes
web cam driver must be on netbook CD . There are two folders Win 7 and Win XP . if you lost orig. CD you have to go to your Computer brandname’s Web
@Kyle: hello Kyle, I installed windows 7, and now I can see the webcam with other devices, I tried the new driver for windows 7 but still the same problem and same error.
Any Ideas???
hi! how to fix a cam showing multiple screen? it shows 9 little square..
I have a toshiba L500D-16L Laptop, my webcam does not work i have tried reinstalling the driver but still it does not open.please i need help
I tried System Restore option too and still the same problem
@Mery – Very strange, the only scenario I am familiar with where error: “the program issued a command but the command length is incorrect” occurs is related to a account login problem, and not when installing a driver update.
It seems to me something on the system is corrupt, either with the webcam software or driver, or with the Windows installer itself.
Have you tried using the System Restore option to use an earlier restore point to bring the configuration back to an earlier date? If not, see if that helps. After using an older restore point, try installing the webcam driver again.
Yes, same problem
@Mery – Are you still getting an error when installing the SP48236.exe?
I tried this this driver too but it didn’t work, still the same problem :(
@Merry – Seems there is really something wrong with the webcam driver software. But I checked the HP download you need for your laptop model, and that is not SP48236.exe, but SP42568.exe.
Try downloading and installing that. You might need to uninstall the existing version first if it still shows up in the Control Panel->Uninstall list.
I installed SplitCam and when i tried it, i get: “error: the program issued a command but the command length is incorrect” and after that youcam start autommaticaly and show me the same first error: “Cannot connecte to this video device. please select another capture device via Settings or close anu application that may be using this video device and restart Youcam”.
it’s HP Pavilion G60-235DX Notebook and I’m running windows vista 32-bits
@Mery – You could try a program like SplitCam, which can help prevent “webcam in use” problems, but the original driver should really install.
What is the exact model G60 you have? Can you check the bottom of the laptop and let me know the model? e.g. G60-nnnxx. And alos please confirm which Windows version you are running.
I tried to install the HP webcam driver (SP48236.exe) again but everytime I do that I get: “error: the product definitation file is lost”. I have searched the internet and forums but I couldn’t find an answer. Please help!