How To Fix Webcam Problems
With broadband internet widely available, many PC users are actively using their webcams for video chatting and online meetings. Not only does the increased bandwidth facilitate the use of video over the internet, but improved webcams and better video compression also help a lot. But if your hardware is not working as it should be, a webcam is not much fun. So dealing with webcam problems can be a necessary evil. Webcam problems often simply mean there is no image to be seen, but in other cases, you might actually get an error message or will not be able to select the webcam as the video source in your programs.
In Windows Live Messenger, for example, you might get webcam error 0x8a70013, indicating a problem with the webcam device.
Steps to solve the webcam problems
Check the webcam connection
One of the very first steps is of course to check your webcam connection. Most webcams use the USB port to connect to the PC, so check if your USB cable is properly plugged in. For built-in webcams, these steps of course do not apply. Many new laptops have a built-in webcam. Also, try connecting your webcam directly to your PC instead of through a USB hub (if you are using one).
Enable the webcam
But don’t forget to check if you need to manually activate your webcam. In most cases, the webcam will be automatically activated by software that can use the webcam, but for some computer brands, it is necessary to press a certain key combination to activate the webcam (it will be a Function key, either with Alt or Ctrl or the Fn key, but check the laptop manual for details).
Some known key combinations:
<Fn> + <F9> (Alienware laptop webcams)
<Fn> + <F6> (Packard Bell laptops, MSI laptops, Lenovo laptops)
<Fn> + <F10> (Neo laptops, some Asus laptops)
Check the webcam in the Device Manager
The next thing to do is to check your Windows Device Manager and see if all hardware is recognized and installed properly. Use the Scan for hardware changes in the Action menu to make sure Windows lists all available hardware devices.
It might be that the hardware is recognized as a camera, but the right drivers are not installed. The yellow exclamation mark will indicate a problem.

If the device is not recognized in Windows, it will be listed under Other Devices.

In either case, you can try to update the drivers. Right-click the device, and in the popup menu select Update Driver Software (in Windows 11 – Update driver). Then follow the instructions on screen, but make sure you allow Windows to search the web for updated drivers.
In case no driver for the webcam can be found, you can try a third-party driver-finding program that scans your PC for installed hardware and allows you to install missing drivers.
Reinstall the webcam software
If this fails, the next step would be to uninstall the software that came with your webcam. Use the Add or Remove Programs feature in the Control Panel. If that does not work you can use a third party uninstaller.
After uninstalling the software, restart your PC and then reinstall the webcam software. In most cases, this will solve the problems. Depending on the software, you might need to unplug your webcam during the software installation. For many HP systems, you need to install the CyberLink YouCam software, which can be downloaded from the HP site (for Windows 7 and Windows 8). This program allows you to check the webcam feed to see if it is working.
Check the software settings
If the drivers and webcam software are correctly installed, and you still cannot see any video, there can be a problem with the program settings. Most chat and meeting software have a configuration option to select the video source for the webcam feature. If you have multiple devices that qualify for video, you might need to select your webcam device as the source for the webcam feature in that program.
Some webcams and programs require additional software, although that should be installed with the webcam if things are right. But is does not harm to check if your Java, Flash (discontinued in 2019) and Quicktime software (version 7.6) are installed and up to date. But certainly check your DirectX software, since all video applications, including webcams, use DirectX for video processing. Try downloading the latest DirectX version and install it (Windows XP: DirectX 9.0c – Windows Vista: DirectX 10 (version 11 for Vista with SP2) – Windows 7: DirectX 11 – Windows 8, 8.1: DirectX 11.2 is only available through the Windows Update function – Windows 10: DirectX 11.3 and 12 are included with Windows and updates are only available through Windows update).
Manual focus correction
Lastly, if your webcam’s image is not sharp, check to see if it has a focus ring. A blurry image can sometimes simply mean the webcam is not in focus. Adjusting the focus through the ring can solve that problem.
Adjust video capture quality
Other picture quality problems with webcams can be addressed by changing the video capture properties for the webcam. Most programs that can use a webcam will have the option to access the properties of the video source, which will bring up the video capture properties window.

Do keep in mind that not all settings will be enabled depending on the webcam and the webcam driver installed on your computer. In the example, you can see that some settings are disabled. The example shows the video capture properties for an Acer Crystal Eye webcam.
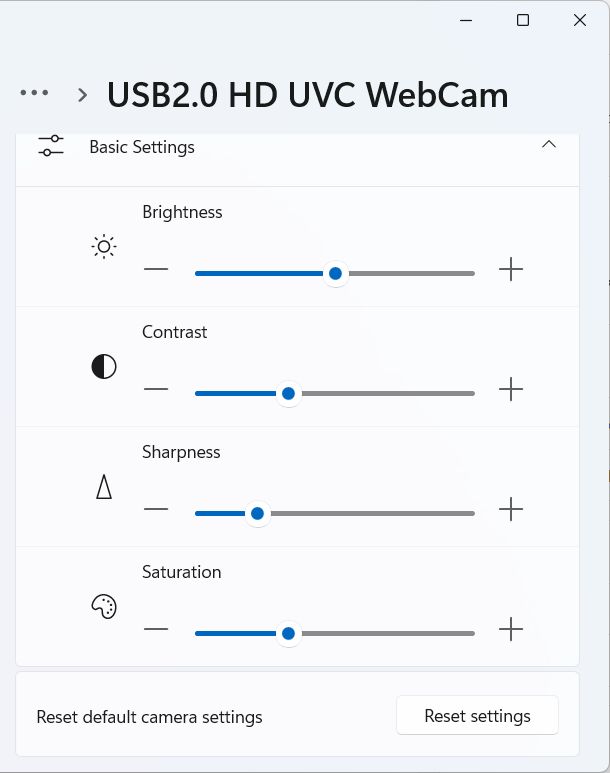
In Windows 11 the Camera properties look different. Access them by opening Settings from the Start menu, then select Bluetooth & devices in the left-hand pane, click Cameras in the right-hand pane, and then click your camera.
Camera Privacy Settings Causing Webcam Problems
Starting with Windows 8.1 (and Windows 10) there is a privacy setting in Windows that allows (or blocks) access to the camera. If access to the camera is blocked to Apps, your webcam will not work in certain applications.
Here are the steps to ensure that the camera is not blocked in Windows 10:
- From the Start menu, select Settings.
- In the Settings window, click on Privacy.
- Make sure that the setting for Let my apps use my camera is turned On.


Fix Flipped Camera Issues
Having the image from the camera shown as mirrored or upside down has been a long-time problem on some Windows-compatible webcams. In most cases, the right device driver for the camera will fix the issue.
If the camera image is not showing correctly, or changes to an incorrect image when using it to capture video, try the options below to fix it.
Registry tweak to flip camera
Although this solution is not applicable to all webcams, it is good to check if it is applicable in your case.
- Open the Registry Editor using the Windows + R keys and then type
regeditin the Run box. Press Enter or click the OK button. - In the Registry Editor, select the top-level entry (Computer), and then use the File menu Export option to make a backup of the registry.
- Next, locate the following registry entry:
HKEY_LOCAL_MACHINE\SYSTEM\CurrentControlSet\Control\Class\
{6BDD1FC6-810F-11D0-BEC7-08002BE2092F}\0000\VIDEOPROCAMP - With the key selected, change entry in the right-hand panel called
HFLIPfrom 0 to 1 (or from 1 to zero, depending on the current value). If the entry does not exist, you can create a new DWORD (32-bit) Value with that name.
Note: Use theVFLIPentry for a vertical flip.
If you cannot find the key, this option probably will not work for your webcam.
Use software settings to flip the camera
If you cannot get the webcam image corrected in Windows itself, using the driver, settings, or registry tweak, you can often use program settings to correct the webcam image.
Do keep in mind that many video chat programs show you the mirrored image of the webcam while people on the other end see the correct image of you. So consider if it is really something that needs to be addressed!
In Zoom you can toggle video mirroring to change the image.
- Click the up arrow in the Video button on the Zoom meeting window.
- Select the Video Settings option in the popup menu.
- In the Video settings pane, unmark the option Mirror my video.
- Close the Video settings pane.
- Close and restart Zoom (close it completely from the Taskbar icon).


If you prefer working with web-based interfaces for online meeting and chat programs like Zoom, Google Meet, and others, installing a browser plugin or extension is the better way to go. For Chrome, there is VideoMirror, which is free and supports camera mirroring. There are others, but make sure to check that the mirror function is available in the free version before you install it.
If you are using your webcam for instant messaging / video chatting with one of the popular chat programs, have a look at ManyCam, which allows you to record your webcam but also allows screen recording, which allows you to record any video stream! Third-party programs like ManyCam act as a virtual webcam and even work to mirror the camera image in Discord, which is not otherwise possible.
Windows 10 Camera Problems
In one of the initial Windows 10 updates, a camera problem was introduced that needed a specific fix. The update causes the camera to stop working in most apps trying to use it. The update pertained to the Windows Frame Server Mode for processing webcam images. Microsoft disabled support for webcams using MJPEG and H264 compression. The way to address this is to disable the Frame Server Mode to allow it to work.
- Open the Registry Editor in Windows.
- Make a backup of the registry using the File -> Export option.
- Navigate to the following registry key:
HKEY_LOCAL_MACHINE\SOFTWARE\Microsoft\Windows Media Foundation\Platform - Right-click in the left-hand pane and select New in the popup menu.
- Select DWORD (32-bit) Value and enter the
EnableFrameServerModeas the name. - The value should be zero (0) by default, if not, change it to zero (0) by double-clicking the new key.
- If you are running a 64-bit version of Windows, you need to repeat these steps for the following registry key:
HKEY_LOCAL_MACHINE\SOFTWARE\WOW6432Node\Microsoft\Windows Media Foundation\Platform - Close the Registry Editor and check if the camera issue is fixed.


A restart of Windows should not be required, but if the fix does not work, restart Windows to make sure the changes take effect.
Realtek Webcam Problems
If your Windows system is using a webcam that is using Realtek components, a specific problem can occur. The Windows service host will report errors that report the camera frame service terminated unexpectedly. The error is caused by a Realtek driver file (RsProvider.dll). The file resides in the path: C:\Program Files\Realtek\RsProviders\RsProvider.dll (unless your system drive is not the C-drive).
You can either delete or rename the RsProviders folder or try a registry option to disable it. Lenovo provides a patch for its affected systems to disable it. The patch removes the following key:
HKEY_LOCAL_MACHINE\SOFTWARE\Microsoft\Analog\Providers\RsProvider
Before you change the registry, make a backup! If you decide to delete the RsProvider folder, also make a backup first (the better option is to try and rename it first).
Windows 11 Camera Troubleshooter
Microsoft has included a troubleshooter feature in Windows 10 and Windows 11 that can help fix common problems. So, if you experience a camera-related problem in one of these Windows versions, run the Camera Troubleshooter first.
- Open the Settings from the Start menu.
- Select Bluetooth & devices in the left-hand pane.
- Click Cameras in the right-hand pane.
- Select your Camera (USB2.0 HD UVC WebCam in the example).
- Click the Troubleshoot button.

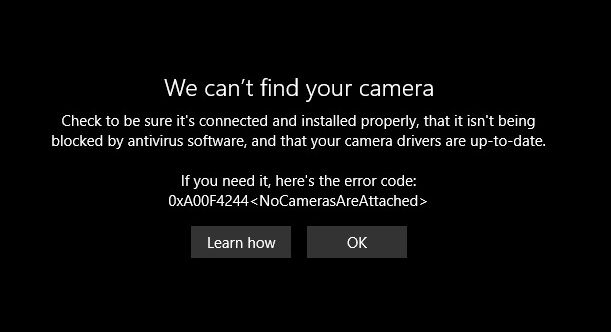
Errors that can be solved this way include the 0xA00F4244 error showing NoCamerasAreAttached. The Camera window will show the message “We can’t find your camera“.
A second frequent error in Windows 10 and Windows 11 relating to the webcam is error 0xA00F429F WindowsShowFailed. The message, in this case, is “Can’t start your camera“.
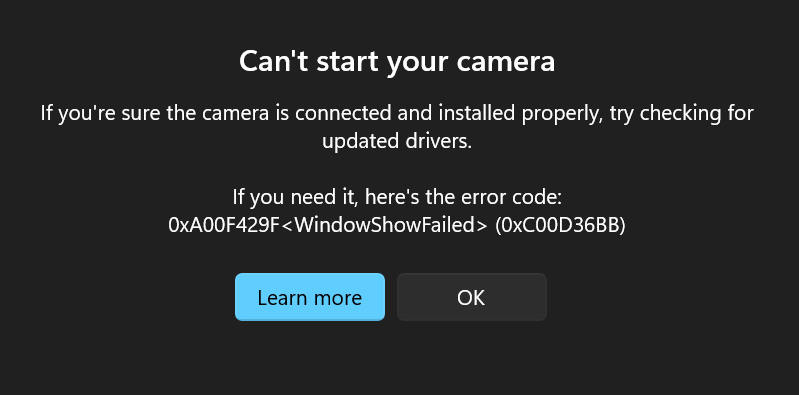
In most cases, this is an App access issue (permissions), but just run the troubleshooter to see if it can be fixed by Windows automatically.


kyle will u send me the link to download what i need to download for my webcam to work please ?
@david milam – you say “video drivers”, but I guess you mean webcam drivers, right? And yes of course you can try and (re)install the drivers for her webcam.
Do you know the webcam brand and model (or laptop if it is a built in cam)? And what is the Windows version?
hey my girlfriend’s got a problem with her webcam, i believe she’s missing the video drivers and is out of date, is there anything we can do about that?
@negi balwant – You’ll need to provide a bit more detail for me to be able to help you. What is the windows version, what cam, and what chat program?
i need my cam on line when i am chating some one
@Sheri – What webcam software are you using? The only situation I know that causes this is when the video input source is not properly selected/configured in the webcam program. Some programs then show the desktop instead.
So check the settings of the program and make sure the webcam is set as the video capture source.
My webcam keeps showing what is on my computer screen, How the hell do I fix this?
Thanks
@Pat – USB devices showing as unplugged while they are not often indicates a problem with the device registration in the registry. Since it is a built in webcam, you cannot do anything about the physical connection.
I would try unplugging all other USB devices and possibly uninstalling them in the Device Manager. That way you can find out if there is a conflict between any of the USB devices (or their drivers).
Other things you can try is uninstalling the “USB Root Hub” devices in the Device Manager and then reboot. They will be automatically reinstalled, and this can also fix USB problems.
If nothing works, try shutting down, unplugging and removing the battery for a few minutes. After than reassemble and power up.
@Denny – Not all webcams are compatible with Skype. If your webcam works fine in other chat programs, then the webcam is fine, so it is a Skype problem.
You can try using a program like SplitCam which will work in between the webcam and Skype.
i’m using laptop. my camera is working properly but not coming properly in skype.its comes to piece pieces. help me…
is this laptop problem or skype problem…?????
By the Way, it also says that USB composite Driver_#002.Hub_#004 along with Hp photosmart 430 series is unplugged as well, are these connected to the webcam problem at all?
Hello I installed the Driver finder because my built in webcam does not show up in the device manager at all, the driver finder is saying that it is an unplugged device. How do i remedy the problem if the web cam is built in and there is nothing to plug in?
on my acer arcsoft webcam companion 3 on my sony vaio the option buttons dont show up how do i fix it
@ShannonMarie – I would suggest you try SplitCam. You indeed need to download it, and install it.
You will then have another (virtual) webcam device called SplitCam, which you should select as the video input device in MSN.
so do i use splitcam or manycam???
do i need to download that if so how and its for msn my camera :)
@jojoba – Was the webcam working properly before, or has it always only shown black and white?
Since you say the driver is installed and up to date, one thing to try is to uninstall the webcam device in the device manager, reboot, and let Windows reinstall it using that driver (should be automatic). That way the configuration of the device should be reset.
And try using different webcam software, sometimes a problem can be related to a specific program only.
hello!
please can you help me i have sony vaio vpccb but its webcam’s video is black and white driver is fully installed and updated.
@ShannonMarie – Have you tried enabling the webcam with the Fn+F11 key combination (at least I think that is the key combo for that type)?
And try using SplitCam or Manycam and see if they show the webcam image properly.
The advent 5421 seems to be identical to a gericom model, so I checked the support site for that, but there are no webcam drivers.
@ShannonMarie – Have you tried enabling the webcam with the Fn+F11 key combination (at least I think that is the key combo for that type)?
And try using SplitCam or Manycam and see if they show the webcam image properly.
The advent 5421 seems to be identical to a gericom model, so I checked the support site for ta
i got a advent 5421 laptop and the webcam at the topwhen you turn the laptop on it stays on green but when i go on cam its red but ever since the light has automatically turned off so no light comes on and it wont let me go on cam… someone helpp mee please :)
@paula malcolm – There is probably some additional webcam software installed that is affecting the webcam behavior (something like manycam, which can add special effects to your webcam). Try checking the startup programs (using “msconfig”) to see if anything like that is being run.
@ritika – Did you get any error during installation, or does the device manager show an error for the webcam?
If so, try uninstalling the webcam software and reinstalling it.
If not, try using a different program, like SplitCam to see if that shows the webcam picture.
i have installed the iball face2face camera C12.0 but no image
There is a picture on my web cam (hearts) and I cant video chat on skype The picture wont go away. The light comes on like it wants to but it wont work…very annoying. Once it said the program was blocked by another program??? Not sure what to do
@pilar tanez – adjustment in color is normally offered by the application accessing the webcam. There will be an options/settings/properties type of selection that shows the Webcam settings. If not available in the application, you can try installing SplitCam or ManyCam, which will allow you to change those settings. They will then also have effect on the use of the webcam in other applications.
For the opening without permission, the first thing that comes to mind is the online use of the webcam (in a browser). Check your security/access settings in the Flash Player.
im facing a problem about my webcam . .picture appears but there is no adjustment in color and it opens without permission
@California0324 – The file winbrand.dll is actually a Microsoft file, that is not supposed to have anything to do with the webcam driver.
I would suggest you run the Windows system file checker at a administrator command prompt. Type “sfc /scannow” and press Enter. That will check the Windows system files and offer to fix any errors found.
If the webcam still has problems, try uninstalling the webcam software first (rather than only the driver).
You can also try using the System Restore feature to bring back the configuration from a previous date, but if the DLL is corrupt, that might not help.