How To Remove Microsoft Java VM
Before you remove the Microsoft Java Virtual Machine, you want to check that it is installed and make sure that Internet Explorer is not using it.
Follow these steps:
- Start the Internet Explorer
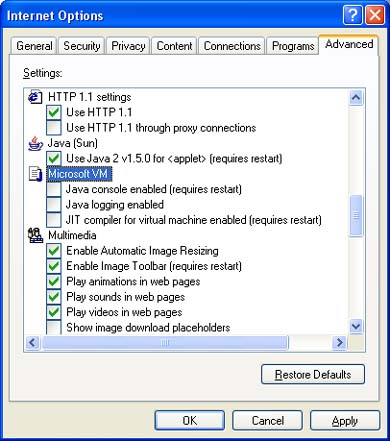
- In the Tools menu, select Internet Options
- In the Internet Options dialog box, select the Advanced tab.

- If you cannot find the Microsoft VM entry, the Microsoft Java VM is not installed.
- If it is present, clear the check boxes of the options below it.
- Next, click OK to close the Internet Explorer Options dialog box.
- Close the Internet Explorer
If you have found that the Microsoft Java VM is installed in the previous steps, you can uninstall it.
Uninstalling the Microsoft Java VM involves a number of steps:
- First, click the Windows Start menu and select the Run option.
- In the Run dialog box, type the following command:
RunDll32 advpack.dll,LaunchINFSection java.inf,UnInstall - Next, press Enter or click OK.
- This will bring up a message box to ask you for confirmation. Click the Yes button to confirm.
- After completion of the command, you will need to reboot your system.
Once you have rebooted your computer, there is some cleanup required. There are files and directories on disk and some registry entries that need to be removed manually in order to completely remove the Microsoft Java VM from your computer.
- Open the Windows Explorer.
- Now browse to the systemroot folder. In most cases this will be “C:\Windows” or “C:\WINNT”. If you have installed Windows on a different drive, use that drive letter.
In the systemroot folder, delete the Java folder. - Next browse to the systemroot\inf folder and remove the java.pnf file if present.
- Next browse to the systemroot\system32 folder and remove the jview.exe file as well as the wjview.exe file.
- Now you can close the Windows Explorer.
- Next click the Windows Start menu, and select Run.
- In the Run dialog box, type regedit and press Enter or click OK.
- In the Registry Editor, locate the following registry keys and delete them. HKEY_LOCAL_MACHINE\SOFTWARE\Microsoft\Java VMHKEY_LOCAL_MACHINE\SOFTWARE\Microsoft\Internet Explorer\AdvancedOptions\JAVA_VMYou can delete the keys by right-clicking them and then selecting Delete in the popup menu.
- Now close the Registry Editor.
This completes the manual removal of the Microsoft Java Virtual Machine. If you have problems uninstalling other software, you might want to consider using an uninstaller tool. This kind of tool removes programs, clears the related files and folders from disk and cleans up the registry in one go.
If you edit the Windows registry like this, another good investment is a registry cleaner. This kind of tool will clean obsolete entries in the registry, but also compact or compress the registry, which helps speed up your computer.
And of course make sure to install the Sun Java VM after you remove the Micorsoft Java VM!


Thank you. It works.
@Fritz Liessling - Thank you for your feedback. I understand that you are looking for other resolutions, but within Windows…
Although the answer to this question is correct, it is really a cop-out answer. It's easy enough to find answers…
To the pcauthorities.com administrator, You always provide useful links and resources.
???? ?? ??? The Last of us