12 Tips to Optimize Windows Performance
Why would you need to optimize Windows performance? Modern PCs are equipped with fast CPUs and sufficient memory. So performance would never be an issue. But there are scenarios where performance on Windows systems can be problematic. Like with previous Windows versions, using a computer over time will result in applications getting installed and uninstalled, files getting stored and removed, and the updates getting installed.
All these actions will generally not affect performance on modern PCs. But on older systems, or systems that just meet the system requirements for the latest Windows version, performance can become an issue.
We should also not forget that although Microsoft has improved Windows versions over the years, there are also new features and functionalities being added to new Windows versions that might not benefit everybody.
So for those users looking to improve the performance of their Windows system, we have created this list of possibilities. Some of them apply to all Windows versions, while others are specific to a particular Windows version (mentioned per tip).
#1 – Upgrade the PC hardware
The first tip is the obvious one, even though it might not be possible in all cases. Upgrading the computer hardware is the easiest way to improve performance on any Windows PC. In most cases upgrading the internal memory (RAM) is the most efficient solution. When Windows uses up all memory, it uses virtual memory (disk space). Even with an SSD disk, virtual memory usage is not as fast as using internal memory. So if possible upgrade the RAM. Microsoft states 2 GB as the minimal amount for a 64-bit system, but more is definitely better. Especially if you run video or image processing software more memory makes a huge difference.
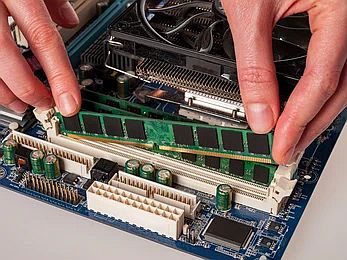
For desktop users, it is often possible to upgrade the CPU. Whether this is a practical solution depends on the cost. If you can do it yourself, it could be cost-efficient. The advantage is that you can install a Windows 11 compatible CPU to enable an upgrade to Windows 11.
The last piece of hardware I want to mention in the context of Windows performance is the disk. On older systems still using hard disks (HDD), replacing them with solid disks (SSD) will offer great performance improvements. And even if your system is using an SSD, replacing it with a newer, faster model will help. Replacing a SATA-based SSD with an M2 version is also possible.
#2 – Update Device Drivers
Device drivers take care of the communication between hardware and Windows. Drivers are a critical component in the proper functioning of a Windows computer. The correct drivers help the stability of the Windows computer, but they can also affect performance.
The latest Windows versions already support a lot of hardware directly. Drivers are either included or installed from Windows Update. Just make sure you have Windows check for updates automatically, or do it manually on a regular basis.
If you have older or incompatible hardware, it might not be installed automatically. In that case, device drivers need to be installed manually and also updated when new versions are available.
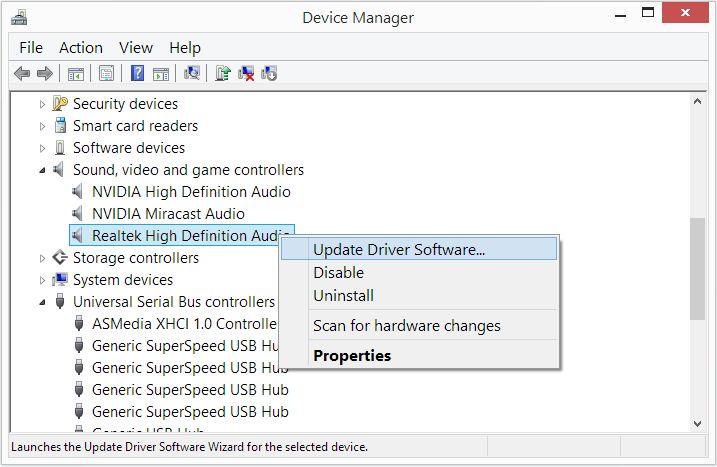
Use the Device Manager in Windows to update device drivers manually.
#3 – Disable Indexing
Windows indexing is used to make Windows Search faster. Basically, disks, folders, and files are scanned and indexed. Great for fast searches, not great for overall Windows performance.
Since searching will still work in Windows even with indexing turned off, it is important to consider if you want to leave indexing on or not. If you do not use Windows Search a lot, or your hardware is fast enough to provide search results without indexing, turning it off will help in improving Windows performance.
Control which files to be indexed
Start with the Indexing Options in the Control panel. Open the Control Panel from the Start menu and search for Indexing.
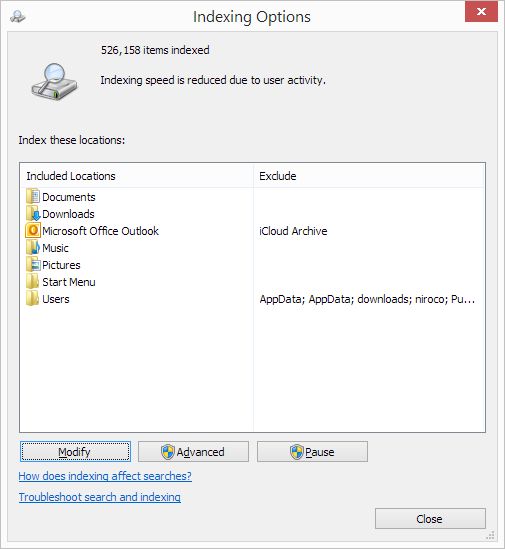
Use the Modify button to change the locations that are indexed. Apart from file locations, you can also control Outlook indexing.
The Advanced option allows you to change the location of the index file (put it on an SSD if you can), and select which file types are indexed.
Disabled indexing on full disk
It is also possible to disable indexing for a complete drive. Simply right-click the drive in the File Explorer and then select Properties. Then clear the box next to Allow files on this drive to have contents indexed in addition to file properties.
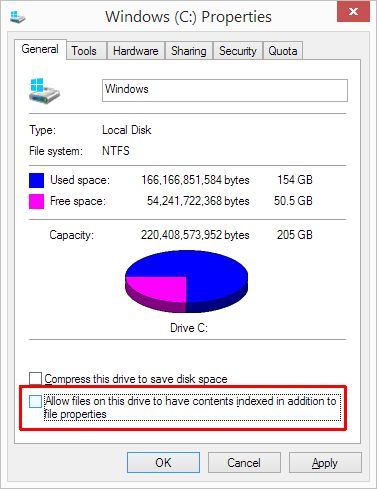
Click Apply or OK to confirm. Make sure to confirm that the changes should apply to the drive, subfolders, and files. Processing this change can take a while, but it is a one-time action, so just wait for it to complete.
Disable Windows indexing altogether
Rather than selecting what to index and what not, why not disable indexing completely? Windows indexing is done using a service, so disabling the service will stop the indexing to be executed. This is the best option if you want to completely disable indexing.
Use the Windows Search Box, or Run (Windows + R keys), to run the command services.msc. This will bring up the Services window. Now look up (scroll down to) the Windows Search entry, right-click it, and in the popup menu select Properties.
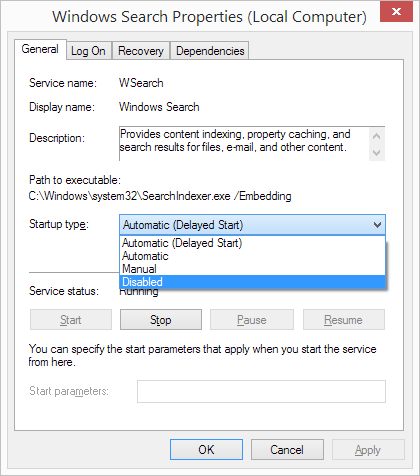
Change the Startup type to Disabled, and click OK. You need to restart the PC for these changes to take effect, or you can click the Stop button to stop the service immediately.
Be aware that other than the previous options, this option disables search completely. If you need to, it can easily be turned back on again by changing it to Automatic.
Note: in case Windows Media streaming is used on the PC, you might not want to disable indexing. This has been known to cause problems.
#4 – Disk Clean-up
Running disk clean-up will free up space on the drive. Windows has a built-in option for disk cleanup. Freeing up space can help with performance, especially when a disk is running low on available disk space.
For hard disks, it is also helpful to run a disk defrag, where used storage space is re-aligned. This process is not useful on SSDs since there are no moving parts on those drives. It is actually not good to run defragmentation on an SSD as it can harm the lifespan of the drive.
#5 – Disable Startup Programs
This may sound like something that will only affect the Windows startup time. But actually, any program that is executed at startup not only affects the startup time, it can also stay running in the background. And depending on the tasks executed by the program, this can negatively impact Windows performance.
So, check which programs are run at startup and see what they do. If not needed, simply disable or remove them. The easiest way to do this is to use the Task Manager.
Right-click the Taskbar, and then click Task Manager in the popup menu, or press the Ctrl + Shift + Esc keys simultaneously. In the Task Manager window, select the Startup tab.
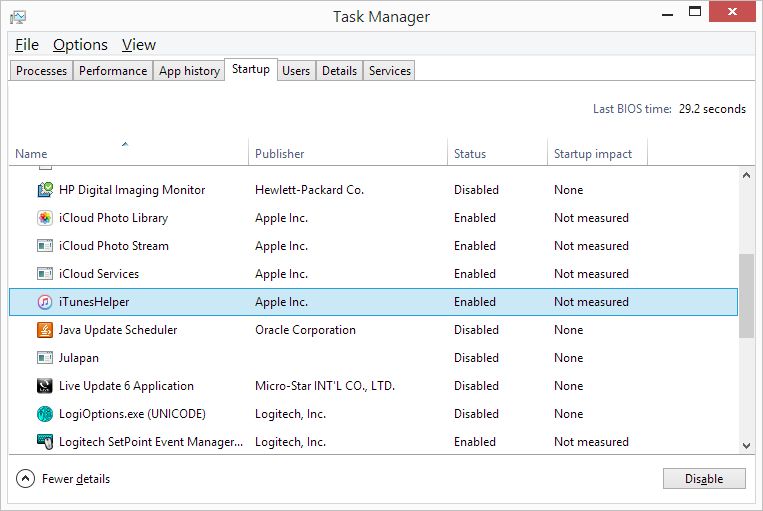
Simply click one of the programs that have a status Enabled and click the Disable button to disable it. During the next Windows startup, the program will no longer be executed automatically.
#6 – Select High-Performance Power plan
In most cases, the default power plan configured in Windows is the Balanced option. Although this is a good option to save energy, if you really need to maximize Windows performance you can select the High performance option. This will obviously use more energy, but for a task that needs processing power, like video rendering, or running a game, it will help. Use the Control Panel to change the power options.
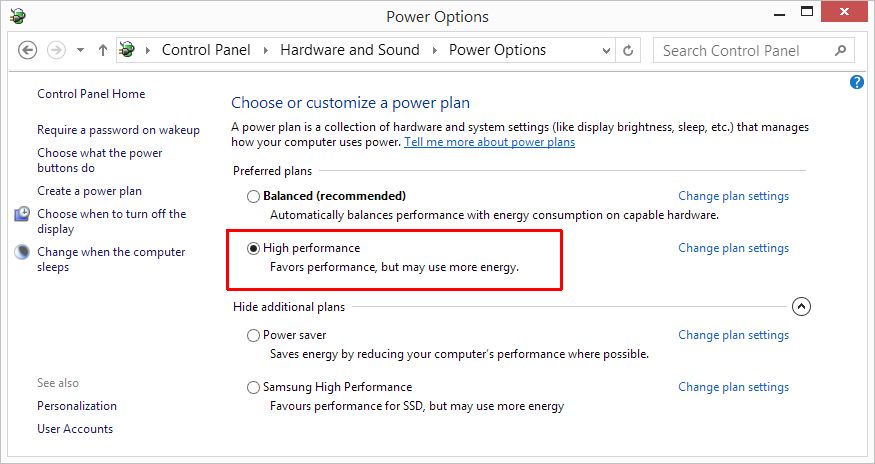
Once changed, the option takes effect immediately. No need for a restart of the computer.
#7 – Optimize the Internet connection
This is only relevant if your performance concerns are related to the Internet speed. But a lot of applications do use an active Internet connection, and Windows itself also accesses the Internet in the background.
If you are on a cabled network, great. As long as the cables are suited for your connection speed, things should be as fast as your Internet provider allows. But if you are on a Wi-Fi connection, it can be very helpful to check and optimize the connection.
Microsoft has an app to analyze your Wi-Fi connection. The app is called WiFi Analyzer. It allows you to check the channels in use, timings, and signal strength. With that information, you can configure the router for optimal wireless performance. If you prefer to use a mobile device, there are apps for Android and for iOS.
#8 – Turn Off Visual Effects
Every version of Windows evolved graphically. Graphics hardware and displays evolved as well. As a result, we can see a graphical user interface with many nice features. Windows are animated, Window contents can be dragged while showing the content, shadows, fading, smooth fonts, the list goes on.
But if you are after maximum performance, all these options might not be required. So see what you really want and need and disable the rest.
Open the Control Panel and select the System option in System and Security (this can vary depending on the Windows version). In the System window, select the Advanced system settings.
Under Performance, click the Settings button.
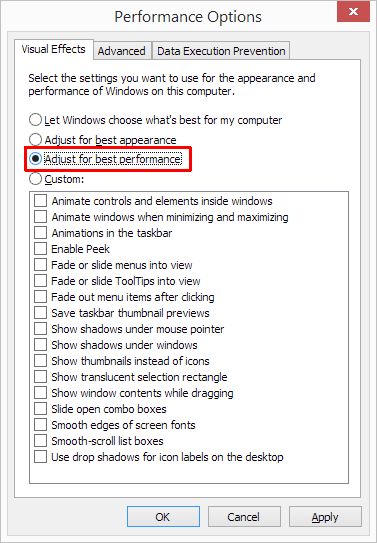
Next, select the option Adjust for best performance and click OK. This will disable all visual effects. If you prefer, you can select the Custom option and chose options individually.
The impact of disabling the visual effects will be biggest on older systems, or on a system that only just meets the minimum system requirements for the Windows version it is running.
Disable transparency effects
In Windows 7, 10, and 11, you can take the configuration of visual effects a step further by also disabling transparency effects. Like some of the other tips, this option will have the most effect on a slower PC, not on the latest hardware. But we’ll include it to be complete.
In Windows 7 the transparency effect is part of Aero. You can easily disable it. Right-click an empty area on the desktop, and in the popup menu select Personalize (you can also go through the Control Panel for this). In the Personalization window, click the Windows Color option. Clear the checkbox next to Enable transparency, and then click the Save changes button.
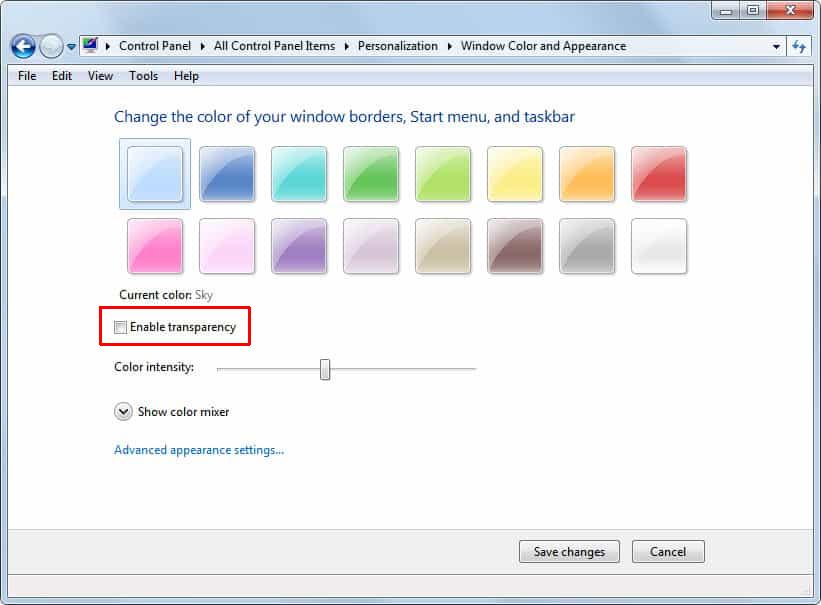
Note: It is possible that the Aero features are not available in Windows 7. This is generally the result of the video card driver not being compatible with the Windows Display Driver Model. Try updating the display drivers if that is the case.
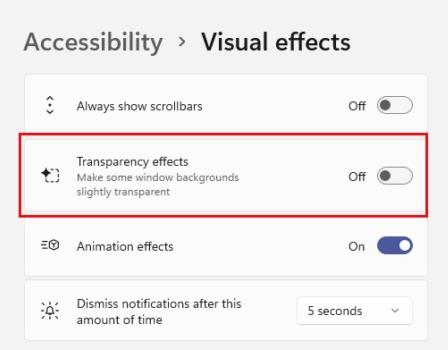
For Windows 10 and Windows 11, open the Settings from the Start menu. In the Settings window, click Personalization, and then click Colors. Now disable the Transparency effects by changing the option from On to Off.
#9 – Disable background apps (Windows 10 and Windows 11)
Some programs are useful to have running when needed. In Windows 10, Microsoft allows apps to run in the background. For maximum performance, you do not want apps running update processes, or generating notifications at all times. So check the list of background apps, and disabled the apps selectively.
In Windows 10, open the Windows Settings from the Start menu. In the Settings window, select the Privacy option. Now go to Background apps, by scrolling down in the left-hand panel.
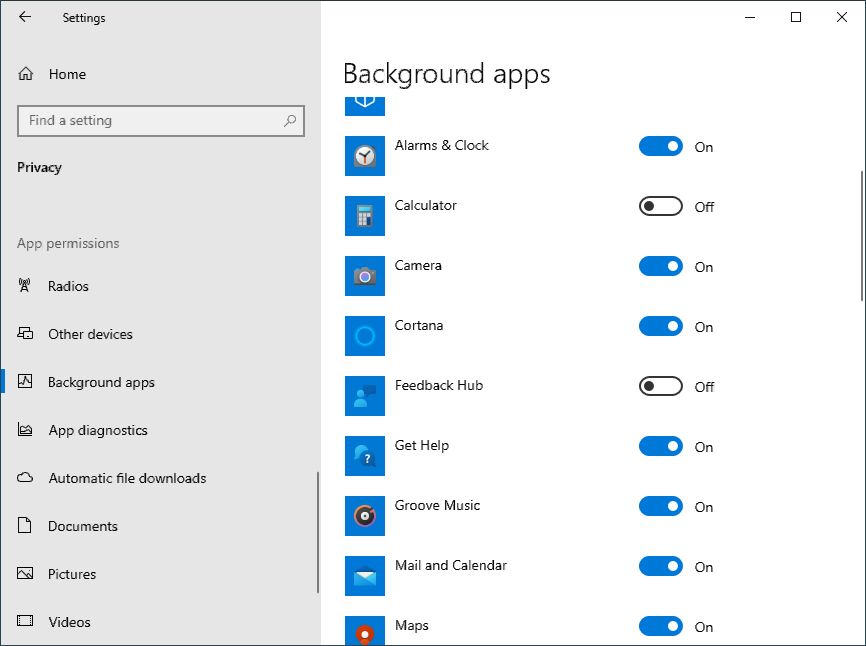
Go through the list of apps and toggle the On to Off for apps that you want to prevent from running in the background.
Please note that this list only contains the apps that are compatible with the Microsoft Store. For other apps, you will need to check the app itself for any background settings.
In Windows 11, open the Settings from the Start menu. Next, select Apps and then Apps & features.
Here you will see the App list, with all available apps on your system. Locate the app for which you want to disable the background execution. Click the three vertical dots next to the app name and in the popup menu, select Advanced options.
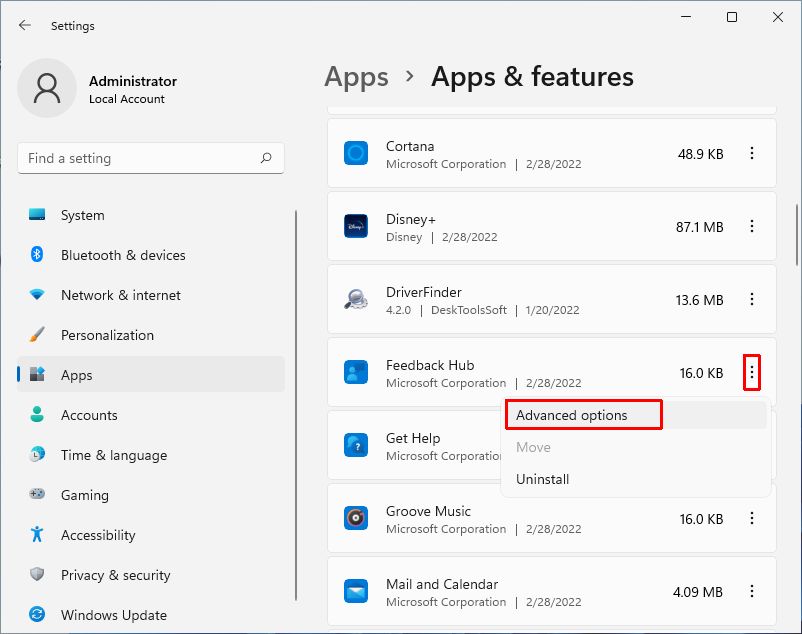
In the next screen, scroll to the section called Background apps permissions. Now change the drop-down option under Let this app run in the background to Never.
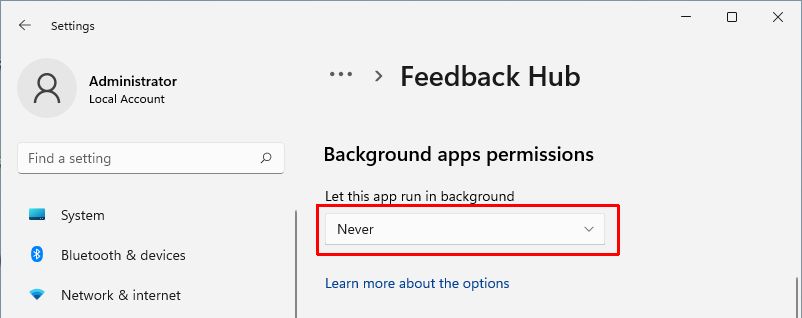
In Windows 11, the app list will also include apps that are not compatible with the Microsoft Store. But like in Windows 10, there is no option to control the background behavior from here. That will again be done using any settings available in the application itself.
#10 – Windows Update Configuration (Windows 10 and Windows 11)
In the latest Windows versions, Microsoft has tried to make improvements to Windows Update. This means that by default, the update service runs in the background, updates are downloaded automatically, and also installed automatically.
In itself, this is a good idea for keeping the Windows system up to date, but the download bandwidth and CPU time spent on this can negatively affect performance on other tasks or applications. Luckily there are ways to change the Windows Update configuration to reduce the bandwidth used, or delay the execution of Windows Update altogether.
Pause Windows Update
In Window 10, click Settings in the Start menu. Next, select Update & Security and then Windows Update.
Now click the Pause updates for 7 days option.
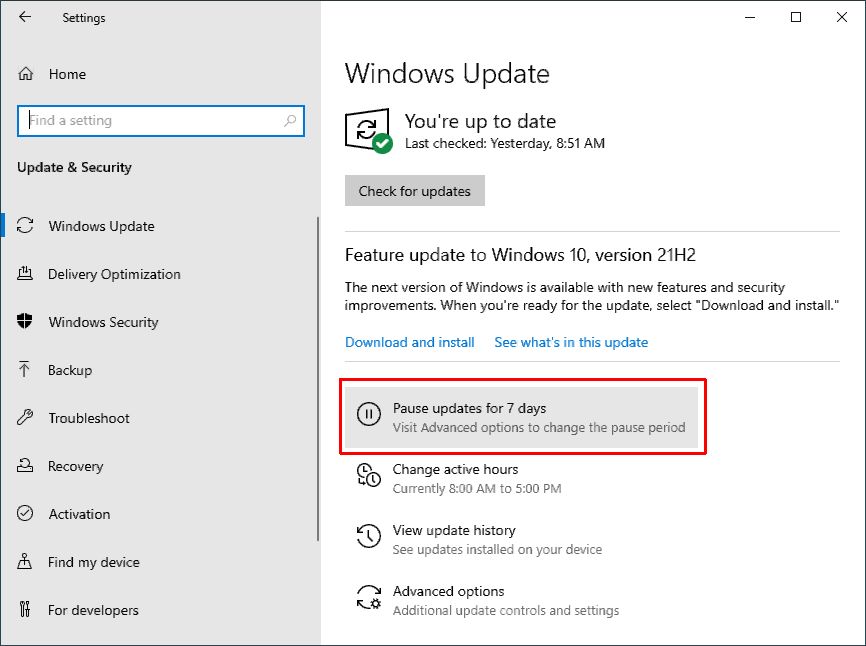
If you want to pause updates for more than 7 days, click Advanced options instead. Under Pause updates, select a date until which no updates should be installed.
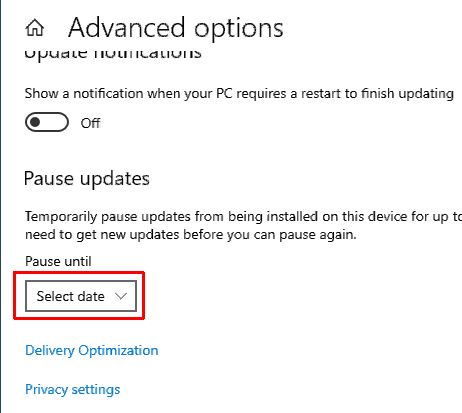
In Windows 11, open the Settings from the Start menu. Click Windows Update in the left-hand panel. Under Pause updates, click the Pause for 1 week button, or select a different duration in the drop-down list. Be aware that there is a limit to how long updates can be paused. If the limit is reached, new updates need to be downloaded and installed before updates can be paused again. This is a safety feature Microsoft build-in.
Limit Windows Update Download Bandwidth
Apart from Windows Update installation settings, you can also reduce the bandwidth used for downloading Windows updates. That way more bandwidth is available for other purposes.
Microsoft has made efforts to reduce the size of updates, but it really does not matter how fast they download. So I always configure the bandwidth for downloading updates to a minimum.
In Windows 10, open the Settings from the Start menu. Next, click Update & Security, followed by Advanced options. Next, locate and click the link Delivery Optimization. Next, click the Advanced options link. This will bring up the Download settings.
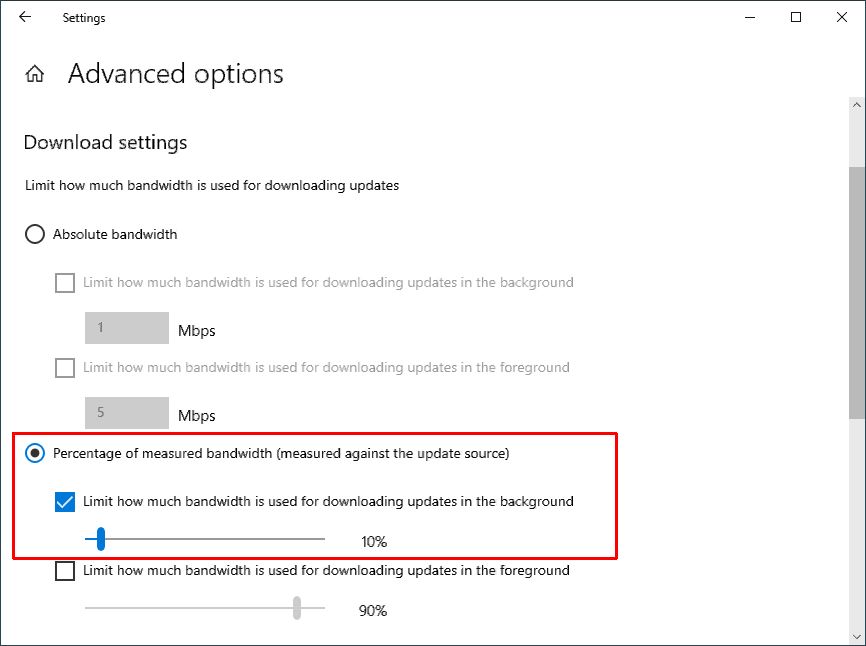
You can either use an absolute or percentage-based limit for downloading updates. In the example, I have used a 10% limit to illustrate the option.
#11 – Use ReadyBoost for better Windows Performance
ReadyBoost has been around since Windows Vista. We wrote about ReadyBoost back in 2008! And the feature is still supported on new Windows versions, including Windows 11.
ReadyBoost is a caching feature that uses a USB device. The feature is really only useful on slower systems, especially if they still use HDDs instead of an SSD. A fast USB port also helps, so using a USB 3 port over a USB 2 port is recommended. The throughput (or transfer rates) on the USB device also needs to meet certain requirements, otherwise, the ReadyBoost option will not be available.
Once plugged, simply open the File Explorer and click This PC in the left-hand panel.
Now locate the USB device in the right-hand panel, click it, and select Properties. In the Properties window, click the ReadyBoost tab. You can either use the complete USB device for ReadyBoost or specify a specific amount of storage space.
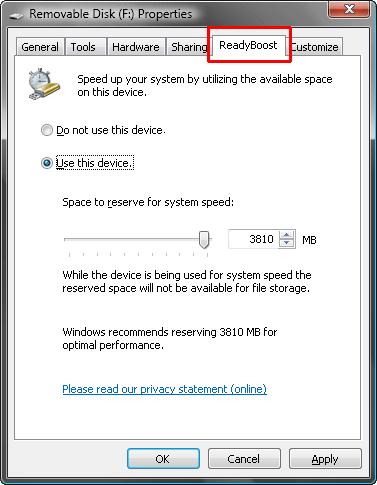
Note: If the ReadyBoost tab is not available, that means the feature is not supported for the selected drive.
#12 – Change a Program Priority
When it is not Windows performance in general that you want to address, but rather a specific program needs to perform better, you can try increasing the execution priority.
Start the Windows Task Manager by pressing the Ctrl + Shift + Esc keys at the same time.
In the Task Manager window, select the Details tab. In the list of processes, locate the application that needs a higher priority. Right-click the process, and in the popup menu click Set priority and then select the desired priority level in the submenu.
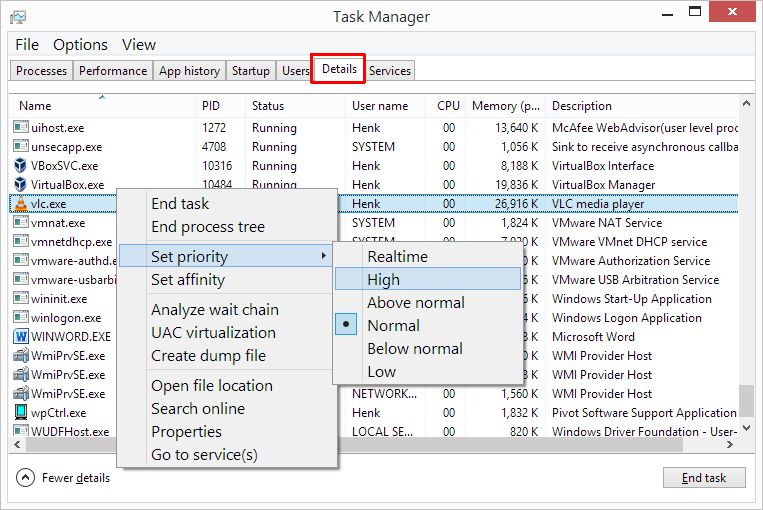
The result is that the process, which means the selected application, will get more CPU time assigned by the operating system. That also means that other things might seem slower…
Other Performance Tweaks for Windows Performance
With the above tips, improvements can already be made on a Windows level. In addition, there are some other tweaks that can help with performance, but these are depending on the hardware or software installed on the system. Here are some more things to look at:
GPU settings
Modern video cards are powerful and can be configured, and used for much more than just graphics rendering. Look for a vendor-specific option in the Control Panel to make changes (e.g, NVIDIA Control Panel, or the AMD Radeon software).
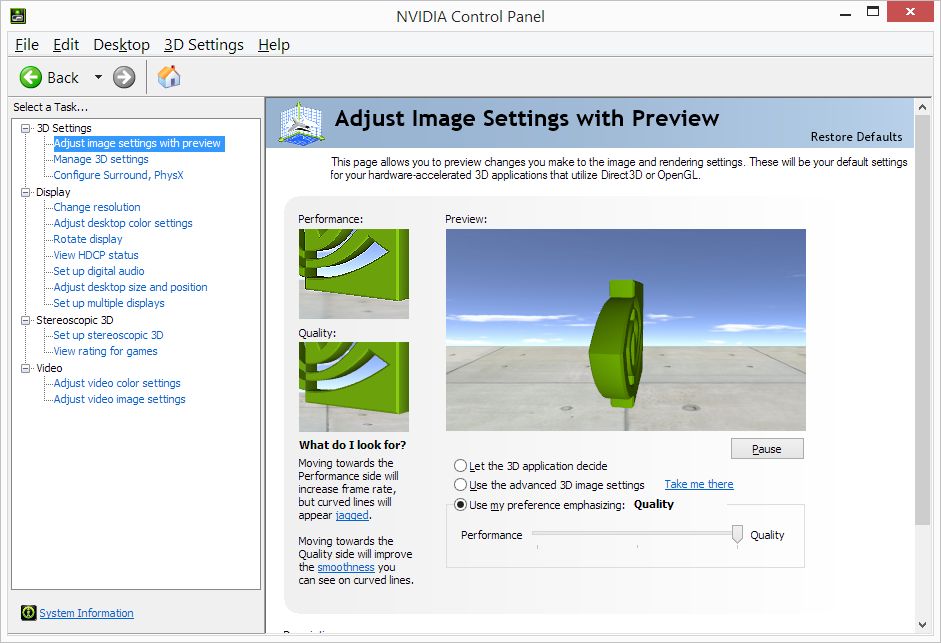
Certain aspects of the video and graphics rendering can be configured. Quality can be reduced for better performance for example. Modern graphics cards can also be used more and more to perform tasks that are traditionally executed by the CPU.
OneDrive Sync
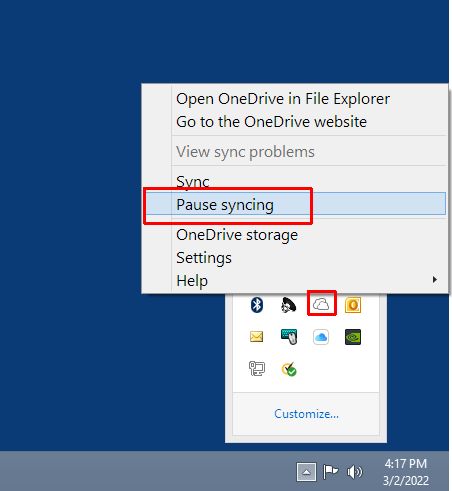
If OneDrive is installed and in use, it will automatically synchronize between the computer and the cloud storage. This will take processing time and Internet bandwidth. Temporarily stop this by right-clicking the OneDrive icon in the notification area of the Taskbar and then selecting Pause syncing in the popup menu.
Registry Cleanup
The Windows registry is where all configuration data is stored (it replaced all those individual .INI files from the early Windows versions). As a result of applications being installed, uninstalled, and general PC usage, the registry can contain invalid data. Speed impact on modern PCs is limited, but it is possible to clean up the registry.
This will require a third-party application. Most will find errors in the registry and fix them and offer a cleanup option as well. Make sure you make a backup of the registry before making any change though!
Restart Windows
If you are like me and leave the PC on for days on end, a simple reboot can do wonders.
We have covered some of the above point in the past for older Windows versions. But together with the newer, more specific options for Windows 10 and Windows 11, we hope to have given a fresh perspective on the aspect of optimizing Windows performance. Happy computing!


Thank you. It works.
@Fritz Liessling - Thank you for your feedback. I understand that you are looking for other resolutions, but within Windows…
Although the answer to this question is correct, it is really a cop-out answer. It's easy enough to find answers…
To the pcauthorities.com administrator, You always provide useful links and resources.
???? ?? ??? The Last of us