Activate DMA mode for IDE controller
Most computer systems these days relay heavily on a big and fast hard disk. During normal computer operation, the operating system accesses the hard disks frequently. Since hard disks become larger and larger, it is important that your hard disk is configured to operate at maximum performance.
One of the aspects that involve hard disk speed is Direct Memory Access, or DMA. In short, DMA allows a computer device to access the computer memory directly, without needing involvement from the CPU. This allows for optimum data transfer rates for these devices. Most hard disks these days are DMA capable. But they are not always running at maximum speed since the DMA mode can be configured incorrectly. In Windows XP and Windows Vista this configuration is part of the installation, Windows checks the DMA capability of the attached devices.
To manually activate the DMA mode for hard disks or other drives, like DVD drives, follow the steps below. The steps differ for Windows XP and Windows Vista.
Windows XP
- Open the Windows Control Panel.
- In the Control Panel, select Performance and Maintenance.
- Next, select System.
- In the System Properties dialog box, select the Hardware tab.
- Next, click the Device Manager button
- In the Device Manager Window, click the IDE ATA/ATAPI Controllers to expand it.
- Now right-click the Primary IDE Channel and in the popup menu, select Properties.
- In the Primary IDE Channel Properties dialog box, select the Advanced Settings tab.
- In the Transfer Mode field, make sure that for both Devices the selected entry is:
DMA if available. The Current Transfer Mode field will show the active transfer mode and this should match the maximum DMA mode supported by your device. - Now Click OK, and repeat these steps for the Secondary IDE Channel.

If the Current Transfer Mode in the Properties dialog box does not show any DMA Mode, you can try to force Windows to reexamine you hard drive for DMA capabilities.
Windows Vista
- Open the Windows Control Panel.
- In the Control Panel, select System and Maintenance.
- Next, select Device Manager. You might need to click Continue in the UAC dialog.
- In the Device Manager Window, click the IDE ATA/ATAPI Controllers to expand it.
- Now right-click all IDE and/or ATA entries, and in the popup menu, select Properties.
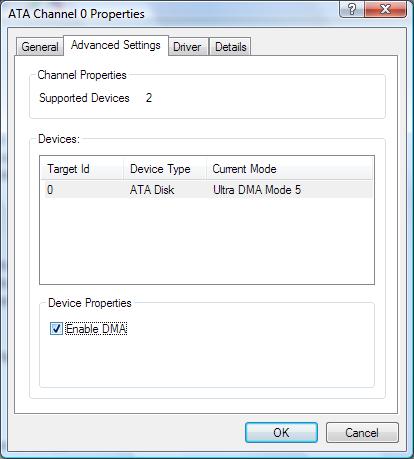
- In IDE Channel or ATA Channel Properties dialog box, select the Advanced Settings tab.
- In the Device Properties group, make sure that the Enable DMA checkbox is selected and click OK.

The Current Mode column in the Devices list will show the active transfer mode for all attached devices.
As mentioned at the start, the DMA mode and the use of DMA is critical to a fast computer. So if your computer is slow, make sure you check the DMA settings for your hard disks and correct the configuration when required. This will ensure Windows performance is not negatively influenced by the hard disk performance anymore.
For further disk performance optimization, make sure to check and optimize the performance settings on the hard disks themselves!


@Marc – The article is up and I added the link to the bottom of the article.
Thanks Anthony. I’ll wait fro the link!
@Marc – Not all controllers support this option. It also depends on the driver, but it could be the controller does not have the option, or the DMA is already turned on without a way to manually control it.
One more thing you can try is to enable the write caching and enhanced performance on the disk drives itself. I’ll put up an article on the and link to it from here.
Hi Anthony,
Need help!I’ve Windows Vista 64 bit on a Sony Vaio FW 248J – 4 gig – 500 gig SATA drive. I’m trying to activate the DMA box on Vista but I cannot find it! When I go to Device manager, I first click on IDE ATA/ATAPI then Intel(R)ICH9M-E/M SATA AHCI Controller and finally I right click on properties. At this point, I’ve looked all over for “the Advanced tap” to get into the DMA box and I cannot find it! I only get four boxes -General, Driver, Details,Resources- Thanks for yor help. Marc