How to Enable Game Mode on Windows 11
PC performance never seems to be sufficient when you try to play a game. In Windows 11, performance is a balance between power and battery usage and user experience. For games, however, Microsoft has included the option to set a Game Mode. This will ensure no CPU time is taken for non-essential processes and graphics and disk performance are optimal.
Enable Game Mode
In Windows 11, you can enable the Game Mode in the Settings.
- Open the Settings from the Start menu, or press the Windows + I keys at the same time.
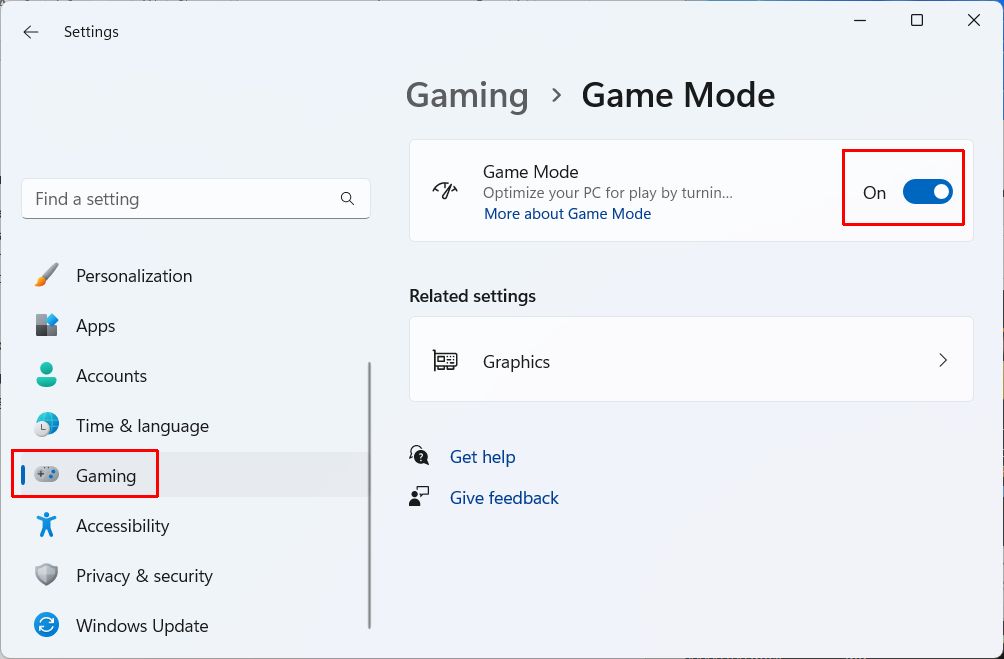
- In the Settings window, select Gaming in the left-hand panel.
- Next, click the option Game Mode.
- Toggle the Game Mode switch in the right-hand panel to On to enable it.

Optimize Windows 11 Graphics
In addition to the Game Mode in Windows 11, you can optimize the graphics system for windowed games. This setting is intended to improve performance in DirectX 10 and DirectX 11 compatible games. The setting allows these games to use the flip-model to reduce latency and improve frame rates. You can read more about that from Microsoft.
To activate this general graphics setting, use these steps.
- Open the Settings from the Start menu, or press the Windows + I keys at the same time.
- In the Settings window, select Gaming in the left-hand panel.
- Click the option Game Mode.
- Under Related settings, click Graphics.
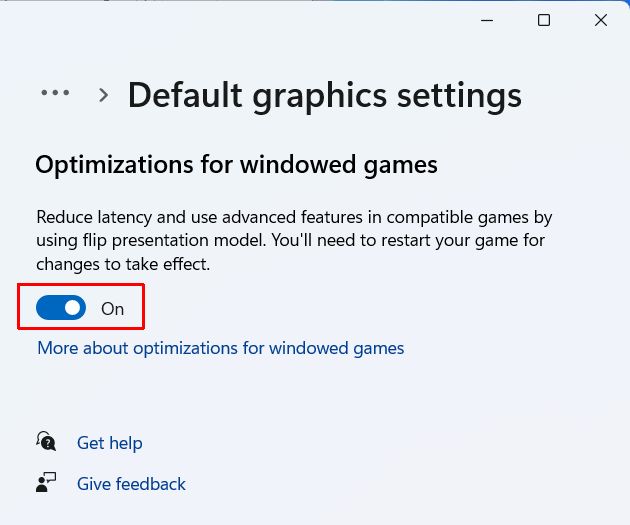
- Click the Change default graphics link.
- Toggle the option Optimized for windowed games to On.

Select Graphics preference for Games
Apart from the generic settings mentioned so far, there is an option in Windows 11 to specify which graphics card is used by a game if you have multiple graphics cards installed in the computer. This only applies to a system with multiple graphics cards installed of course. But if you are a gamer, chances are you picked a computer that has this feature.
To use this option, and select your high-performance graphics card to be used for your games, follow these steps.
- Open the Settings from the Start menu, or press the Windows + I keys at the same time.
- In the Settings window, select Gaming in the left-hand panel.
- Click the option Game Mode.
- Under Related settings, click Graphics.
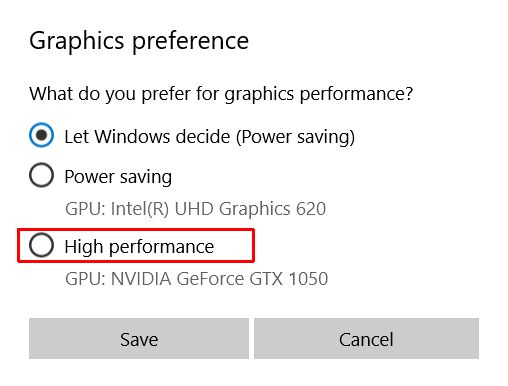
- In the App list, scroll down until you see the name of the game in the list. Click it, and then click the Options button that shows.
- Now select the High performance option.

- Click the Save button to confirm.
Note: After changing the graphics preference for an App, you can change it back to the Windows default by clicking the Reset button next to the Options button when you click the App again in the App list. This will allow Windows to automatically choose the graphics card for the App.
Apart from these graphics settings, games will also benefit from being executed when the computer is running in High-Performance mode. That is relevant if you are using a laptop for gaming, as you might be running it on battery power. Preferably, plug the power when playing games on a laptop in Windows, but in any case, make sure to set the power mode to high-performance rather than balanced.


Thank you. It works.
@Fritz Liessling - Thank you for your feedback. I understand that you are looking for other resolutions, but within Windows…
Although the answer to this question is correct, it is really a cop-out answer. It's easy enough to find answers…
To the pcauthorities.com administrator, You always provide useful links and resources.
???? ?? ??? The Last of us