Disable Ads in Windows 11
Advertising is a revenue model for a lot of businesses these days. Especially online, you are confronted with ads in almost everything you look at. Microsoft is no different and you’ll see more advertisements in Windows 11 than ever. Advertisement is not just showing an ad on your desktop in various places but also promoting third-party applications using preinstalled applications. Bloatware anyone? In this article, I’ll explain how you can minimize the exposure to advertisements in Windows 11, and how to disable ads in Windows 11.
Some instances of Microsoft promoting its own products cannot be prevented. In the latest Windows 11 updates, where the Get Help option is starting to replace the Troubleshooting options, advertisements of Teams are shown. The only effective way to deal with that is to prevent you system, or network, to retieve advertisement. A possible solution is PiHole, but it is not for everyone.
Remove Preinstall Applications
Promoting software by preinstalling applications on a computer is one of the oldest methods of advertising. PC manufacturers make deals with software vendors to include a free version of their software. Once you start using it, they hope you buy a license or subscription.
This is the same technique that was used in the recent past with software vendors bundling other products. When you install a piece of software, another piece of software also gets installed. Unless you explicitly disable the additional installation of the third-party app. Bundling is almost completely banned now because Microsoft and anti-virus programs do not allow such installers anymore (or they are flagged as malware).
Odd then, to see apps preinstalled on Windows 11 that are not from Microsoft. Not all are actually installed, but some are links to install them when you click them. Examples are Hulu, Twitter, Instagram, and Spotify.
If they are installed, they take up space that you can’t use otherwise. If they are not installed, they might trigger you to use something that you might not want. There can be better alternatives that are simply not considered anymore for the wrong reasons.
Uninstalling Apps in Windows 11
- Open the Start menu using the Start button, or by pressing the Windows key.
- Select Settings.
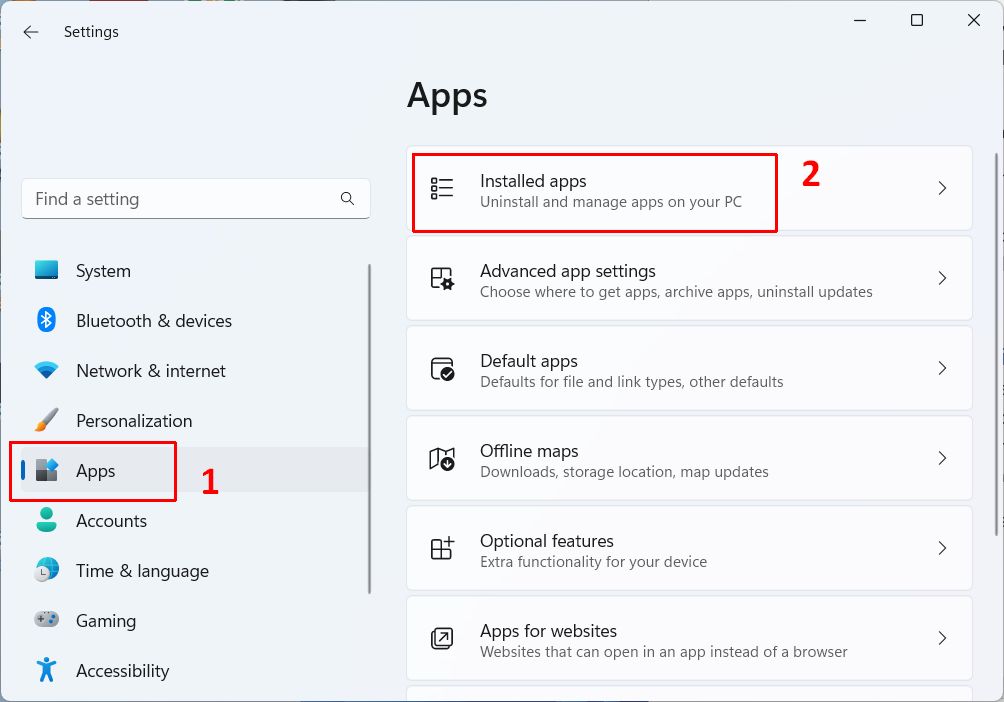
- In the left-hand pane of the Settings window, click Apps (1).

- Next, click Installed apps (2) in the right-hand pane.
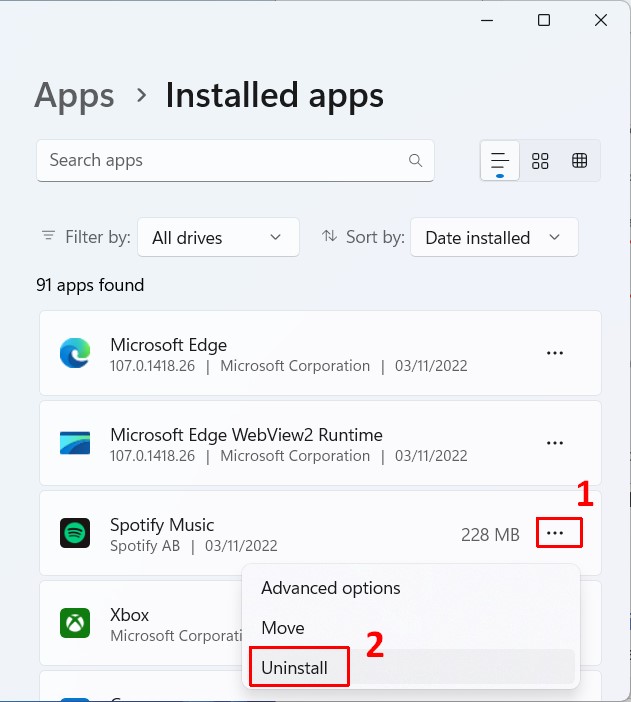
- Locate the app to uninstall, and click the 3 horizontal dots (1) next to the app name.
- In the context menu that shows, click the Uninstall option (2).

- Repeat steps 5 and 6 for all apps you want to uninstall.
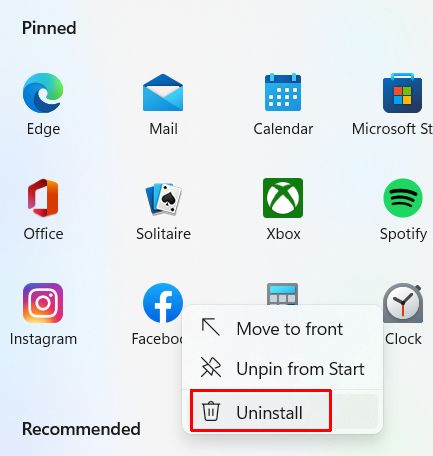
Apps that are not actually installed yet will not show in the Installed apps list. To remove these apps, uninstall them from the Start menu directly.
- Open the Start menu.
- Right-click the icon of the app to remove it.
- In the context menu, click the Uninstall option.

Note: You can see that the app is not actually installed yet because the Pin to taskbar and App settings options are missing from the context menu.
Disable notifications in Windows 11
Windows 11 has a few settings that allow it to show information related to the app being used or the task being executed. These notifications are intended to help users learn about Windows 11 and the things they can do. Examples are lock screen notifications, suggestions in the Settings app, notifications in the File Explorer, and general Windows 11 notifications.
Here is how to easily disable these features if you are not interested in getting this type of information through notifications.
Lock Screen notifications
Windows 11 can show “fun facts, tips, tricks, and more” on the lock screen. But who decides what is shown? And how is this decided upon? If you are not interested in being presented with information (ads?) from Microsoft on the lock screen, you can disable the option. You can also take it a step further and disable the information sharing with Microsoft.
- Open the Settings app from the Start menu, or press the Windows + I keys.
- In the left-hand pane, click the Personalization option.
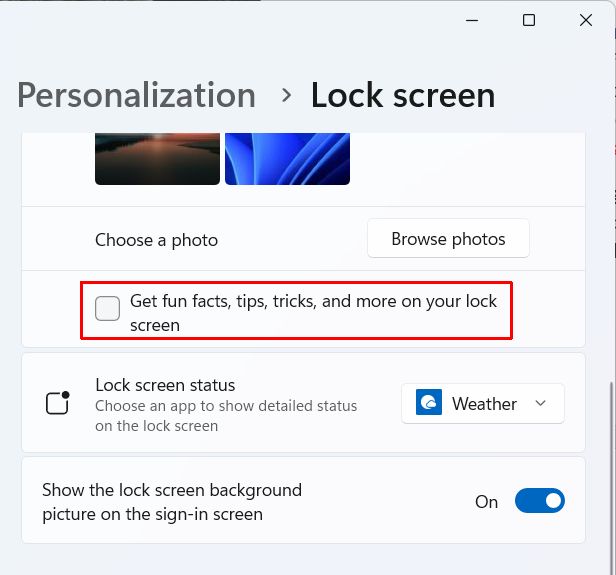
- In the right-hand pane, click the Lock screen option.
- Now uncheck the box named “Get fun facts, tips, tricks, and more on your lock screen”.

- Close the Settings window.
File Explorer notifications
Even the File Explorer in Windows 11 (and previous versions of Windows) has an option to show notifications. Although the wording of the option does not seem to indicate advertising, the notifications can certainly be used to show information including advertising.
To disable these notifications in the File Explorer, follow these steps.
- Open the File Explorer.
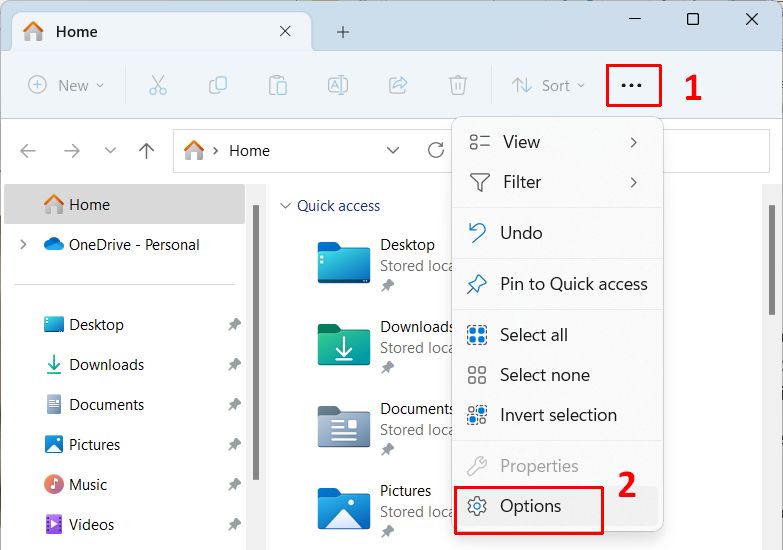
- In the top right of the File Explorer window, click the 3 horizontal dots (1).

- In the drop-down menu, click the Options entry (2).
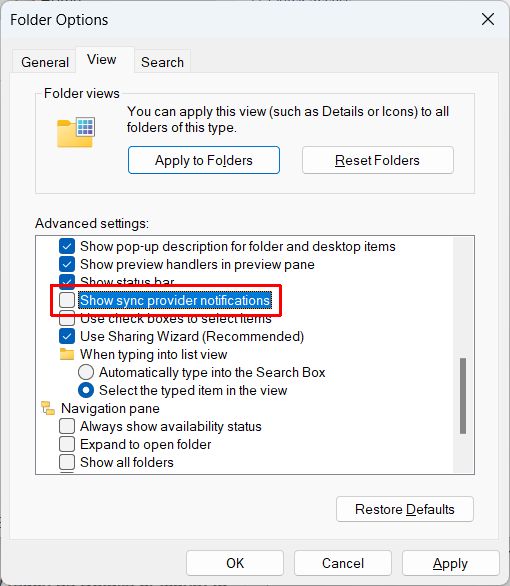
- In the Folder Options dialog box, select the View tab.
- Now scroll down in the Advanced settings list until you see the option Show sync provider notifications. Clear the checkbox in front of it to disable it.

- Click the OK button to confirm and close the Folder Options dialog box.
This might only have been intended for showing valid notifications regarding sync status updates for OneDrive, but ads have been shown in previous editions of the File Explorer related to OneDrive and Office365. Unless you really need sync notifications, you might want to disable the option.
Suggestions in Settings
The Settings app in Windows 11 is like an addition to the Control Panel which we know from earlier Windows versions. Many features in Windows 11 are controlled through the Settings app. So, it seems like a weird place to offer suggestions to the user, but it does. The notifications are intended to help discover new features in Windows 11 and get tips regarding apps and content.
No need for suggestions in the Settings app? Turn them off with the steps below.
- Open the Settings app from the Start menu.
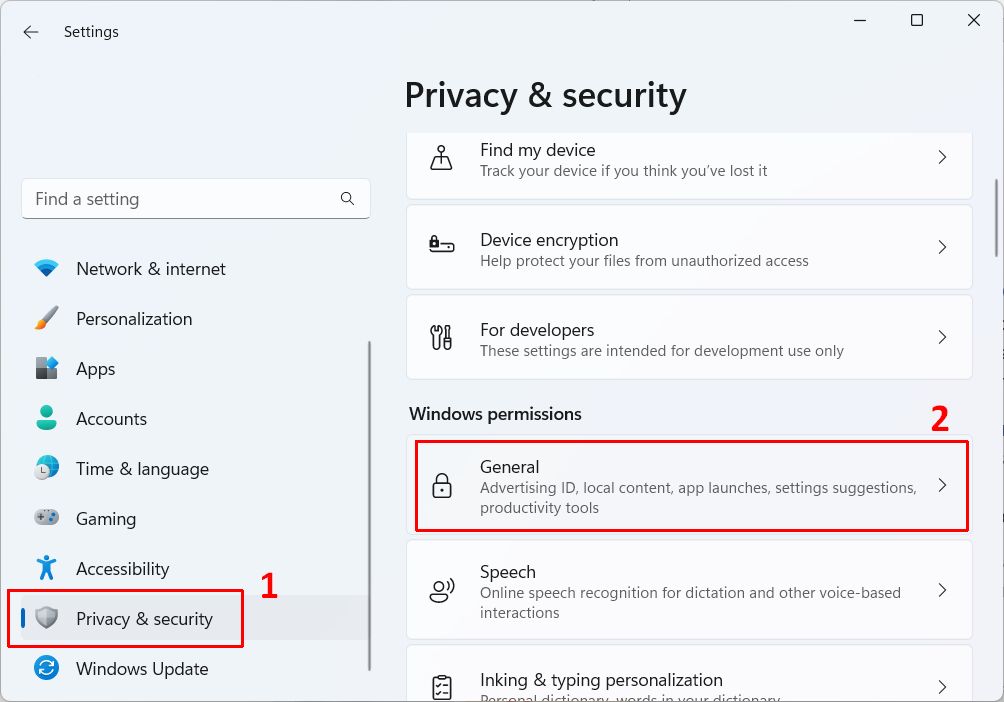
- In the left-hand pane, click the Privacy & security option.
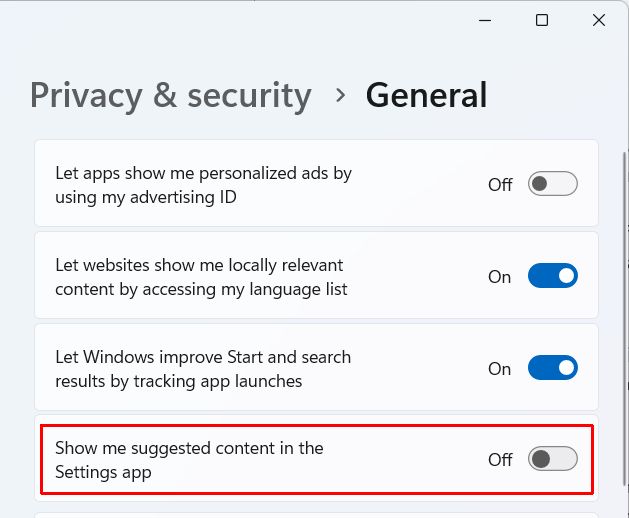
- In the right-hand pane, locate Windows permissions and click the option General.
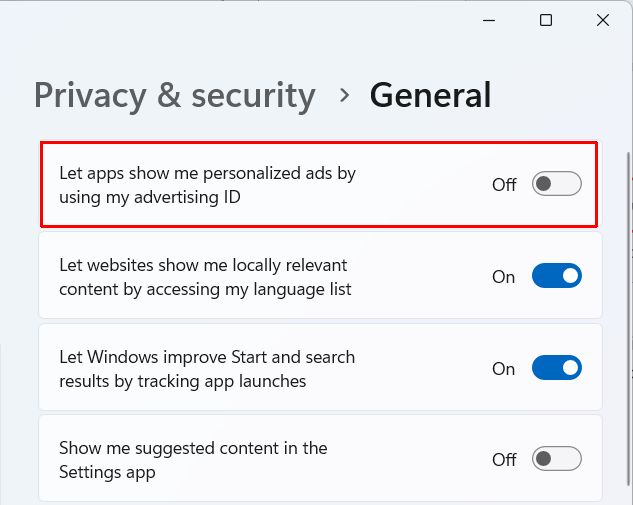
- Toggle the switch for “Show me suggested content in the Settings app” to Off.

- Close the Settings app.
That is it, you will no longer see suggestions in the Settings app.
Windows 11 general notifications
Tips and suggestions can be useful when you start using Windows 11. But if you have used it for a while, this feature might not be needed or even desired anymore. There are two options you need to disable to achieve that.
- Open Settings from the Start menu.
- Click the System option in the left-side pane.
- Next, click Notifications in the right-side pane.
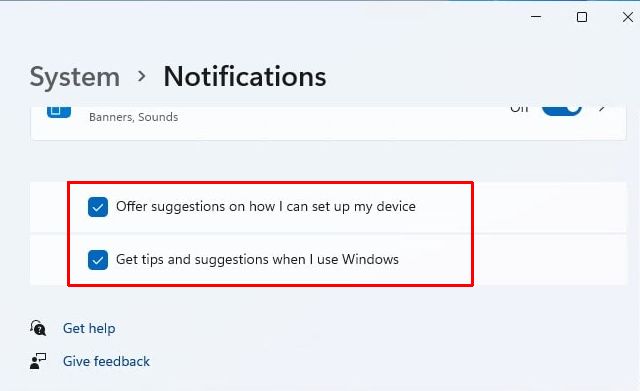
- Uncheck the options “Offer suggestions on how I can set up my device” and “Get tips and suggestions when I use Windows”.

- Close the Settings window.
Windows 11 will no longer show tips and suggestions after completing these steps.
Privacy Protection in Windows 11
One of the best methods to prevent (effective) advertising in Windows 11, is to disable personal information and usage data to be shared. Location data, usage data, diagnostic data, whatever it is called, is personal data that you might not want to be used for targeted advertising.
Disable the advertising profile
Windows 11 creates a personalized advertising profile for each user. The profile can then be used by apps to show you personalized ads. If you find ad targeting using your personal profile too invasive of your privacy, you can disable this option in Windows 11.
- Open the Settings app (Windows + I keys).
- In the left-hand pane, select the Privacy & security option (1).
- In the right-hand pane, click the General option (2) under Windows permissions.

- Now turn Off the option “Let apps show me personalized ads by using my advertising ID”.

Note: If you want to further protect your privacy, you would also turn off the next two options. Access to the language list and tracking app launches tells Microsoft about your system usage. - Close the Settings window.
Keep in mind that this setting only pertains to the usage of the advertising profile, not the creation. Minimizing the data available to Microsoft for keeping an advertising profile is covered in the next sections.
Limit data sharing in Windows 11
Disabling the usage of data is one, but preventing the sharing of data is even better. Limited data will mean a less accurate advertising profile, which is better from a privacy perspective. So, use the steps below to reduce the amount of data that is shared with Microsoft in Windows 11.
- Open the Settings app.
- In the left-hand pane of the Settings window, click the Privacy & security option (1).
- In the right-hand pane, click the option Diagnostics & feedback (2).

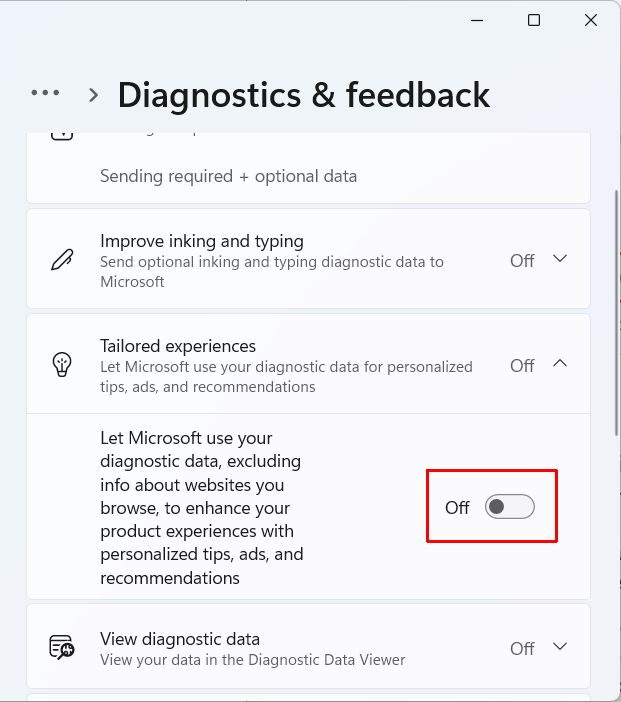
- Click the option Tailored experiences. This will open up a panel showing a switch with the text “Let Microsoft use your diagnostic data, excluding info about websites you browse, to enhance your product experience with personalized tips, ads, and recommendations”.

- Toggle the switch to Off.
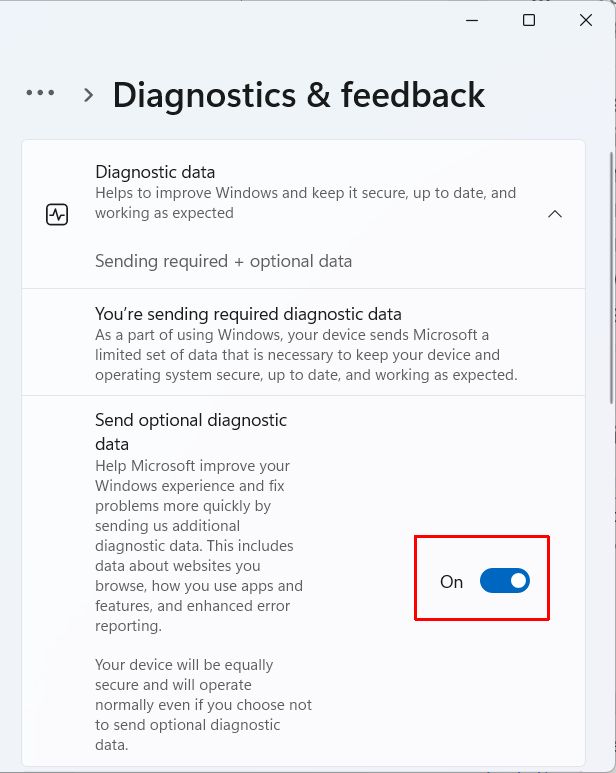
- Next, click the option Diagnostic data in the right-hand pane.
- Toggle the switch for Send optional diagnostic data to Off.

- Next, click the Personalization option in the left-hand pane of the Settings window.
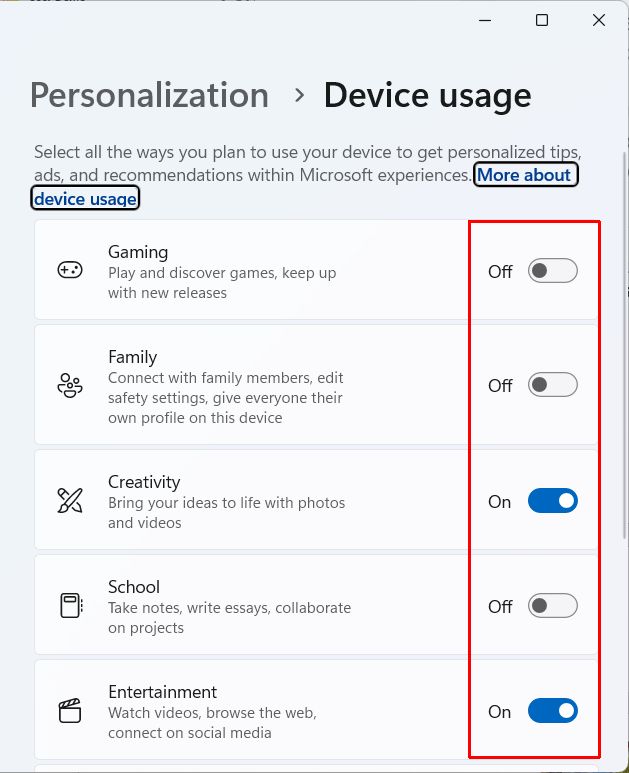
- Scroll all the way down until you see the setting Device usage. Click it.
- In the right-hand pane, toggle all switches to the Off position.

These switches are based on the questions asked during the initial Windows 11 setup. They do not control app installation or settings but only tell Microsoft more about the intended usage of the device. - Close the Settings window.
Final notes on advertising
This story would not be complete without a note about the never-ending discussion about advertising in general. It is a method of earning money, simple as that. And if you want something for free, it may result in advertising being used to make sure it can be free. But Windows 11 (and Windows 10) are not free. You either pay for them, or the OEM vendor pays for them.
So, should recommendations for Microsoft services be allowed? Upsells for OneDrive storage? Or even, use Edge instead of Chrome? The discussion will remain I think, and for me the most important aspect is transparency. In general, companies try to get away with what the law allows, or what users accept. As a user, I just wish it was easy to choose: enable or disable the ads. Not through 10 different settings, below-the-fold options in a window, or ambiguous wording.




Thank you. It works.
@Fritz Liessling - Thank you for your feedback. I understand that you are looking for other resolutions, but within Windows…
Although the answer to this question is correct, it is really a cop-out answer. It's easy enough to find answers…
To the pcauthorities.com administrator, You always provide useful links and resources.
???? ?? ??? The Last of us