Optimize Windows 11 for Gaming
Most gamers will already be familiar with the Game Mode in Windows 11. This mode helps to optimize Windows 11 for gaming by prioritizing game processes over others to make them run faster. In addition, with game mode active, the Windows Update process is also prevented from installing updated drivers and rebooting.
But there are a few other settings, including security settings in Windows that can be disabled to improve the PC’s performance. Although you lower the security protection during that period, these settings can help improve Windows 11 gaming performance.
Select the Graphics Card for Gaming
Most modern PCs have integrated graphics cards. This would be part of the chipset in systems with an Intel chipset (Intel HD, UHD, or Iris Xe graphics). For AMD the integrated graphics are referred to as accelerated processing units (APU). And although their performance has improved over the years, onboard graphics cards cannot be compared with dedicated graphics cards like Nvidia and AMD cards.
So, for best game performance, you would use a system with a dedicated, high-performance graphics card, or add a high-performance graphics card (in the case of a desktop PC).
To ensure Windows 11 uses the best graphics card in your system for gaming, the graphics card needs to be selected as the default, or selected for the specific game (app). In most cases, Windows will already select the appropriate option, but to manually select the card use the steps below.
- Open the Windows Settings from the Start menu, or press the Windows + I keys.
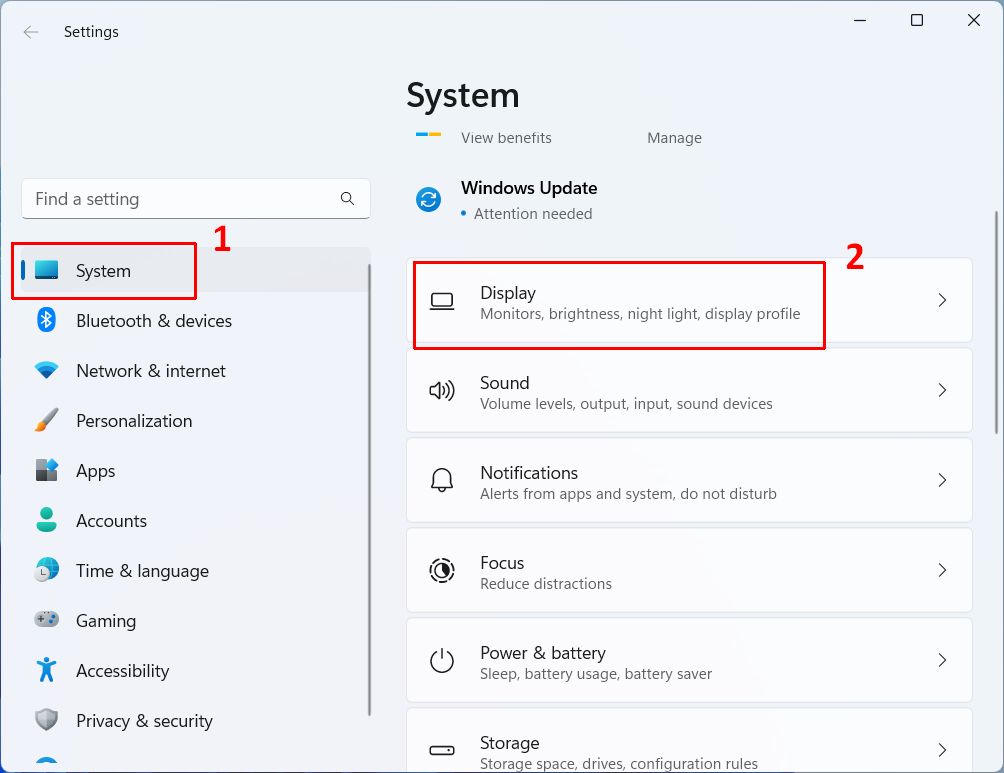
- In the Settings window, click System in the left-hand panel (1).

- Next, click Display in the right-hand panel (2).
- Scroll down until you see Related settings, and then click Graphics.
- Now, scroll down in the apps list until you see the gaming app you want to run.
- Click the game app, and then click the Options button.
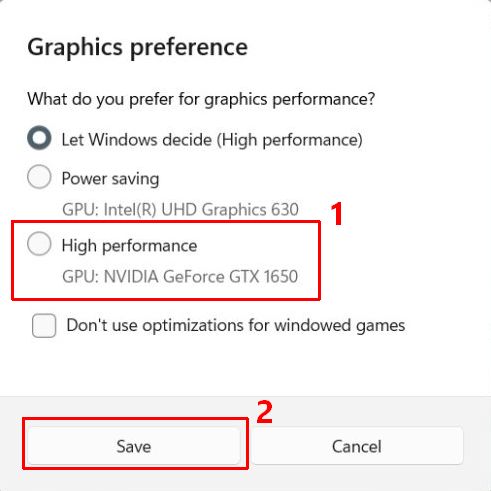
- A popup window will show, offering three options. Select the High-performance option (1) and click Save (2).

Note: The checkbox labeled Don’t use optimization for windowed games can be used to disable optimizations for games that use DirectX rendering and show in a window (can be borderless). Since this reduces latency, it is best to leave it on for most modern games.
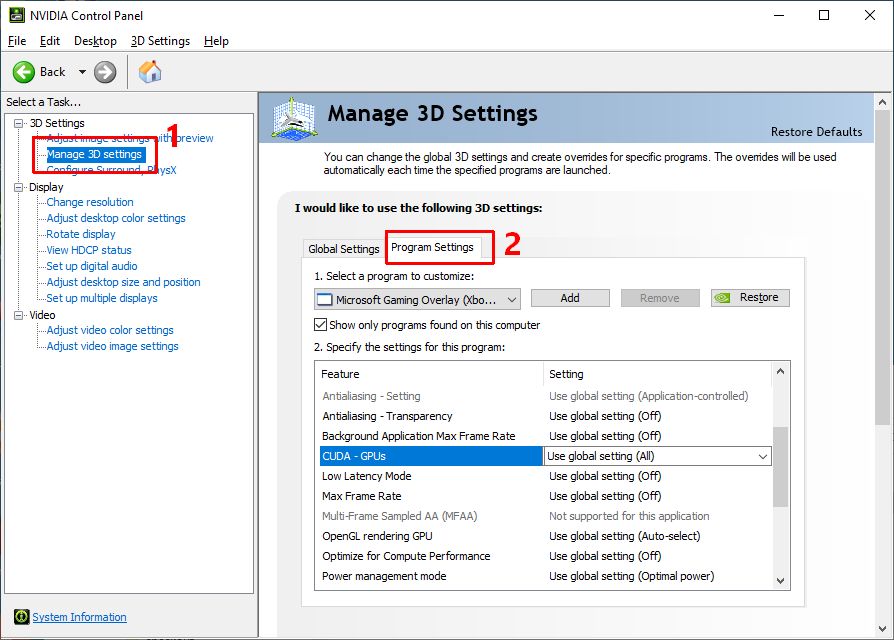
Apart from within Windows Settings, you can also change the graphics card preference in the dedicated apps that Nvidia provides. If you have the Nvidia Control Panel installed, you can select the Manage 3D settings (1) option to change Program Settings (2). This gives more control over specific features to use rather than just a graphics card selection.
AMD uses the Catalyst Control Center to configure graphics card options. Use the 3D Application Settings under Gaming in the left-hand panel to override any default settings per application (game).
Enable Game Mode
Enabling Game Mode is a step that should be taken first. Make sure to enable the Game Mode in Windows 11 before starting your game. I have actually covered this in an earlier article with some other options for better performance.
- Open Settings from the Start menu.
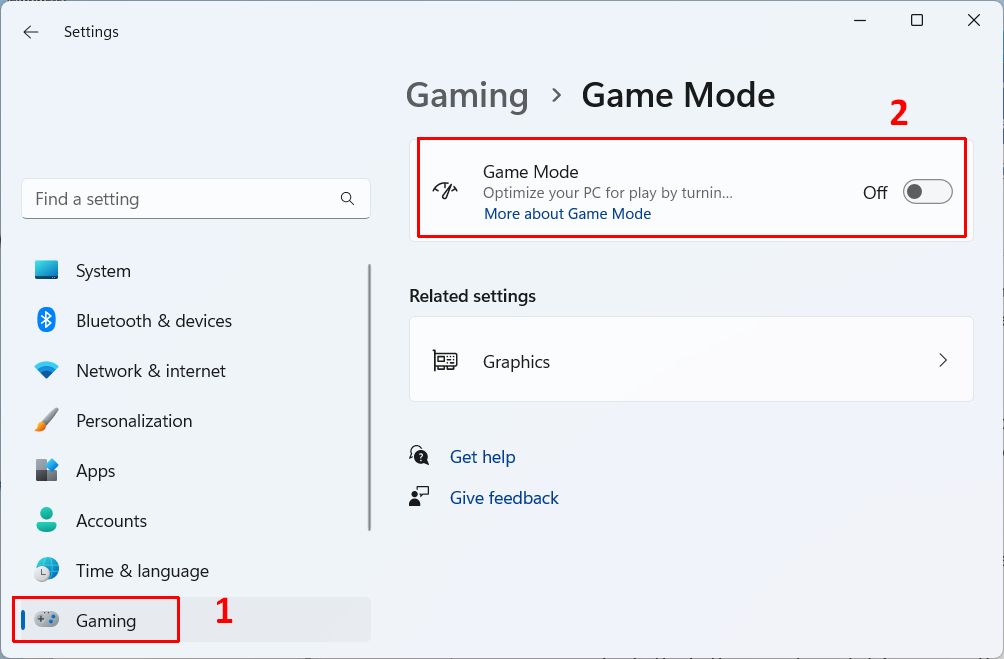
- In the Setting window, click Gaming in the left-hand pane (1).
- Now select Game Mode in the right-hand pane.
- Toggle the switch for Game Mode to On (2).

- Close the Settings window.
After this, start your game and benefit from a faster gaming experience.
Change Security Settings to Optimize Windows 11 for Gaming
As observed by Microsoft as part of the Windows 11 feedback, some settings help improve performance for gaming. There are two options that can be disabled, virtualization and memory protection. Both options can help improve game performance on your PC.
Since these settings do have a benefit to the ‘normal’ Windows 11 operation (Microsoft has the, enable by default), it is recommended to only make these changes for actual gamne play. Once you are done, it is recommended to turn them on again.
Disable Virtualization
Windows 11 has something called virtualization, or Virtual Machine Platform. Although this is a useful feature for enabling virtual systems to run, it does involve processing that is not beneficial to performance. It is like the concept of multi-tasking, nice to do things in parallel, but if one thing was done at a time, it would be completed faster in general.
So, disabling virtualization in Windows 11 can help improve gaming performance since more CPU time is available for the game itself. The feature is enabled by default on Windows 11, so make sure to check the setting if you want to run your games faster.
- Open Settings from the Start menu.
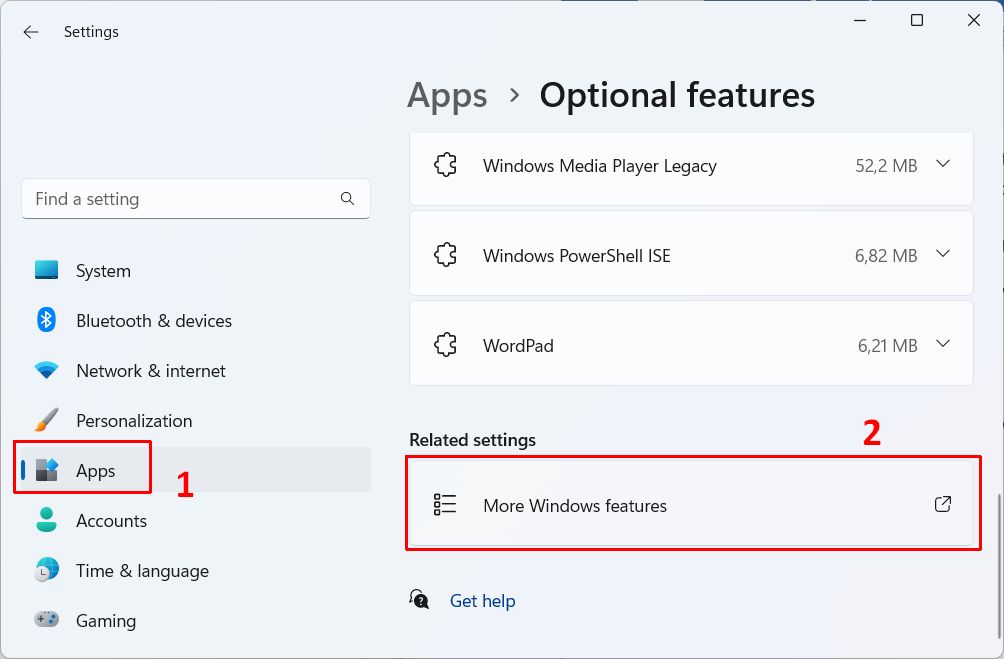
- In the Settings window, click Apps in the left-hand panel (1).
- Click Optional features in the right-hand pane.
- Scroll down to Related settings, and click More Windows features (2).

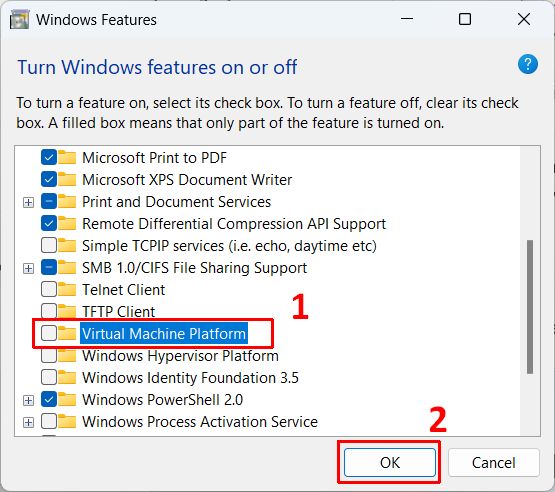
- In the Windows Features window that opens, scroll down to Virtual Machine Platform.
- Clear the checkbox in front of the option to disable the Virtual Machine Platform feature (1).

- Click OK to continue (2).
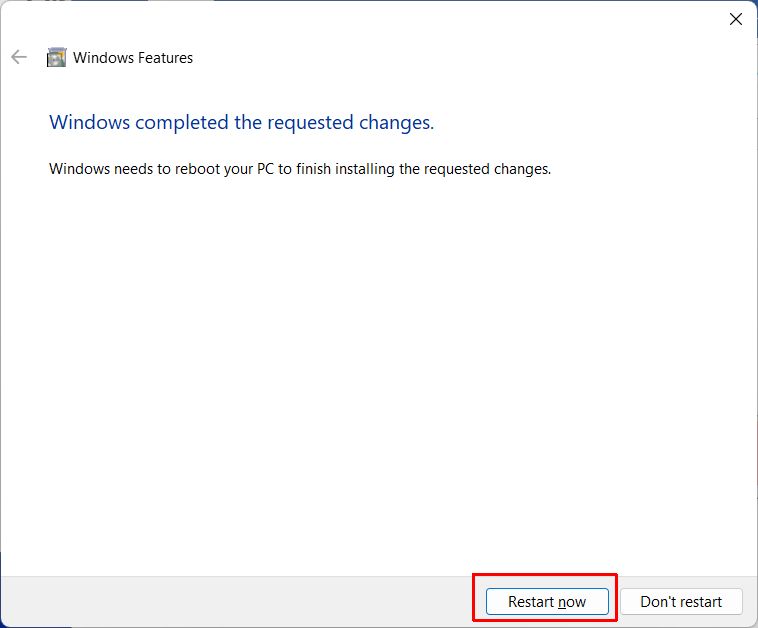
- Wait for Windows to apply the changes.
- Click Restart now to reboot your PC and let the changes take effect.

Disable Memory Integrity
Memory Integrity is part of the core isolation option in Windows 11. This option will make sure only signed and trusted drivers are loaded in Windows 11. It also prevents malicious code from being injected and executed. So, unlike virtualization, disabling the Memory Integrity option will reduce the security protection in Windows 11.
But since testing has shown that this setting does affect performance, you can still decide to disable the option for better gaming performance on Windows 11. Just make sure to only disable it during games and re-enable it after you are done playing the game.
To disable Memory Integrity on Windows 11:
- Open Settings from the Start menu.
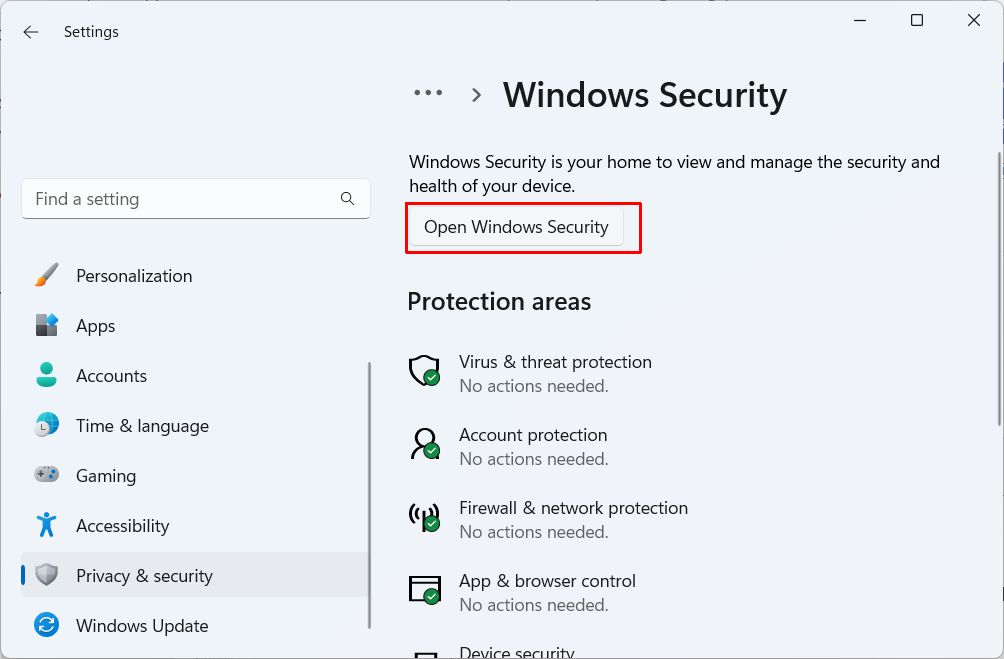
- In the Settings window, click Privacy & security in the left-hand pane.
- Next, click Windows security in the right-hand pane.
- Now click the Open Windows Security button.

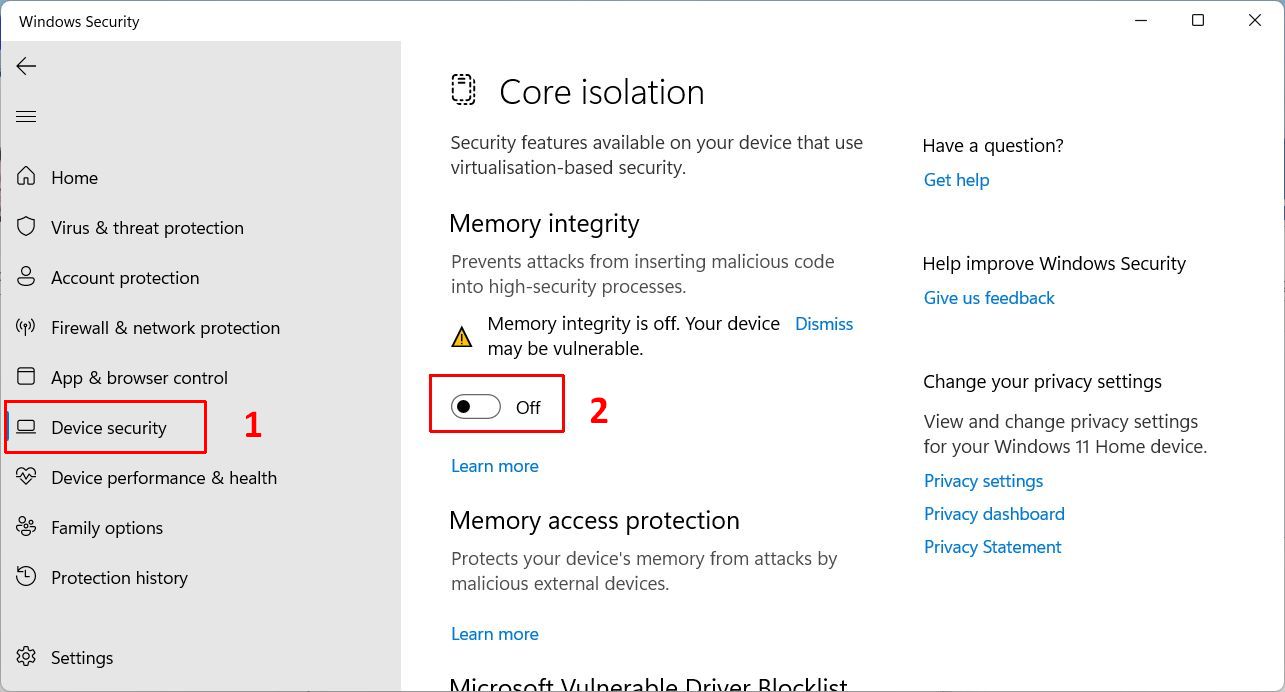
- In the Windows Security window, click Device security in the left-hand pane (1).
- Under Core isolation, click the Core isolation details link.
- Now disable Memory integrity by toggling the Memory integrity switch to Off (2).

Note: The option may already be disabled if you have any device drivers installed that are not considered secure. Try turning the feature on and then click the Review incompatible drivers link to find incompatible drivers. - Restart your PC to have the changes take effect.
For further gaming options on Windows 11, make sure you also check out the Xbox Game Bar and the Xbox Game Bar Settings.


Thank you. It works.
@Fritz Liessling - Thank you for your feedback. I understand that you are looking for other resolutions, but within Windows…
Although the answer to this question is correct, it is really a cop-out answer. It's easy enough to find answers…
To the pcauthorities.com administrator, You always provide useful links and resources.
???? ?? ??? The Last of us