How to Optimize Searching in Windows Vista
With the large number of files on personal computers, the problem of accessing these files in an efficient way becomes more difficult. Although folders can be used to organize files, many of us know that it is hard to think of the ideal folder structure and stick to it. One of the things that help us find our files is the search function in Windows. And to make the search function perform fast, Windows uses an indexing mechanism.
The Vista indexing can be a real help if you need to find files on a disk with a large amount of documents, especially if they’re not logically organized. But an index is basically something extra, requiring disk space and processing time to create and maintain. So take a look at the Vista indexing settings to ensure you have got it configured for best PC performance.
How to Access Vista Indexing Settings
The configuration of the Vista indexing is accessible through the Control Panel.
- Click the Start menu and select Control Panel.
- Next, select System and Maintenance, followed by Performance Information and Tools.
- In the Task panel on the left hand side, select Adjust indexing options.
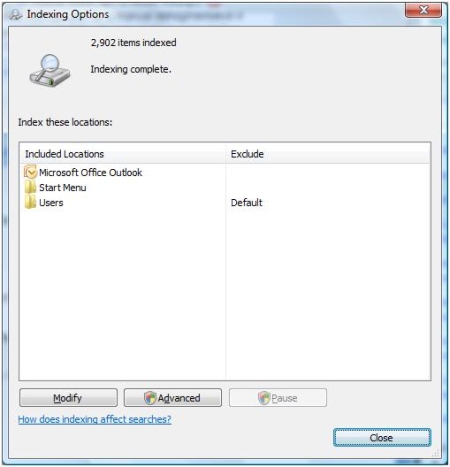
- Now we can see the locations that are indexed on the PC. By default these will include only the user files.

How to Change What is Indexed in Vista
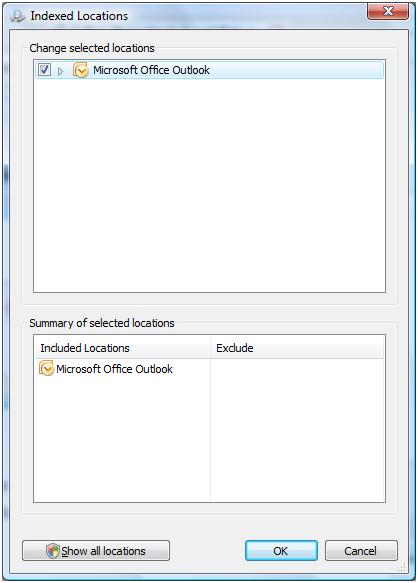
The first step you can take to ensure you optimize indexing in Vista is to check and configure the locations that are indexed. To do this, click the Modify button in the Indexing Options window. Now you will see the Indexed Locations window, although it will not show all locations yet.

Click the Show all locations button to display all locations that can be indexed. If you have User Account Control enabled, you will need to click Continue in the UAC dialog box.
You can now browse your drives and select additional locations to index, or remove selected locations from the index. You will notice that not all locations can be indexed, and this is not recommended as well. Indexing locations with system or application files is not recommended by Microsoft, as it will make the index too large and the search will become slower rather than faster.
Once you are done selecting the locations to be indexed, click OK to close the Indexed Location window.
How to Change the Location of the Index in Vista
It was mentioned earlier that the index files needs disk space and require processing. This means that the location of the index files actually influences the performance of the indexing and searching. Even better, we can change the location of the index files in Vista.
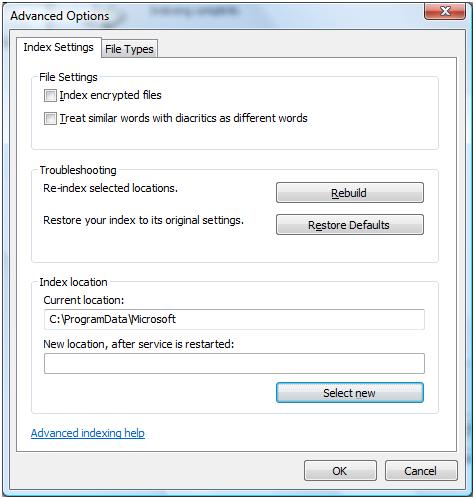
- In the main Indexing Options window, click the Advanced button. If User Account Control is enabled, click Continue.
- In the Advanced Options window, we see the Current location for the index. To change it, click the Select new button.
- A Browse For Folder dialog window is displayed, where you can select the new index location.
- Click OK once you selected the new location for the index. The new location will now be shown in the second text box.Note: The new index location will not be active until the service is restarted, so typically after a reboot.

When you want to change the index location in Vista, consider that the indexing and searching will be faster if you move the indexing location to a separate hard disk. If that is not available, you can use a different drive or partition. What is important is that you move it away from the system drive, since that is so heavily used already.
How to Change which Files are Indexed in Vista
Earlier we saw how to change the locations that are indexed, but which files are actually indexed at these locations? This is determined based on file extensions, the last part of the filename behind the period.
Again, we can configure these file types to optimize the indexing performance. Removing file types that you never search for anyway, and adding new file types that have not been recognized by the indexing.
- In the main Indexing Options window, click the Advanced button. If User Account Control is enabled, click Continue.
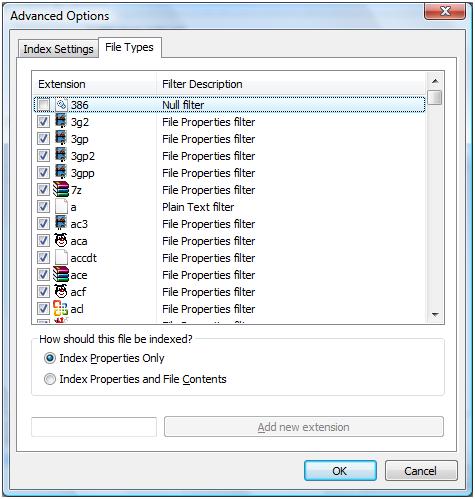
- In the Advanced Options window, select the File Types tab.
- You can now select and clear the checkboxes in front of the extensions to include or exclude them in the indexing process.
- In addition, you can indicate of the file properties are indexed or if the file contents should also be indexed. Although searching for the content of a file can be handy, you want to select only file types that you actually search for in the content indexing (like text documents).
- If you can not find the extension you want to index, you can add it. Type the new file extension in the text box and click the Add new extension button.
- Click OK once you are done.

Using these index configuration options, you can tweak the vista indexing to your preferences and make sure performance is suited for your PC.
If you completely do not want to use the Vista Search, you can disable the service, similar to disabling the indexing service in Windows XP.

Thank you. It works.
@Fritz Liessling - Thank you for your feedback. I understand that you are looking for other resolutions, but within Windows…
Although the answer to this question is correct, it is really a cop-out answer. It's easy enough to find answers…
To the pcauthorities.com administrator, You always provide useful links and resources.
???? ?? ??? The Last of us