Unable to send and/or receive e-mail in Outlook Express
This is one of the most common problems, which can be quite annoying if you are relying on your e-mail. Even asking for help through e-mail can become a problem.
Outlook Express will inform you of send and receive problem through the progress window it shows. A receiving error could result in:
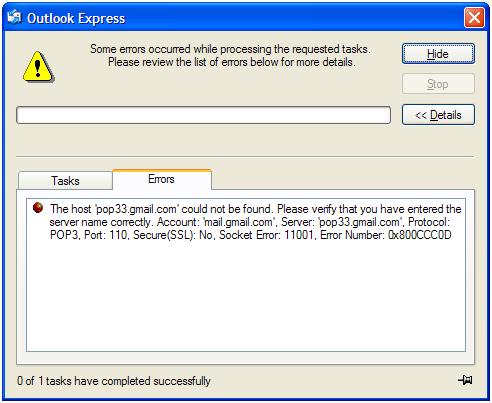
In this case a simple typing error for the receiving e-mail server to illustrate the problem reporting. Important is to note the Error Number in the error message. This error number can help us solve the problem.
But before we look at the details of each error message and what they mean, let’s first follow the basic steps to analyze and solve Outlook Express problems related to sending and receiving.
Step 1 — Make sure your internet connection is working.
By default Outlook Express will use the some connection as your Internet Explorer. So start the Internet Explorer and browse to a website like www.microsoft.com or www.google.com. If that works, we know the connection works.
If this does not work, you will need to troubleshoot your internet connection first.
Step 2 — Check your Outlook Express connection configuration.
In this step you will make sure that your settings are correct. Open the Outlook Express settings by clicking Options in the Tools menu.
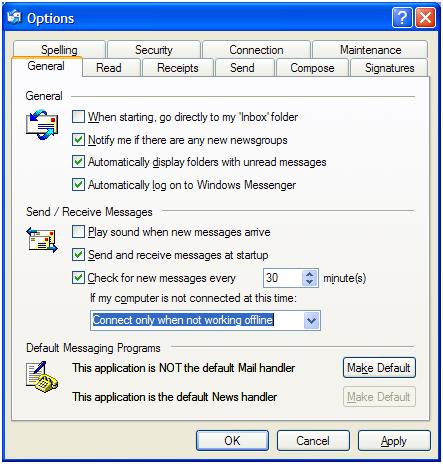
The first tab in the Options dialog box shows you the General settings. It is important that the setting “If my computer is not connected at this time” under “Send / Receive Messages” is not set to “Do not connect”, if you are on a dialup connection.
Step 3 — Check your Outlook Express account configuration.
The most important configuration however, is your account settings. These can be accessed by selecting Accounts in the Tools menu. Next, select the Mail tab in the Internet Accounts dialog box. Now select the account that you have problems with and click the Properties button on the right-hand side.
In the account Properties dialog box, you will see the General tab, where your personal information needs to be entered. The most important setting here is the E-mail address, all others are less critical in the send/receive process.
After making sure your e-mail address is correct, click the Servers tab in the account properties dialog box.
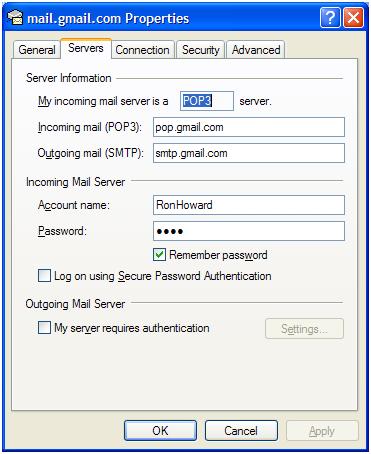
Here we find the details for accessing your e-mail account. For a POP3 or IMAP server, type the Incoming mail and Outgoing mail servers. These are available from your internet service provider (ISP) or e-mail provider. The Account name is your login name for the e-mail service. The Account name is often identical to the e-mail address, but this information is again available from your ISP or e-mail provider. The Password is the password you need to use to access your e-mail and will again be provided to you by your ISP or e-mail provider. If your service provider requires SPA, select the checkbox for Log on using Secure Password Authentication. SPA is rarely used though, and will mostly be used in combination with Microsoft Exchange servers.
If you are using an HTTP e-mail server, the Server configuration will look different.
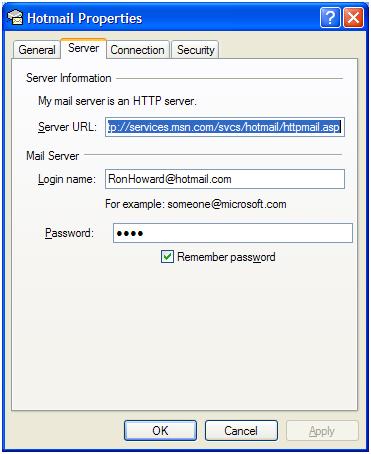
Here the Server URL is important. This is the internet path to the e-mail service. For Hotmail and MSN they are entered by default, but if you use a different HTTP e-mail service, you will need to enter the correct path. The Login name and Password speak for itself.
Step 4 — Check your Outlook Express advanced configuration.
The steps so far ensure most e-mail account configurations will work. But in some cases you need to use the advanced Outlook Express account configuration to complete your setup.
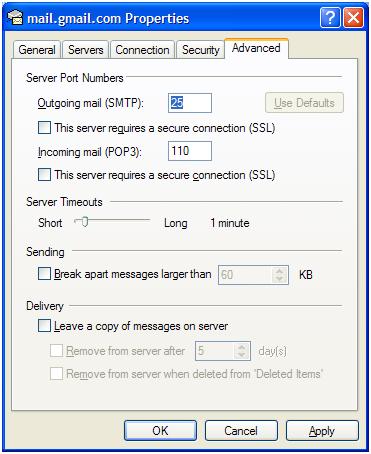
There are a number of things to consider in the Advanced tab. First, it allows you to increase the Server Timeouts. This can work in cases where your internet connection is slow or the e-mail server is slow. If you experience timeout problems, always try to increase this time to see if it resolves the issue.
Some e-mail services work on a secure connection as an increased security level. This means you will need to select the checkbox for Outgoing SSL and Incoming SSL usage. For the Outgoing mail (SMTP), this means the port number will need to change from 25 to 465 and the Incoming mail (POP3) port number will need to change from 110 to 995. There are deviations possible from these numbers, but your ISP or e-mail provider will be able to provide the details.
Step 5 — Using the Outlook Express log file option.
If the earlier steps do not help you resolve the Outlook Express errors, you can try to use the log file option. Outlook Express has an option to generate a log file for certain types of traffic, which can be helpful in analyzing the communication problems.
In Outlook Express, go to the Tools menu and click Options. Next select the Maintenance tab. In the bottom of the dialog box, you will see a Troubleshooting section, with a number of checkboxes. Select the Mail checkbox to activate the log file for e-mail sending and receiving.
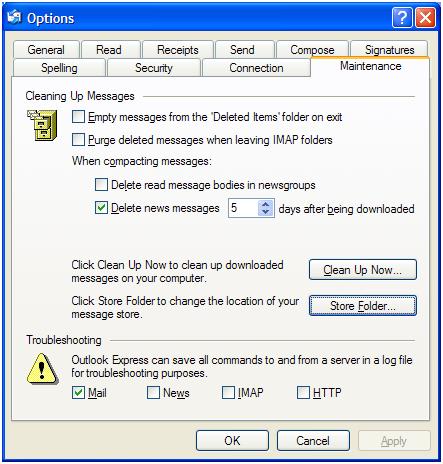
The actual log file will be stored in the Outlook Express Store Folder. The location of the Store Folder can also be found in the Outlook Express Options dialog box. Click the Store Folder button.
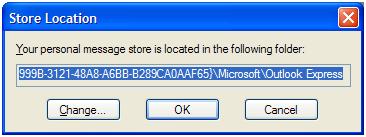
The Store Folder will be displayed in a separate window. Press the Tab key twice to select the path and then press Ctrl+C to copy it. Next, open an Explorer window and press Ctrl+V to paste the path in the address bar. Here you will see any generated Outlook Express log files.
Here is what some of the most important error codes mean:
| Code | Meaning |
|---|---|
| 211 | System status or system help reply. |
| 214 | Help message for human reading. |
| 220 | Service ready. |
| 221 | Service closing. |
| 250 | Requested action completed. |
| 251 | Recipient not local; server will accept and forward the message. |
| 252 | Recipient cannot be verified; server accepts the message and attempts delivery. |
| 354 | Server ready, start message input; end with a dot (.) |
| 421 | Service not available, connection closing. |
| 450 | Requested action not taken: mailbox unavailable. |
| 451 | Requested action aborted: server processing error. |
| 452 | Requested action not taken: insufficient server storage. |
| 500 | Syntax error, command unrecognized. |
| 501 | Syntax error in parameters or arguments. |
| 502 | Command not implemented. |
| 503 | Bad sequence of commands. |
| 504 | Command parameter not implemented. |
| 550 | Requested action not taken: mailbox unavailable. No access or mailbox not found. Could be e-mail relay problem if you are travelling. |
| 551 | User not local. |
| 552 | Requested mail action aborted: exceeded storage allocation. |
| 553 | Requested action not taken: mailbox name not allowed. |
| 554 | Transaction failed. |
For a further, more detailed explanation, you can check RFC 1893.
Step 6 — Check Your Anti-Virus and Firewall Software.
Anti-virus software has options to scan incoming and outgoing e-mail. Try disabling and enabling them to see if this is causing an Outlook Express send/receive problem.
At the same time, make sure that the firewall is not blocking Outlook Express. Normally this won’t be the case, but if you are not using the standard Windows firewall, make sure Outlook Express (msimn.exe) is not blocked.
Step 7 — Clear your Outbox.
Sometimes problematic messages in your Outbox can cause Outlook Express sending problems. Often when this is the case they can not be deleted by selecting and delete. If that is the case, try starting Windows in Safe Mode and then open Outlook Express. Sometimes you can delete the problematic massages in that mode. If even that fails, you can delete the Outbox.dbx file in the Outlook Express Store Folder. This file contains any messages pending in the Outbox. If you delete the file, Outlook Express will automatically create a new one when started. Make sure Outlook Express is not running when you try to delete the file.
Step 8 — Reinstall Outlook Express.
If the earlier steps did not solve your send/receive problems, try reinstalling Outlook Express. Do not forget to make a backup of your Outlook Express accounts and data first. Once the backup is complete, open up the Windows Control Panel and select the Add or Remove Programs option. Next, select Add/Remove Windows Components.
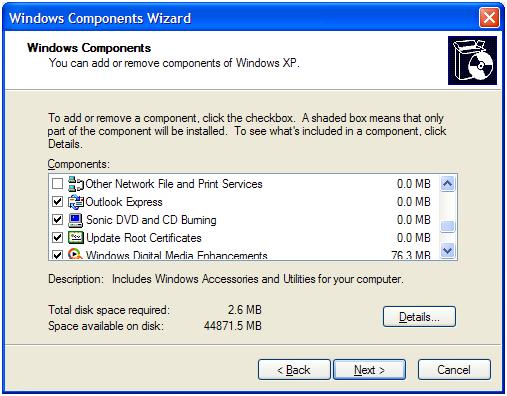
Deselect Outlook Express in the Components list and click the Next button. Wait for the Outlook Express uninstall to finish and then click the Finish button. It is best to restart you PC before reinstalling Outlook Express. After rebooting, open the Control Panel again and go to the same Windows Components Wizard. Now select the checkbox for Outlook Express and click the Next button again. Click Finish when done. Finally you will need to import the accounts and message again.


Thank you. It works.
@Fritz Liessling - Thank you for your feedback. I understand that you are looking for other resolutions, but within Windows…
Although the answer to this question is correct, it is really a cop-out answer. It's easy enough to find answers…
To the pcauthorities.com administrator, You always provide useful links and resources.
???? ?? ??? The Last of us