How to Fix Error Code 0x80004005 in Windows 11
Even with the latest Windows version, Windows 11, it is still possible to run into problems and deal with error messages. One common error code you might see in Windows 11 (and in Windows 10 for that matter), is error 0x80004005. The problem is that this error can have different causes but there is often no clear error message to help you fix it. Rather Windows displays an “Unspecified Error”.
One specific scenario where error code 0x80004005 can appear is during Window Update. Many people have reported the error when upgrading from Windows 10 to Windows 11.

Solutions to fix error 0x80004005 in Windows Update
Since there are different scenarios where the error can occur, there are different possible solutions to the problem. We first take a look at the case where the error shows up during Windows Update.
In this article, we list the various steps you can take to fix the error in Windows itself. First check to make sure there is enough disk space available. If Windows Update cannot download updates, it will fail. Free up some disk space if needed.
Run the Windows Troubleshooter
The Windows troubleshooter is part of Windows and can be used to find and solve common and well-known problems. This is particularly helpful if the error happens in relation to the Windows Update process. This includes upgrading from Windows 10 to Windows 11.
To execute the Windows Troubleshooter for Windows Update, follow the steps below.
- Open the Settings app from the Start menu (or press the Windows key + the I key at the same time).
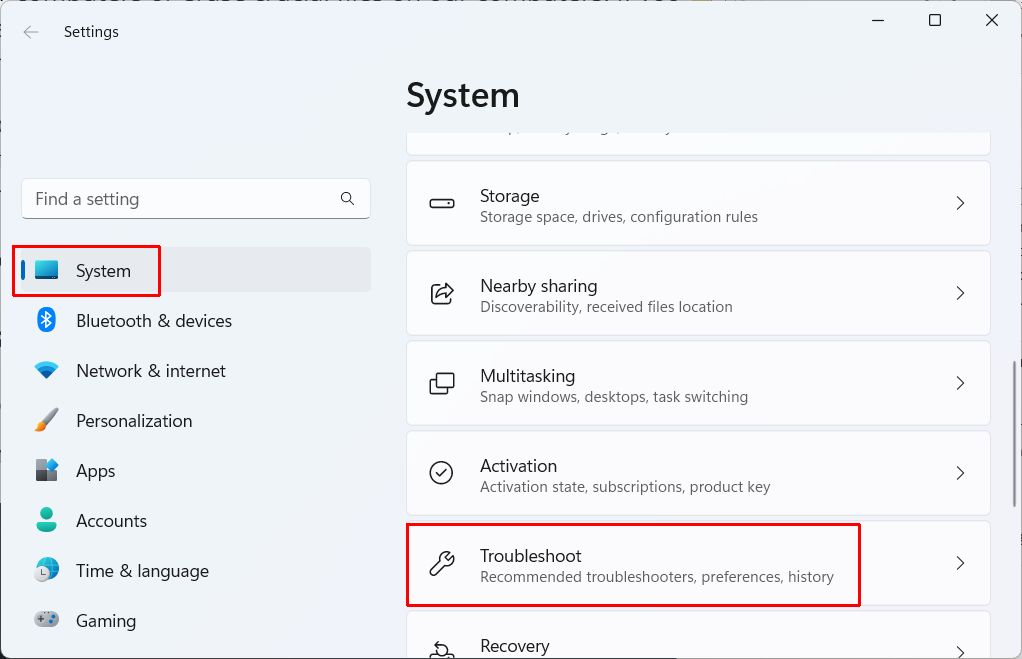
- In the Settings window, in the left-hand panel, select System.
- In the right-hand panel, scroll down to Troubleshoot and click it.

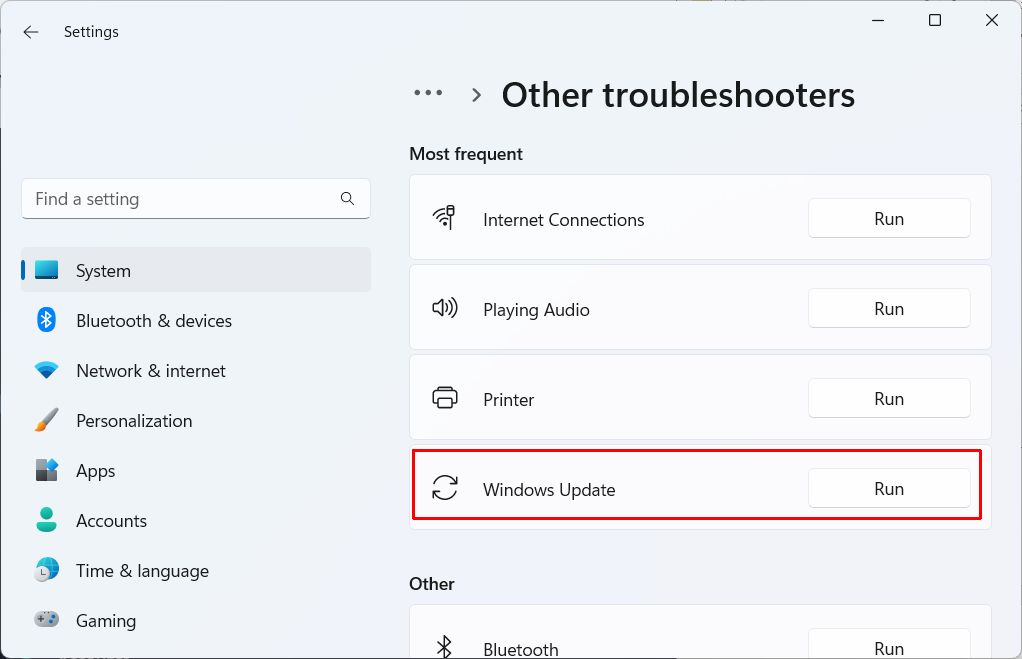
- Under System -> Troubleshoot, click the option Other troubleshooters.
- Next, under Other troubleshooters, locate Windows Update and click the Run button next to it.

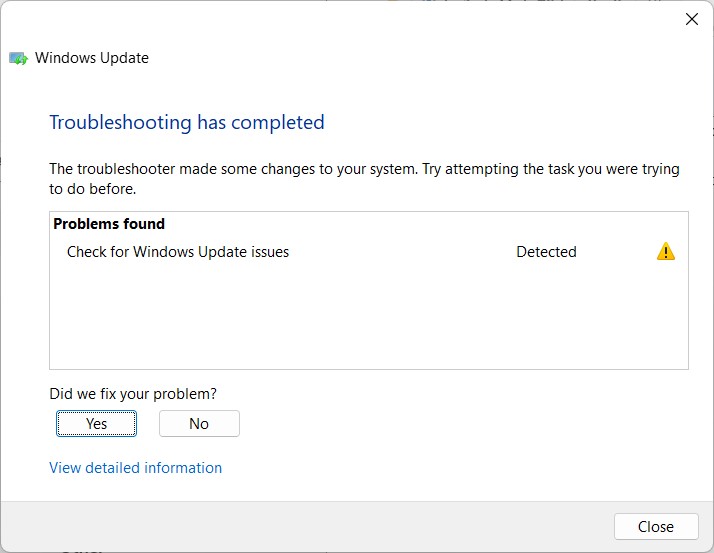
- A new window will come up that shows the progress of detecting problems with Windows Update. Wait for it to complete.
- Once the troubleshooting process completes, you will see a list of Problems found and fixed.

- Click the Close button to close the window and go back to the Settings window.
- After this, try running Windows Update again.
Empty the Windows Update folder
In the process of updating Windows, installation files for the updates are first downloaded to your local drive. The storage location for these files might have incomplete downloads, or have other problems that prevent Windows from updating successfully. Deleting these files can help solve the 0x8000405 error.
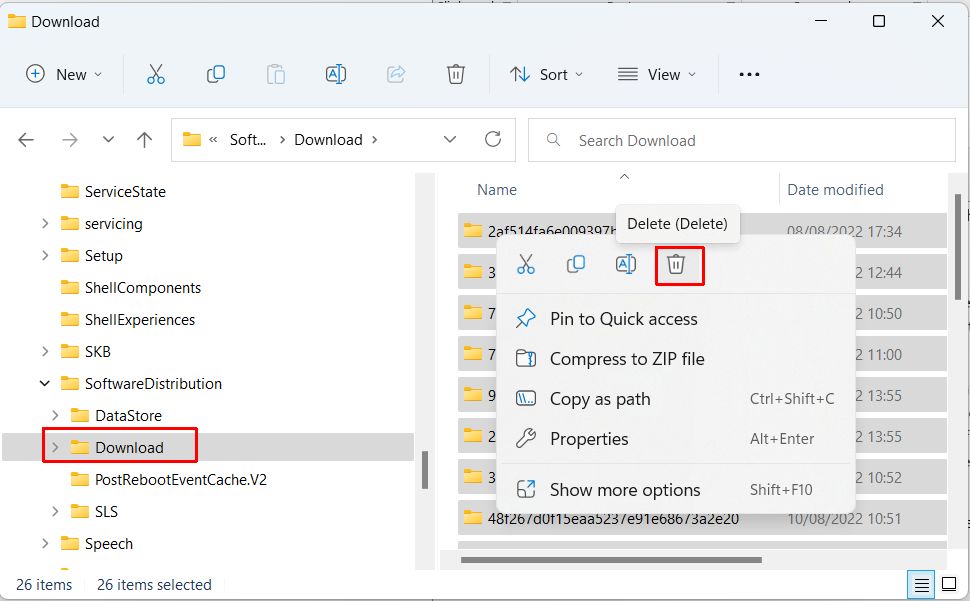
Since update files are automatically downloaded again if not present, it is safe to delete the files in the download folder. In Windows 11 the download location for Windows Update files is C:\Windows\SoftwareDistribution\Download. Empty the content of the folder and try Windows Update again. If it does not fix the error, try deleting everything one folder level up. (C:\Windows\SoftwareDistribution).
Please note that this assumes the default C: drive as the system drive. If you installed Windows on a different drive, replace the drive letter in the folder path.
You can use Windows Explorer to empty the folder.
- Press the Windows + E keys to open a File Explorer window.
- Navigate to
C:\Windows\SoftwareDistribution\Download - Press Ctrl + A to select all files and folders.
- Click the trashcan icon to delete the selected files and folders.

If you see a message with Folder Access Denied, click the Continue button after selecting the checkbox Do this for all current items.
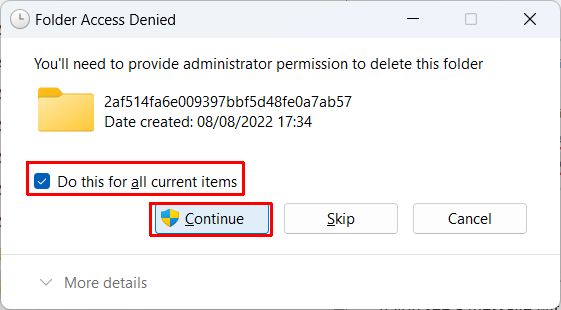
If your user account does not have admin-level access, just log into Windows with an administrator-level account and try the delete again.
Note: depending on the Windows settings, you may need to empty the Recycle Bin on the desktop to permanently delete the files and folders.
Empty the temp files
Apart from files downloaded for Windows Update, Windows also uses a folder referred to as TEMP. This storage space is used for any temporary storage required during operation. Extracting archives, log files, etc. This space is also used during the installation of programs and updates.
Clearing the TEMP folder can help fix error 0x8000405 when it comes to Windows Update.
In previous versions, the easiest way to delete the contents of the temp folder was using the Disk Properties window from the File Explorer. That would show the option Disk Cleanup. This option is not always shown in Windows 11. If not, use the File Explorer. Here are the steps.
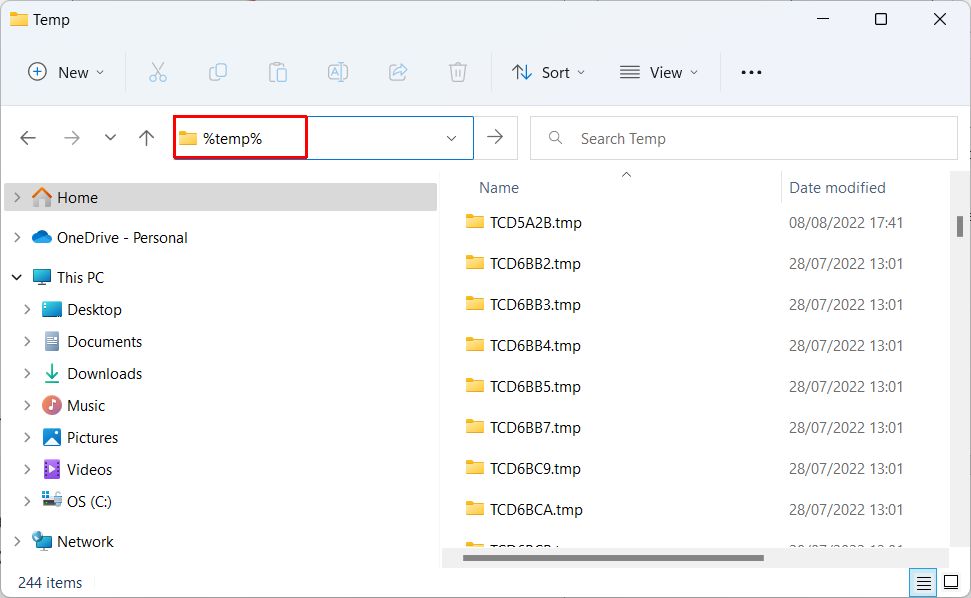
- Use a Windows File Explorer window to navigate to the temp folder. Type %temp% in the folder navigation field and press Enter.

- Use Ctrl + A to select all files and folders.
- Press the Delete key, or click the trashcan icon.
- Empty the Recycle Bin on the Desktop.
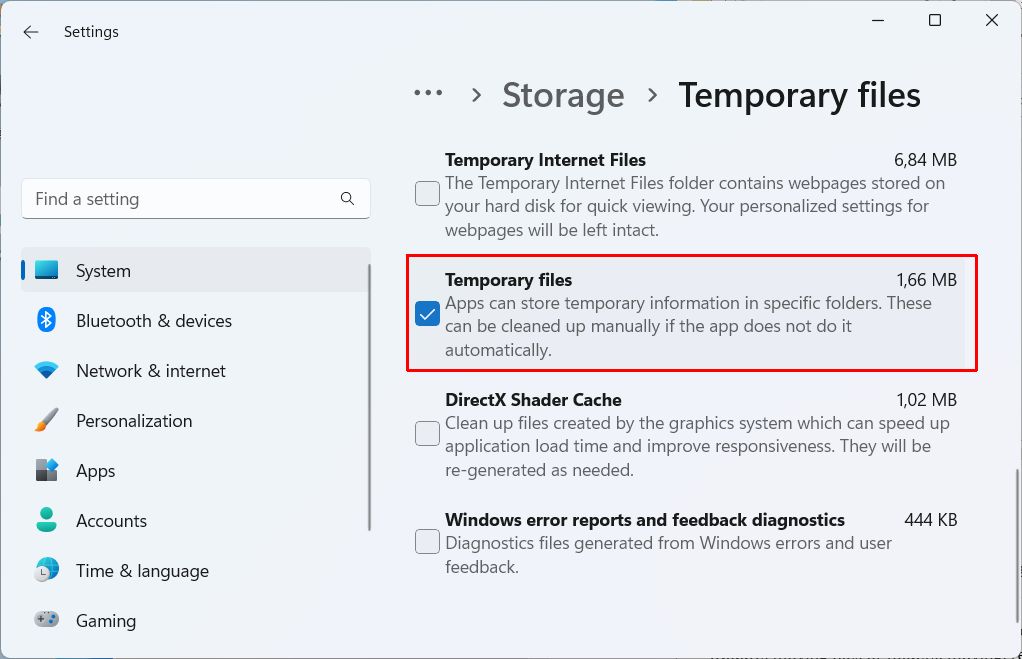
In Windows 11 Microsoft has also added another option to manage storage and delete temporary files. This option uses the Settings app. The steps below show how to use this option.
- Open the Settings app from the Start menu.
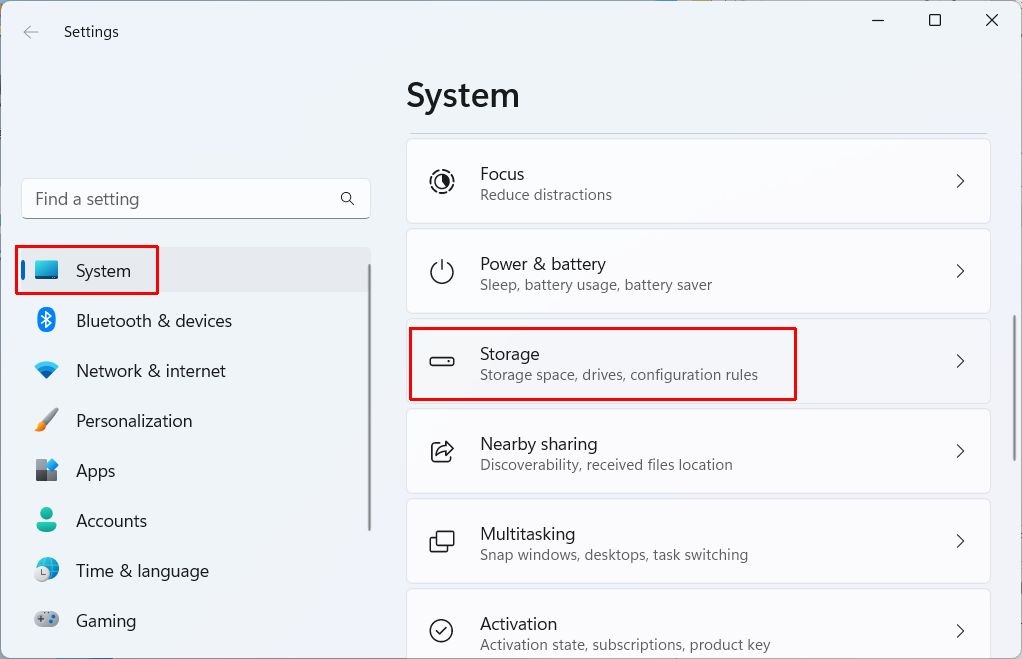
- In the Settings windows, select System, and then select Storage in the right-hand panel.

- Wait for the System -> Storage fields to get updated.
- Make sure the option Temporary files is selected.

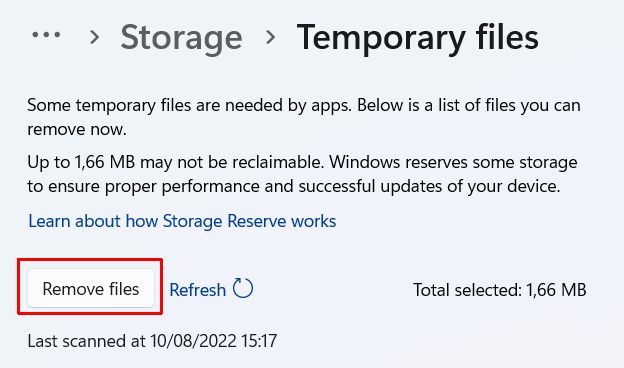
- Now scroll back to the top and click the Remove files button to empty the selected storage location.

- Click the Continue button in the confirmation windows that follows.
Wait for the disk cleanup process to complete. After this, you can try the Windows Update process again to see if the error 0x80004005 is gone.
Fix error 0x80004005 in other cases
If you are seeing the error only when using a specific application, that software package might be the problem. Uninstalling and reinstalling the software can solve the error.
Other causes for the error often relate to disk space or file access issues. So apart from Windows Update, moving files or folders, moving, renaming files, and extracting archive files, can all result in error 0x80004005.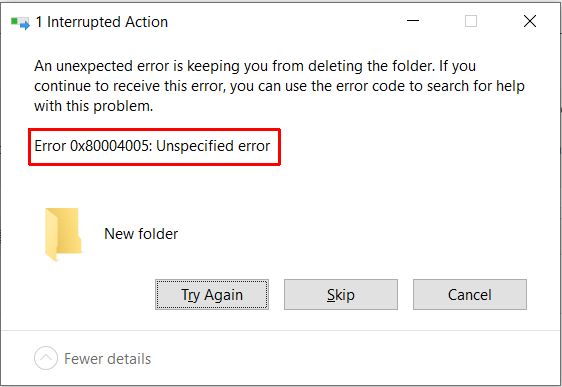
Troubleshoot Files and Folders
For previous versions of Windows (7, 8, and 10), Microsoft has a download available that can troubleshoot problems with files and folders. This download also works for Windows 11.
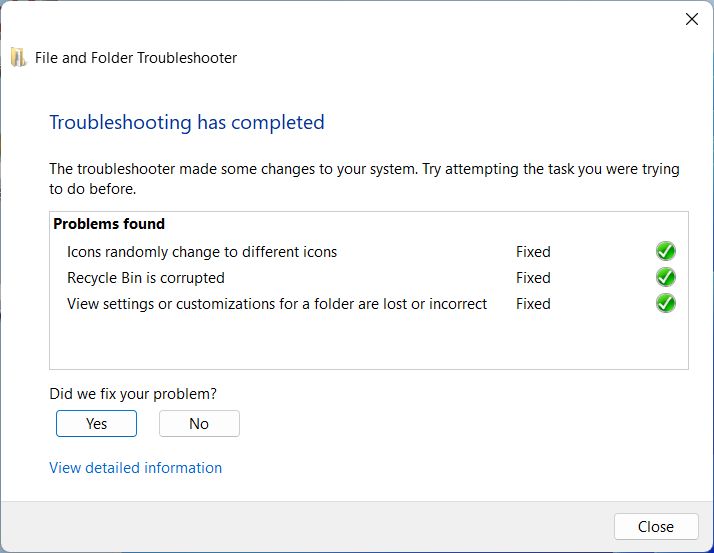
The troubleshooter will automatically diagnose any problems it finds and has the option to automatically fix them.
- First download the troubleshooter from the Microsoft website. Click the Download button on the web page to download the file.
- Run the downloaded file (
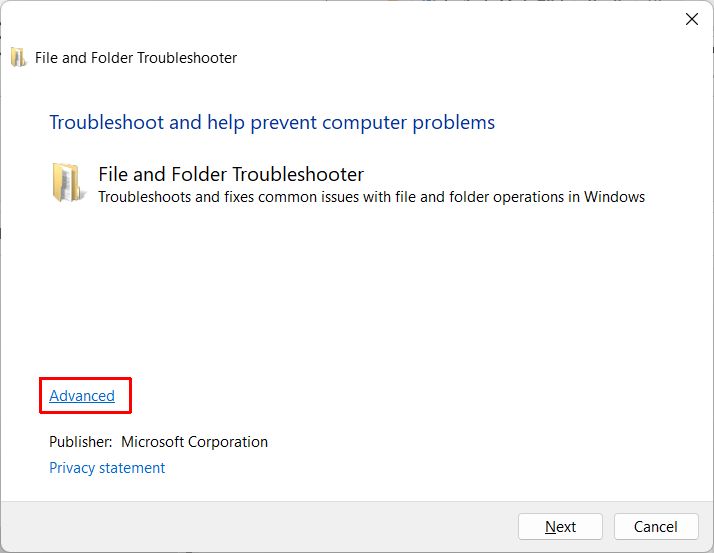
winfilefolder.DiagCab) by double-clicking it. - In the File and Folder Troubleshooter window, click the Advanced button to reveal the option Apply repairs automatically.

- Select the checkbox to Apply repairs automatically, and then click the Next button.
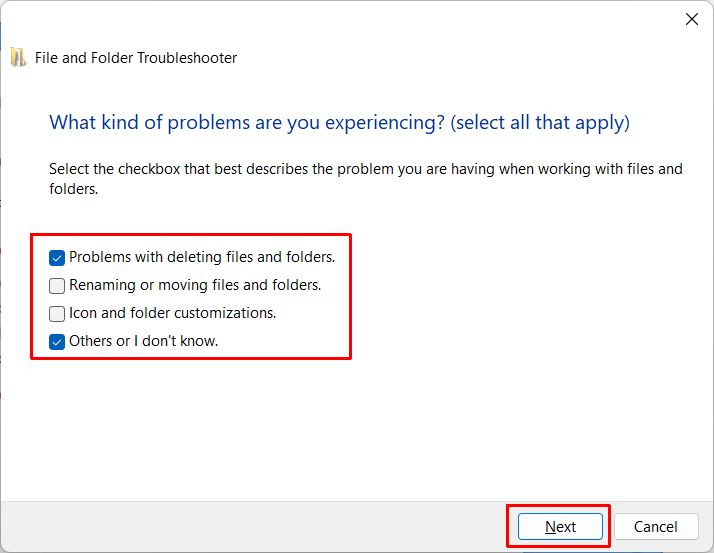
- Next, select which problems you are facing that need to be fixed. You can select multiple options if you are not certain of the exact problem type.

- Click the Next button to start the troubleshooter.
- Wait for the troubleshooter to finish, and respond to any questions during the process.

- Click the Close button to close the file and folder troubleshooter program.
After this, check if your problems relating to the error 080004005 are gone.
Install 3rd party compression solution
The error can also be related to compressing and decompressing archive files (zip, rar, gzip, tar, and others). Although Microsoft has included support for compressed files, installing a 3rd party application like 7-Zip may fix error 0x80004005 in case it is caused by compressed files.
After installation, you can use the 7-Zip File Manager to open and view compressed files.
If you want the 7-Zip application to be used as the default application for all decompression actions in Windows 11, you need to associate the file formats with the 7-Zip application.
- Open the Settings app from the Start menu.
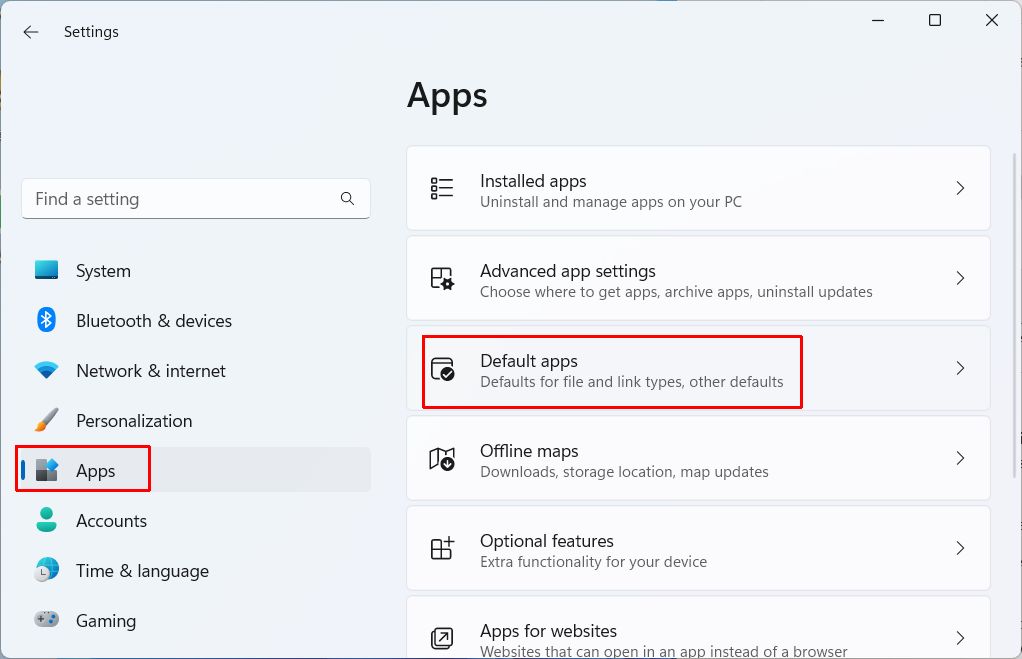
- In the Settings window, click the Apps option in the left-hand panel.
- Next, click Default apps in the right-hand panel.

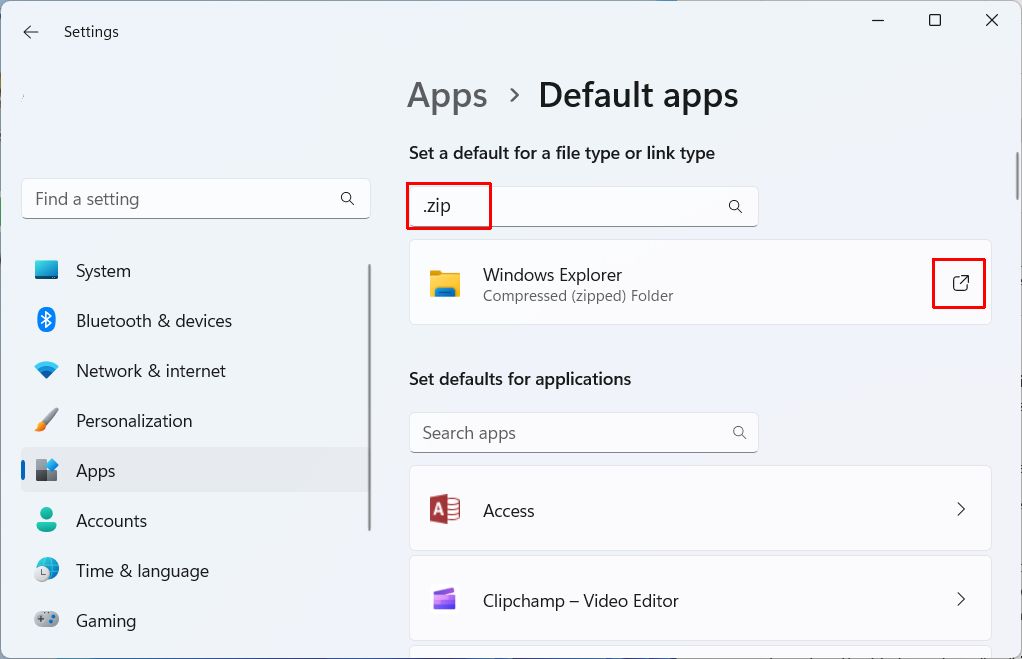
- Since 7-Zip is not an app from the Microsoft App Store, the association needs to be made based on the file type. Type “zip” in the file type search box at the top. Click the .zip option in the search result.
- Now click the open link icon to the right of the current default program (Windows Explorer).

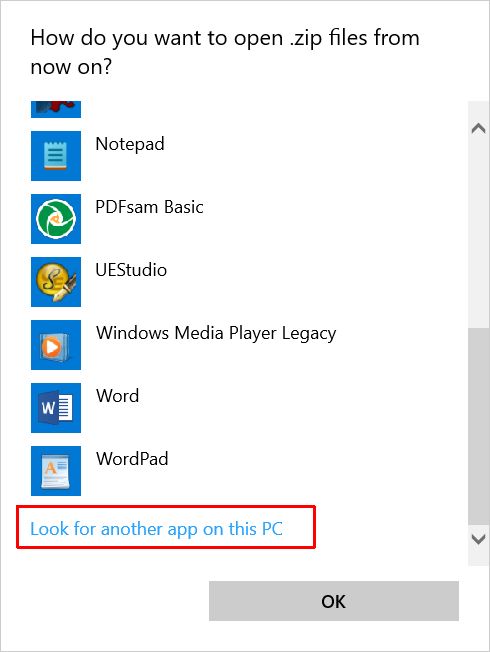
- This will present you with a window to select the app to use for opening .zip files. Click More apps at the bottom of the list.
- Scroll down again to the end of the app list and click the option Look for another app on this PC.

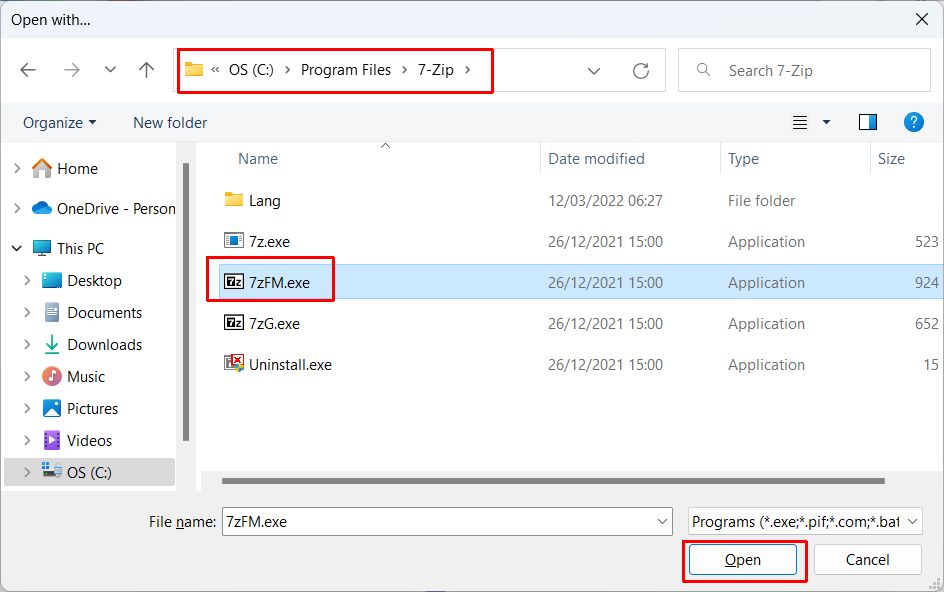
- In the file selection window that opens, navigate to the 7-Zip installation folder (
C:\Program Files\7-Zip) and click on the7zFM.exefile. - Click the Open button to select the 7-Zip File Manager as the app to use for .zip file extensions.

After this, all files with a .zip extension will be shown with the 7-Zip file icon and opened with the 7-Zip file manager when double-clicked.
You can repeat these steps for other file extensions that you want to associate with 7-Zip instead of Windows Explorer. Common file extensions for compressed files are zip, rar, gz, gzip, and lha. But 7-Zip also supports opening CAB files, ISO files, and many other compressed file formats.
7-Zip is a free solution. The best-known alternative is WinZip, which is no longer free. Other options are PeaZip and WinRAR.
Change security software
By default, Windows will use Microsoft’s security solution. Windows Defender, or Windows Security in Windows 11. Many people install 3rd party software to protect their PC. This means the Windows internal security software is disabled. Having two security solutions active at the same time is not a good idea!
In the case of Windows Update, and some other scenarios, the security software can be responsible for the 0x80004005 error. File access is monitored by Anti-Virus solutions to make sure they can protect against threats. But like with any other software, there are many different vendors of AV software.
If you suspect the error is caused by the security software, the best option is to deactivate the software first to see if it solves the problem. Ideally, do this with your network connection disabled (or unplugged in case of wired). That will prevent threats from the Internet from landing on your PC.
If confirmed to be the cause, uninstall the problematic security software and replace it with another AV solution.
Disable startup apps and services
At any time, many programs and tasks will be running in Windows. When additional apps and programs are installed, more tasks can be added to the Windows startup process that run in the background.
Although you can uninstall a program to prevent it causes errors if related to the 0x80004005 error, disabling the startup tasks is also an option. This allows the program to still be used but removes the program from background execution.
Here is how to disable startup tasks in Windows 11.
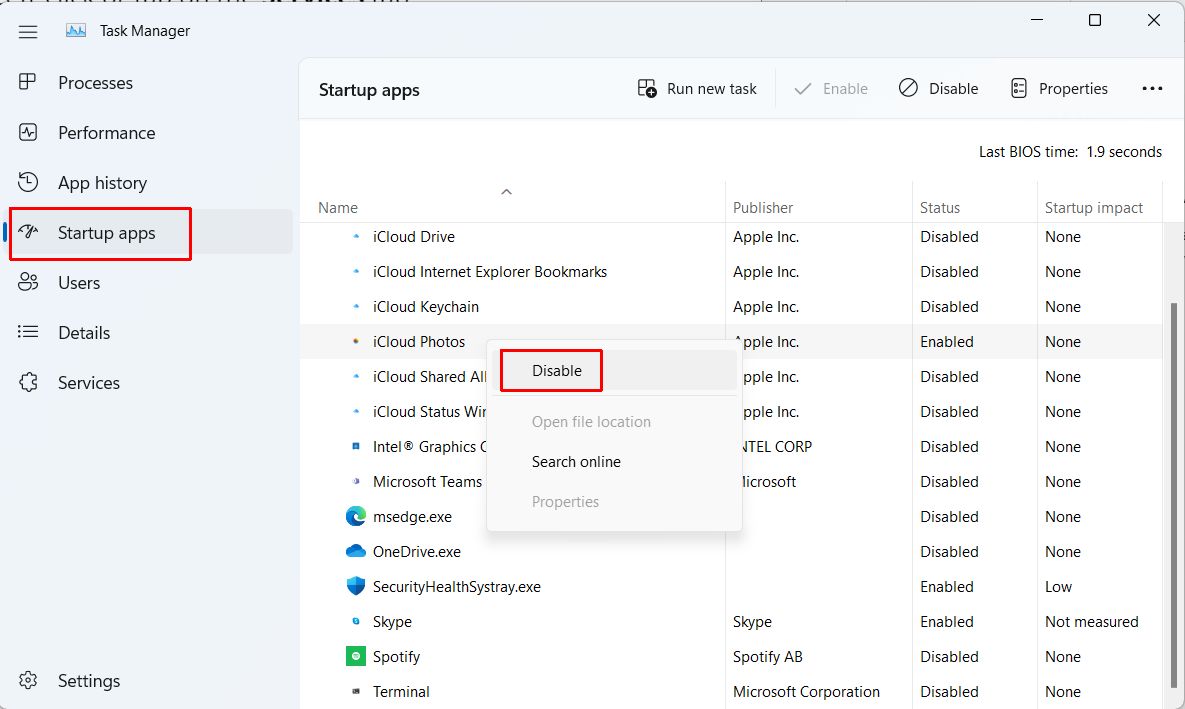
- Press the Crtl + Shift + Esc keys at the same time to bring up the Task Manager window.
- In the Task Manager window, select Startup apps in the left-hand panel.
- Now right-click each Enabled task and in the popup menu, select Disable.

Tip: After disabling and confirming the error is no longer occurring, you can try re-enabling the tasks one by one. - Close the Task Manager when done.
Apart from Startup apps, applications can also install services to run during Windows start. Services can be configured to start automatically or manually (which mostly means then the application is started). But since they too can contribute to the error, you can disable services as a next step to try and fix the problem.
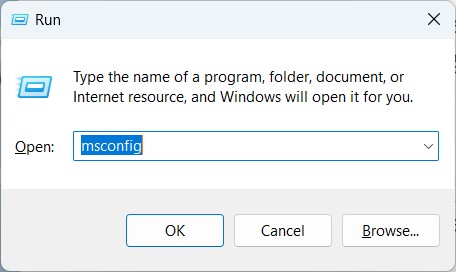
- Press the Windows + R keys at the same time to bring up the Run window.
- Type msconfig and click the OK button to start the System Configuration app.

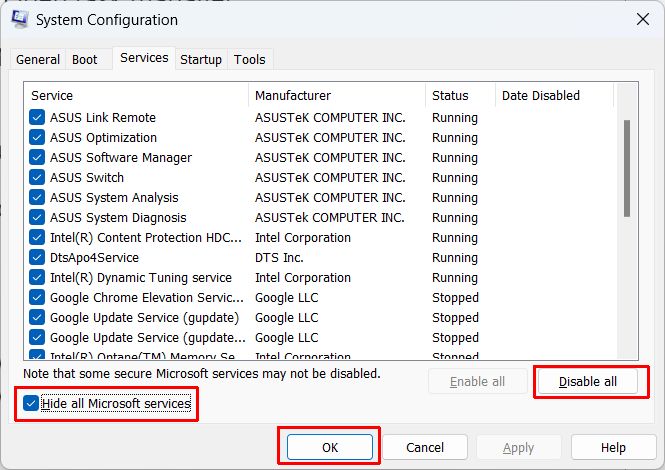
- In the System Configuration window, select the Services tab.
- Select the checkbox Hide all Microsoft services (The Microsoft services are required by Windows to function).
- The resulting list will show all 3rd party services from other vendors. Some will be Running, while others will be Stopped. Take note of the Running services (you can use the Alt + PrtSc keys to make a screenshot).

- Click the Disable all button, and then click OK.
After this see if the problem is fixed. Like with the Startup tasks, you can re-enable the services one by one to pinpoint the service that caused the error.


Thank you. It works.
@Fritz Liessling - Thank you for your feedback. I understand that you are looking for other resolutions, but within Windows…
Although the answer to this question is correct, it is really a cop-out answer. It's easy enough to find answers…
To the pcauthorities.com administrator, You always provide useful links and resources.
???? ?? ??? The Last of us