How to Check Your Memory in Windows
Random Access Memory, or RAM, is used in computers for short term data storage. It is used in memory modules on the motherboard, as well as on video cards. Your computer memory is very important in how your PC performs. Faster memory as well as an increased amount of memory can help your PC performance. And more memory in Windows PCs reduces disk usage (virtual memory).
Problems with Memory in Windows
Microsoft Windows also uses a lot of memory. So much that it can even use the hard disk for more memory. This is then called virtual memory, better known as a swap file, or page file. Checking virtual memory would be doing a disk check.
Internal computer memory holds all data used by the operating system and programs, so if a memory problem occurs, weird things can happen. In the best case, an application loses some data, but the application can also crash, and worst case, the operating system crashes all together. This will typically result in a Window blue screen error.
The most common causes of defect or malfunctioning memory are timing problems, temperature problems and static electricity. So be careful in placing your PC at an cool spot with sufficient air circulation, be very careful when handing memory modules or video cards, and also be careful with overclocking your memory.
Checking RAM in Windows
There are good 3rd party tools like memtest86 to check your computer memory, but in Windows (starting from Vista) there is a Microsoft program to check your PC memory.
In Windows, you simply type “memory diagnostics tool” in the search box of the Start menu and Windows will show you the program shortcut. You can also go to the C:\Windows\System32 folder and double-click the MdSched.exe program file.
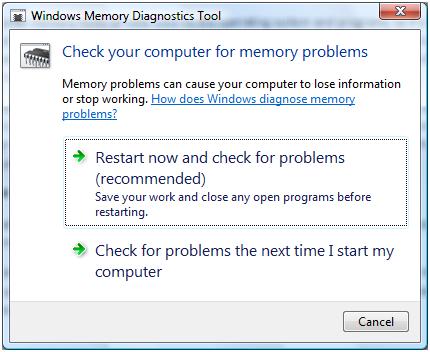
This will bring up the Windows Memory Diagnostics Tool, which shows you 2 options:
- Restart Now and check for problems
- Check for problems the next time I start my computer
Select the first option if you immediately want to check your internal memory in Windows.
Windows will shut down and restart your PC. Once it restarts, it will start checking your computer memory and display progress on screen. Checking the memory in Windows this way will take a little time, so be patient. The results will be shown when you finally log on again. This could just be a small notification in the notification area on the Windows taskbar that show all is fine.
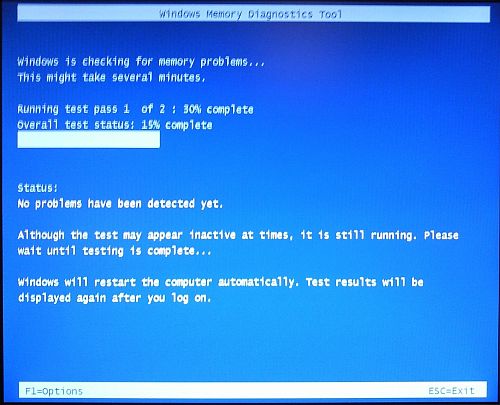
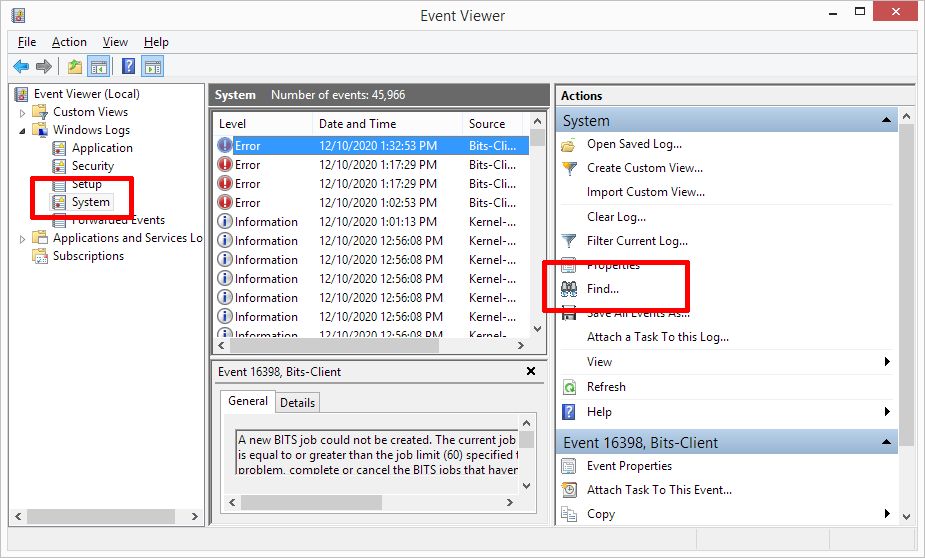
If the results of the memory test do not show automatically, you can manually check them using the Event Viewer. Simply right-click the Start button and in the Start menu, click Event Viewer.
In the Event Viewer window, open the Windows Logs option in the left panel. Under that, select System. Next, click the Find option in the Actions panel on the right.
Now type “MemoryDiagnostics” (no space!) in the Find what box and then click the Find Next button.
Depending on the results, you might need to replace the memory. But luckily RAM is quite affordable these days. Simply check your computer manual or motherboard manual to see what type of memory modules you will need, or open up the computer to check the modules installed and look up the same type.
Warning: computer memory is very sensitive to static electricity, so be very careful when handling memory modules, or leave it to a PC technician.

3 Responses
How to Check Your Memory in Vista – PCauthorities.com…
Memory errors in a Windows computer can cause random problems, including blue screen errors. To check your memory in Vista you can use the memory diagnostics tool….
[…] blue screen errors, so see if your RAM is error free. Vista and Windows have a built-in option to test the memory, for XP you can use a program called […]
[…] so see if your RAM is error free. Vista and later Windows versions have a built-in option to test the memory, for XP you can use a program called […]